# How to create Image-based AR with Video overlay

<iframe allowfullscreen="allowfullscreen" height="416" src="https://www.youtube.com/embed/bU2AE6jtpJE" width="743"></iframe>

1. Provide a name for your campaign. Please remember not to use any space, underscore or special character within the campaign name (Read [here](https://help.marvinxr.com/books/marvin-xr-help-manual/page/how-to-create-surface-ar-campaign#:~:text=As%20a%20security,not%20with%20HTTPS.) for associated reasons). Select **Upload Video** option.  
      
    [![How to create Image-based AR with Video overlay-IMG1.png](https://help.marvinxr.com/uploads/images/gallery/2025-03/how-to-create-image-based-ar-with-video-overlay-img1.png)](https://help.marvinxr.com/uploads/images/gallery/2023-08/crbnipexpf.png)
2. Upload your preferred video (MP4) which should be displayed in AR view, against the target image. Please make sure your video is less than 2MB in size. This is set for optimal performance in audience's smartphone. Too big of a video can take much time to load in the browser.  
      
      
    If you don't have a video ready - we cover you. The default video will show up automatically.  
      
      
    <p class="callout info">Want to compress your video size? Use [**Free Convert**](https://www.freeconvert.com/video-compressor) to convert or compress your video online.</p>
    
      
    <p class="callout success">When you upload a new video, it'll automatically take a snapshot of the first second of the video as a screenshot and show it to the audience before they click on it to play.</p>
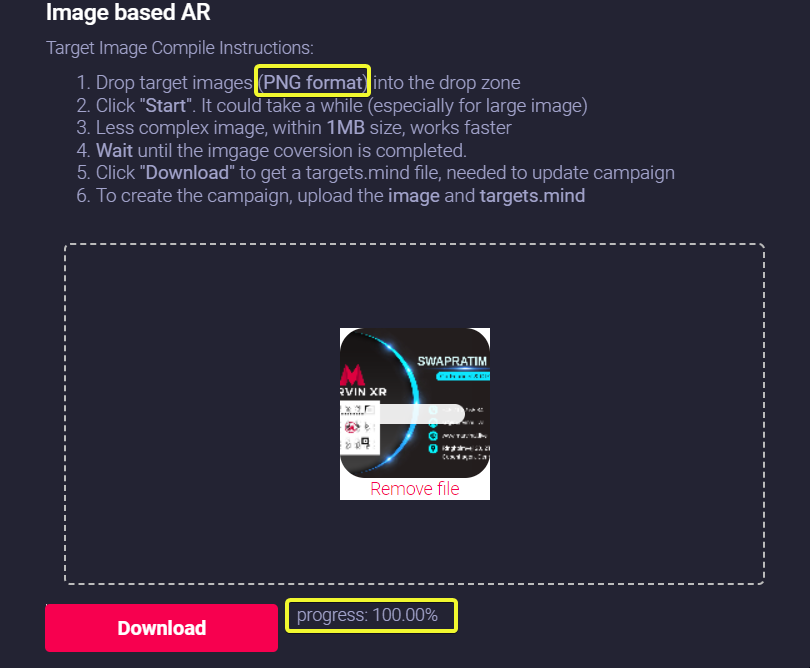
3. Drag your traget image (.PNG format) to the dropbox and click on Start button to create the camera identifiable format (targets.mind). Based on the size and the complexity of the image, it can take from few seconds to couple of minutes to complete this step.  
      
    Click **Download** button to download the AI generated camera recognition trained model (**targets.mind**).
    
    <p class="callout warning">Do not change the name of the file. Keep the trained model name as **targets.mind**  
    </p>
    
      
    [![How to create Image-based AR with Video overlay-IMG2.png](https://help.marvinxr.com/uploads/images/gallery/2025-03/how-to-create-image-based-ar-with-video-overlay-img2.png)](https://help.marvinxr.com/uploads/images/gallery/2023-04/Ibyimage.png)
4. Now upload the following to the campaign:
    
    
    - Target Image (**PNG**)
    - AI trained model for camera recognition (**targets.mind**)  
          
        <p class="callout success">When you upload a new image, the video will automatically resize itself according to the target image's height and width - isn't it cool!</p>
5. Click on the **Create AR Campaign** button to finish the setup.
6. Your AR campaign can take up to 2 minute to get created. Read [here](https://help.marvinxr.com/books/marvin-xr-help-manual/page/how-to-create-surface-ar-campaign#:~:text=Once%20you%20hit,work%20just%20fine.) for the associated reasons.  
      
    [![How to create Image-based AR with Video overlay-IMG3.png](https://help.marvinxr.com/uploads/images/gallery/2025-03/how-to-create-image-based-ar-with-video-overlay-img3.png)](https://help.marvinxr.com/uploads/images/gallery/2023-04/rELimage.png)

Congratulations! Now you have created your first image-based AR campaign with video. Enjoy the experience.