Marvin XR Help Manual
Marvin XR is simplifying 3D product visualization and Web Augmented Reality for eCommerce. WebAR can increase user engagement and 3D storytelling significantly. Thus it can easily surpass traditional advertising and marketing with way higher sales and engagement faster than any other way. Web based AR is comparatively a new technology. The objective of this manual is to make sure that you have thorough understanding of the platform and its power to transform your business.
- Introduction
- Sign up to the platform
- Create your first AR campaign
- Types of Web AR
- Surface AR
- How to create Surface AR campaign
- Color Template for Surface AR
- Responsive iFrame Generator
- Rebranding Surface AR Campaign
- How to Resize 3D Model for Surface AR
- Image-based AR
- How to create Image-based AR campaign
- How to create Image-based AR with Video overlay
- Marker based AR
- How to create marker-based AR campaign
- Eye Tracking AR
- How to create Eye Tracking AR campaign
- Location AR
- How to create location AR campaign
- How to add image to Location AR campaign
- Manage your WebAR campaign
- AR Campaign Menu
- Create Custom QR
- Custom Domain Mapping
- Team
- License
- Security and GDPR
- 3D Editor User's Guide
- Shopify Integration
- BigCommerce Integration
- WordPress Integration
- Troubleshooting Known Issues
- Power Tools
Introduction

Contents
- Sign up to the platform
- Create your first AR campaign
- Types of Web AR
- Surface AR
- How to create Surface AR campaign
- Image-based AR
- How to create Image-based AR campaign
- How to create Image-based AR with Video overlay
- Marker based AR
- How to create marker-based AR campaign
- Eye Tracking AR
- How to create eye tracking AR campaign
- Location AR
- How to create location AR campaign
- How to add image to Location AR campaign
- Manage your WebAR campaign
- AR Campaign Menu
- Create Custom QR
- Custom Domain Mapping
- Team
- License
- Security and GDPR
- 3D Editor User's Guide
- Shopify Integration
- BigCommerce Integration
- WordPress Integration
- Troubleshooting Known Issues
Sign up to the platform
Create your account in Marvin XR platform. Sign up in the platform here.
During sign up, please use a valid email.
Upon successful sign up you will receive a welcome email with basic introduction.
Sign in to the platform here with:
Email: john.doe@business.com
Password: password
|
Always use email address and password while logging in. Please do not use username |
Forgot Password:
In case you have forgotten your password, please click on the Forget Password link and provide your email. You will receive a new link in your email. Click the link and reset your password. Put attention to the basic password rules while selecting your new password.
Change Password:
If you want to change your logging password anytime, visit to your Profile menu and edit it.
Put your current password and new password there, in order to update it and save.
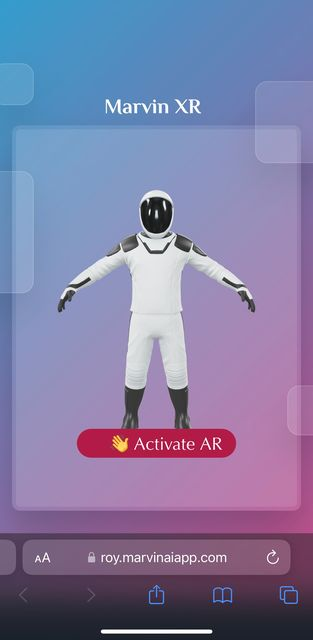
Create your first AR campaign
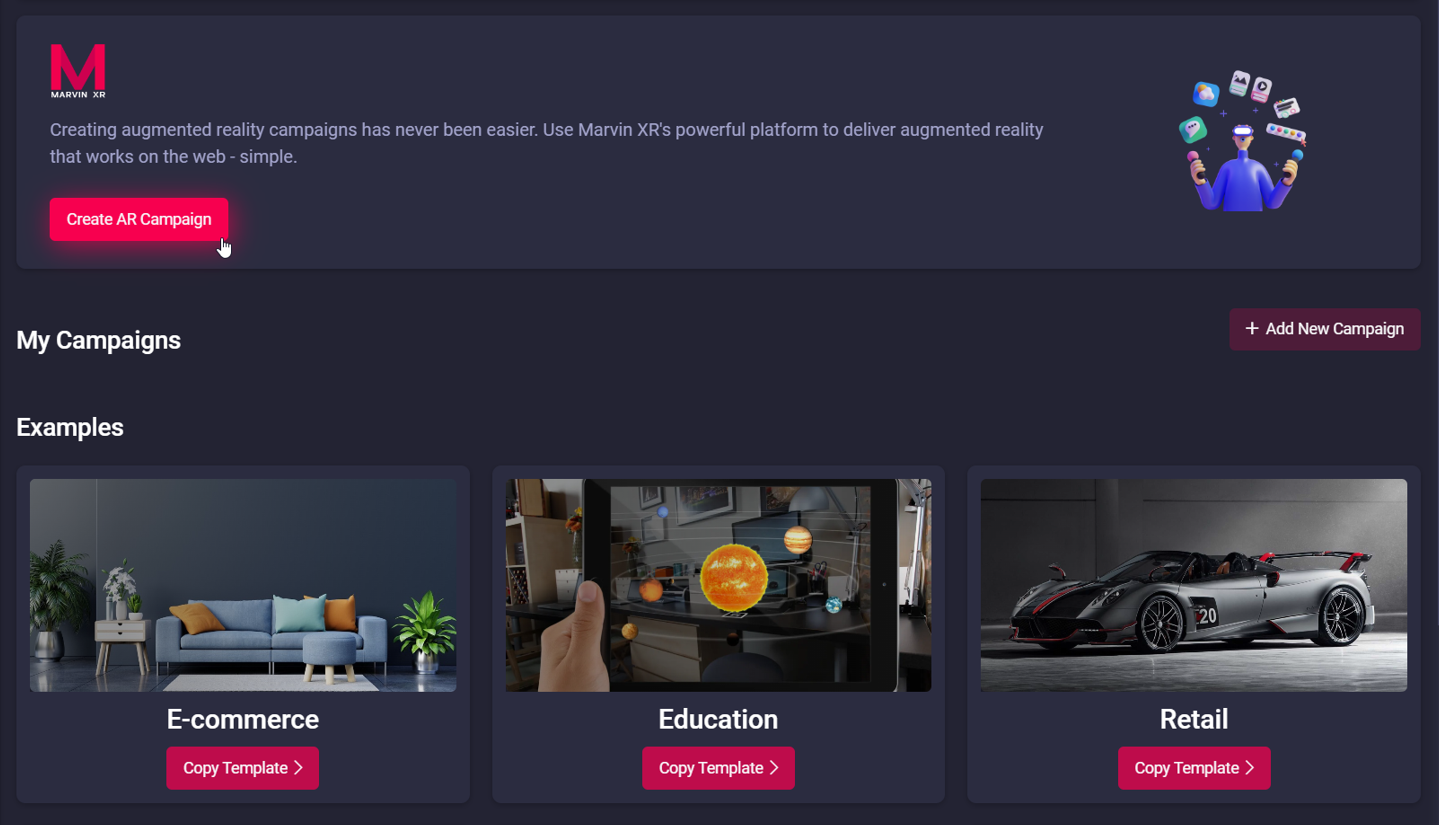
In Marvin's world, each WebAR experience you create, we call them as an AR campaign. Once you login, you will land upon the central dashboard which is your creative playground. Our focus is to bring speed and security for your work while you focus on creating augmented reality experience.
To achieve that, the campaign creation workflow has been built in a very simple way. Instead of navigating through many pages and layouts (which in turn slows down campaign building process), Marvin XR presents a single layout page for building AR campaigns wihtin two minutes.
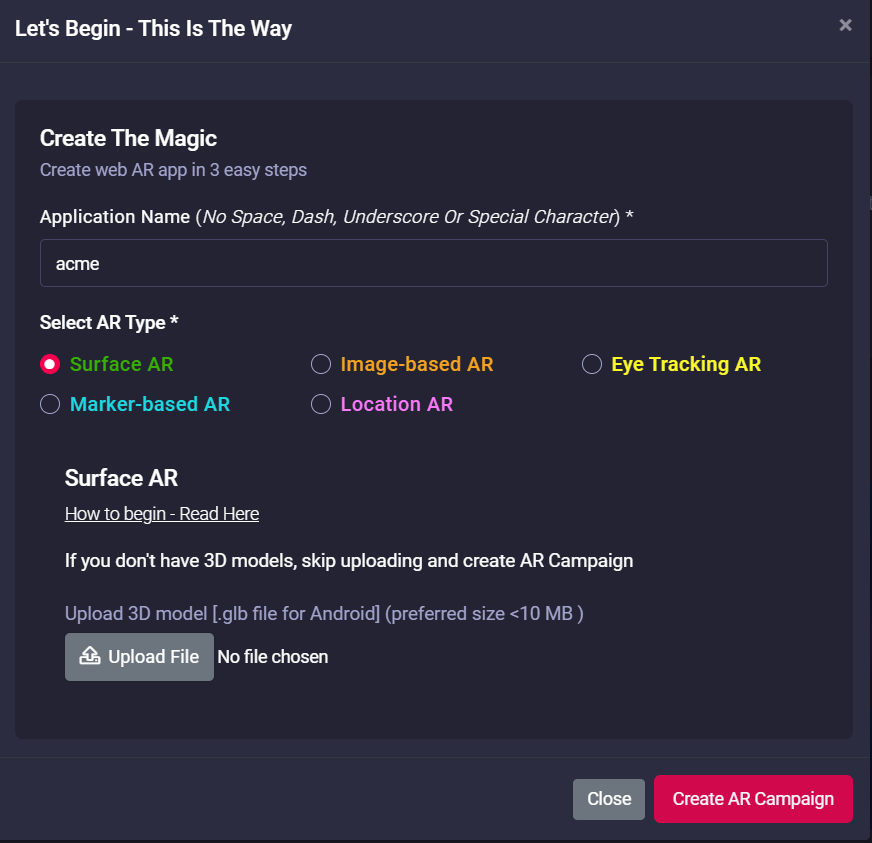
From the central dashboard, click on the Create AR Campaign or Add New Campaign button to start building your first campaign.
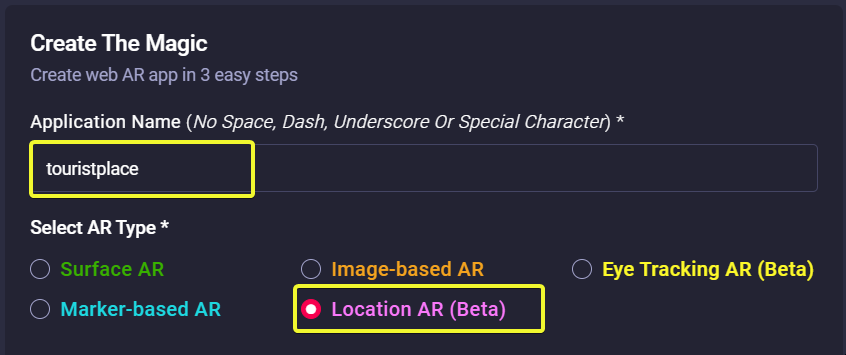
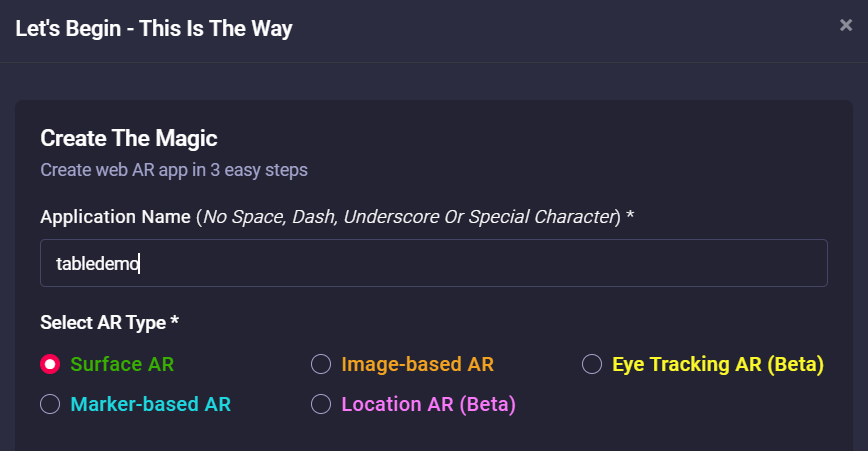
Provide a name for your first AR campaign. Select any of the AR type option from the below list in order to create your campaign. Get your 3D models ready to upload for the campaigns. Marvin XR accepts mostly GLB format for 3D models because it is lightweight from a sizing perspective. For eye tracking AR only, it accepts GLTF model.
We'll describe in more details, the step by step guide for creating each specific type of AR campaign later.
|
Remember NOT to use any space, underscore or special character in your campaign name |

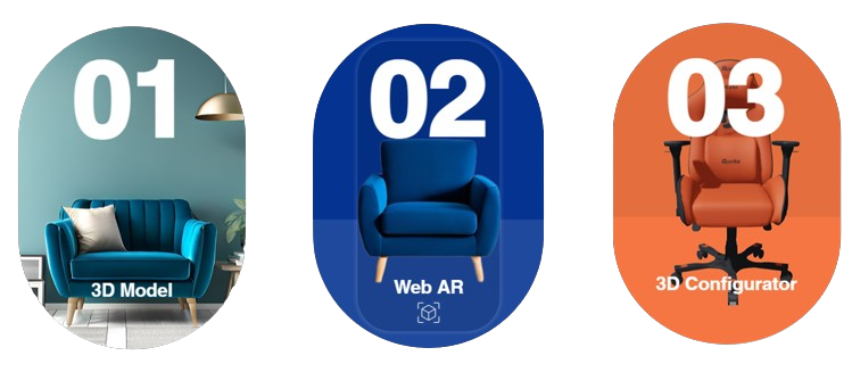
Types of Web AR
Augmented Reality (AR) is one of the latest vibrating technological trend that is spreading day by day. This
technology allows to visualize the real-life environment with a digital augmentation overlay, being a highly visual and interactive method with digital content such as audio, video, grahics and GPS in real world environments through cameas.

Web based augmented reality (WebAR) is defined as an altered form of reality in which computer-generated content is superimposed on the user's real -world views, allowing digital assets to be added to their physical environment. WebAR must also meet three basic characteristics:
- Combination of real and virtual world
- Real-time interaction
- Accurate 3D registration of real and virtual objects
Marvin XR offers the following type of WebAR experiences:
- Surface Tracking AR
- Image Tracking AR
- Marker Tracking AR
- Eye Tracking AR
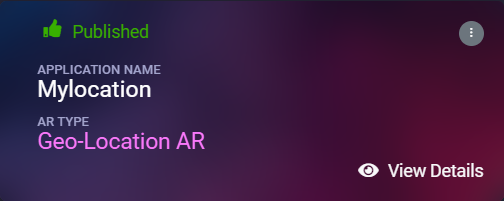
- Geo-Location AR
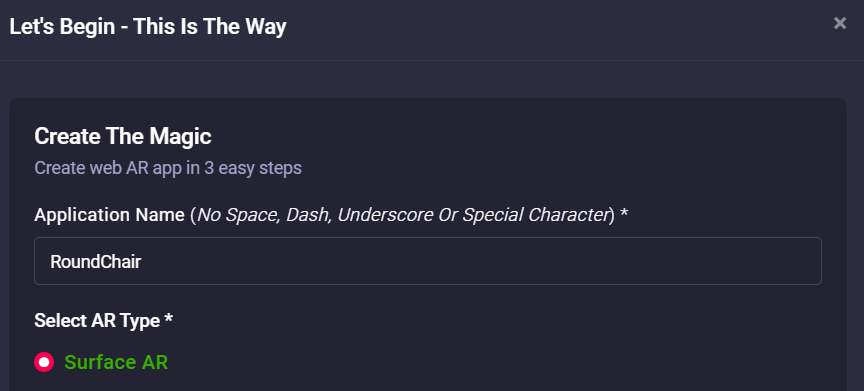
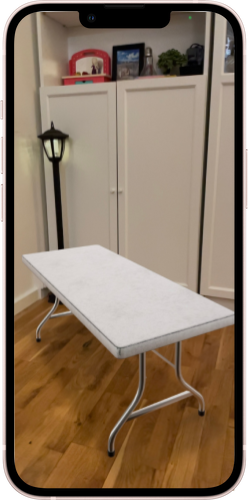
Surface AR
Surface AR utilizes an AR concept called SLAM - simultaneous location and mapping which helps to place the AR overlay wherever you want as long as the surface is a flat surface. You'll need your mobile camera to be able to place the 3D model on any flat surface. Thus, for computer vision to help identifying the flat surface better. Surface should have a bit of texture.
Marvin XR uses the world tracking AR technology for providing Surface AR. Fundamentally, Surface AR is doing two things: tracking the position of the mobile device as it moves and building its own understanding of the real world. ARCore's motion tracking technology uses the phone's camera to identify interesting points, called features and tracks how those points move over time.
The stable, scalable and extremely powerful AR experience can transform advertising and marketing experience for brands who want to create an outstanding impact to the customer experience.
Compatibility: Surface AR is supported in all latest models of mobiles including Android & iOS.
Here is the Support List of Surface AR compatible mobile devices.
For Android, in case, you are facing an issue while playing Surface AR, you should check whether your smartphone supports Google Play Service for AR or not. You should install it if it is not there.
|
Check Android Support List for Surface AR |
For iOS, all iPhone models are beyond iPhone 5s support ARCore service by default. In case of facing trouble, please upgrade your iPhone to the latest iOS version.
|
Check iOS Support List for Surface AR |
How to create Surface AR campaign
You are ready to build your first Surface AR campaign. Follow the below steps to build your first AR campaign within minutes. Go to the central dashboard (after you login, you land up here) and click on any of the buttons - Create AR Campaign or Add New Campaign.
1. Provide a name for your campaign. Please remember not to use any space, underscore or special character within the campaign name.
As a security first model, we provide a SSL certificate for each of your campaigns to safeguard it against any security vulnerabilities. Adding any unwanted character within the campaign name will stop the global certificate authority to approve the request to sponsor a SSL certificate (for trust based rules). This means you'll still be allowed to run the campaign with HTTP but not with HTTPS.
2. Upload your 3D model. For Surface AR only, you need to upload GLB format of 3D models:
The 3D model format is extremely lightweight and most importantly come as a single package.
If you have a GLB model, upload it and create the campaign.
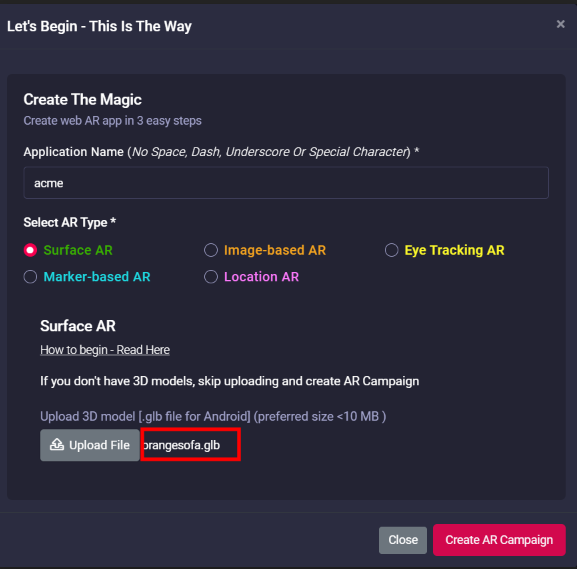
3. Once you hit the Create AR Campaign button, the campaign is generally ready within a few seconds.
You can test it by trying http://<campaign-name>.marvinxr.com on any browser.
It'll open the campaign view without SSL security (no HTTPS).
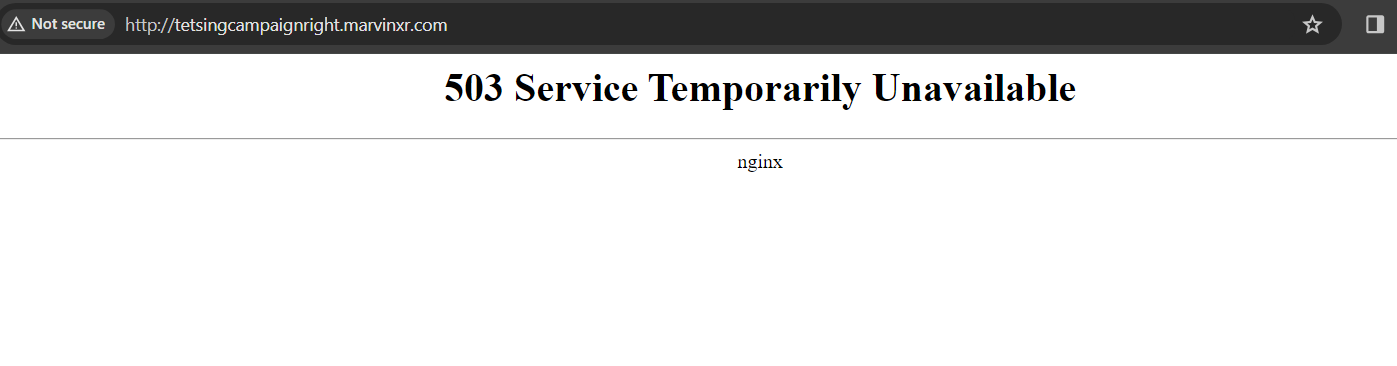
|
If you try to run the campaign with HTTPS immediately after its creation, you'll get the following error: 503 Service Temporarily Unavailable |
|
New Surface AR campaign can take up to 2 minute to get started with SSL certificate (HTTPS mode) |
Let's Encrypt Global Certificate Authority can take up to two minutes to discover your new campaign and assign a new SSL certificte to it. So please wait up to two minutes to get your campaign ready with HTTPS enabled. After two mins, try https://<campaign-name>.marvinxr.com - it'll work fine.
|
More queries about Surface AR: |
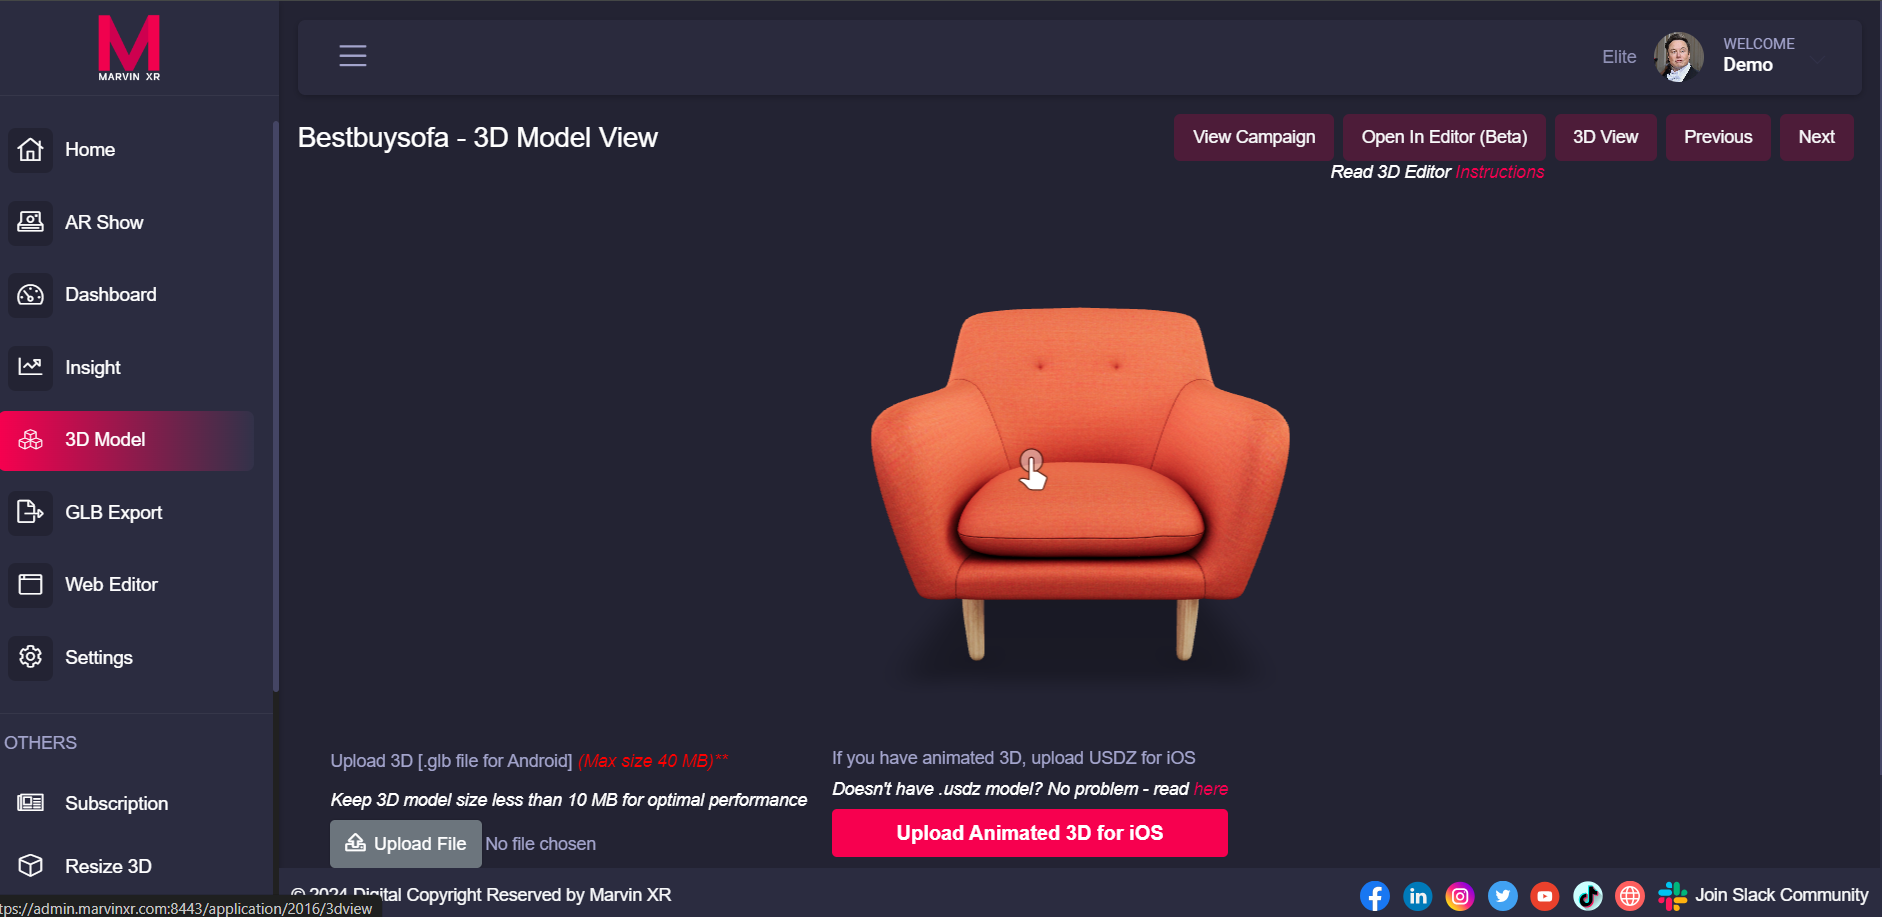
Q: How can I upload an USDZ file for Surface AR campaign?
A: Yes, with Marvin XR, you can do it. It allows to build a Surface AR campaign only with GLB model which can work both with Android and iOS formats. Marvin XR auto-converts it for the iOS usage - cool isn't it?
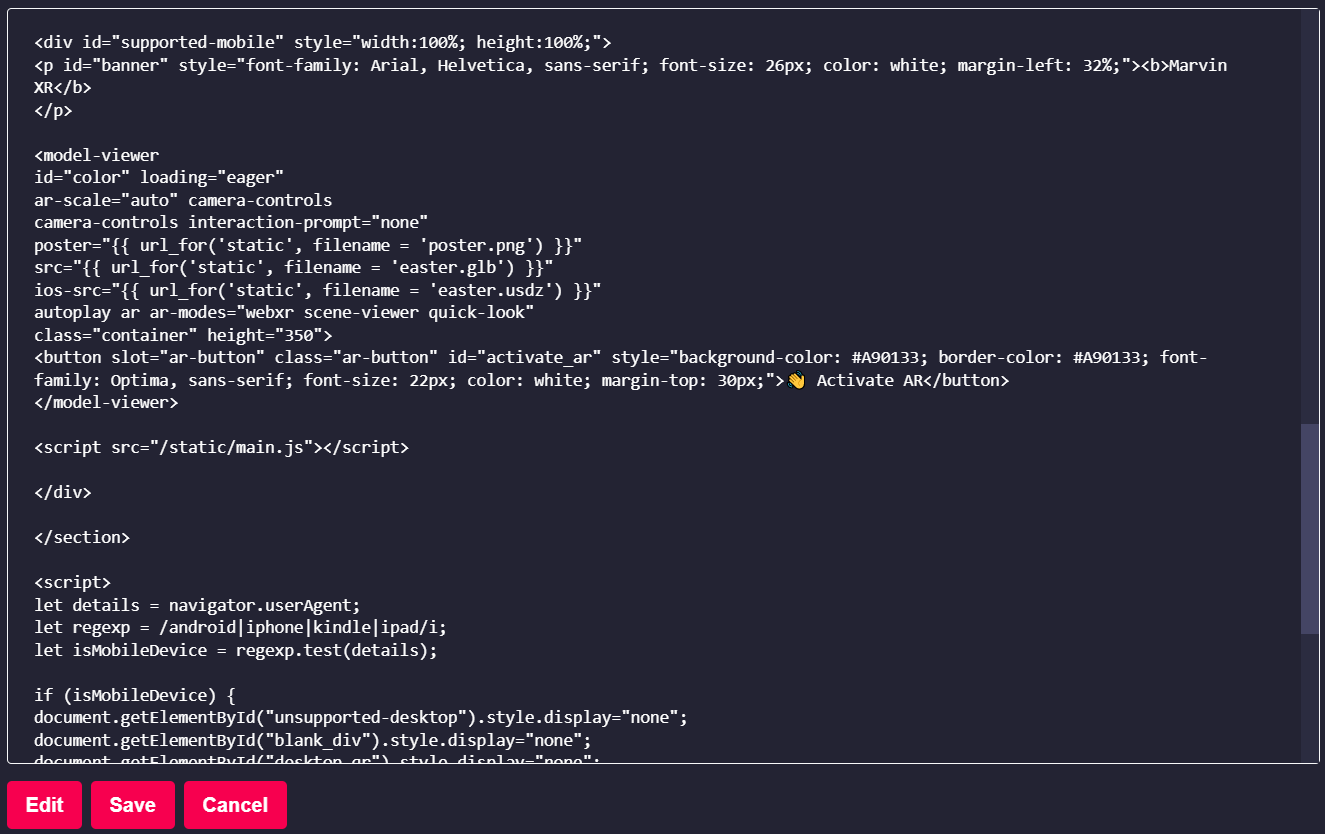
But if you have an animated 3D model - you need to upload USDZ 3D model for iOS. Auto-conversion of animated GLB model to USDZ generates static model only. To view animation in AR from iOS, follow the below steps:
How to do upload USDZ mdoel?
Click on View Details of a campaign and go to 3D Model menu.
Click on the followin button - Upload Animated 3D for iOS and upload your animated USDZ model.
Now go to Web Editor menu and edit the AR campaign HTML view (click on Edit) and find the model-viewer tag inside.
Find the parameter disabled-ios-src and change it to ios-src and click on Save button.
Now you can view the animated WebAR both from Android and iOS.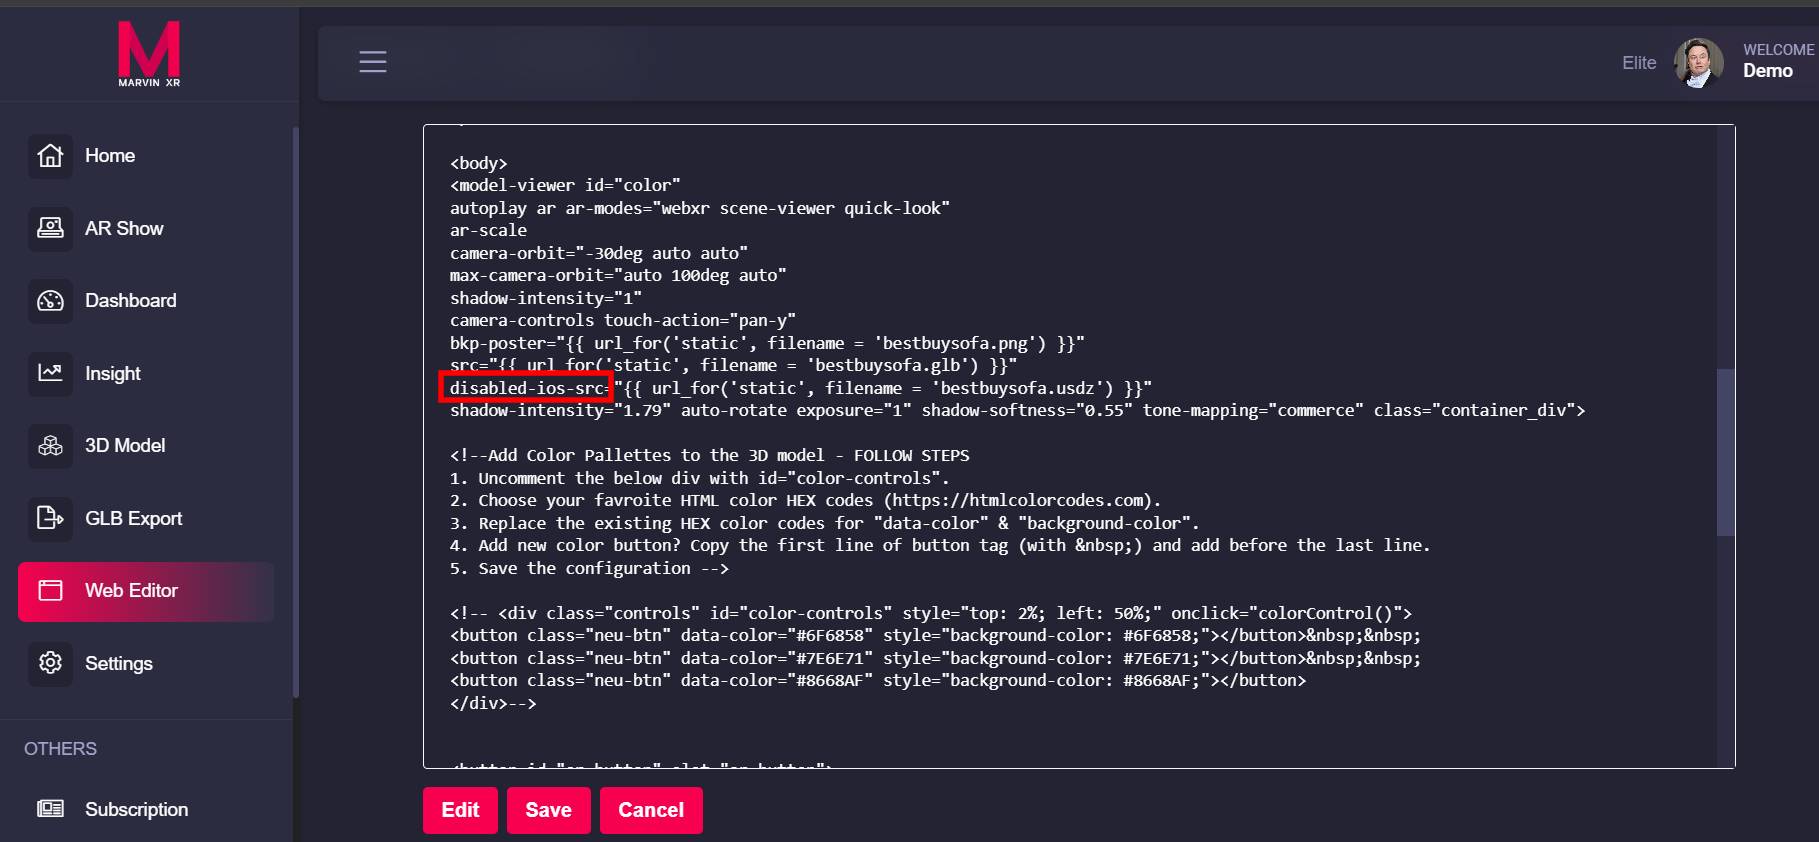
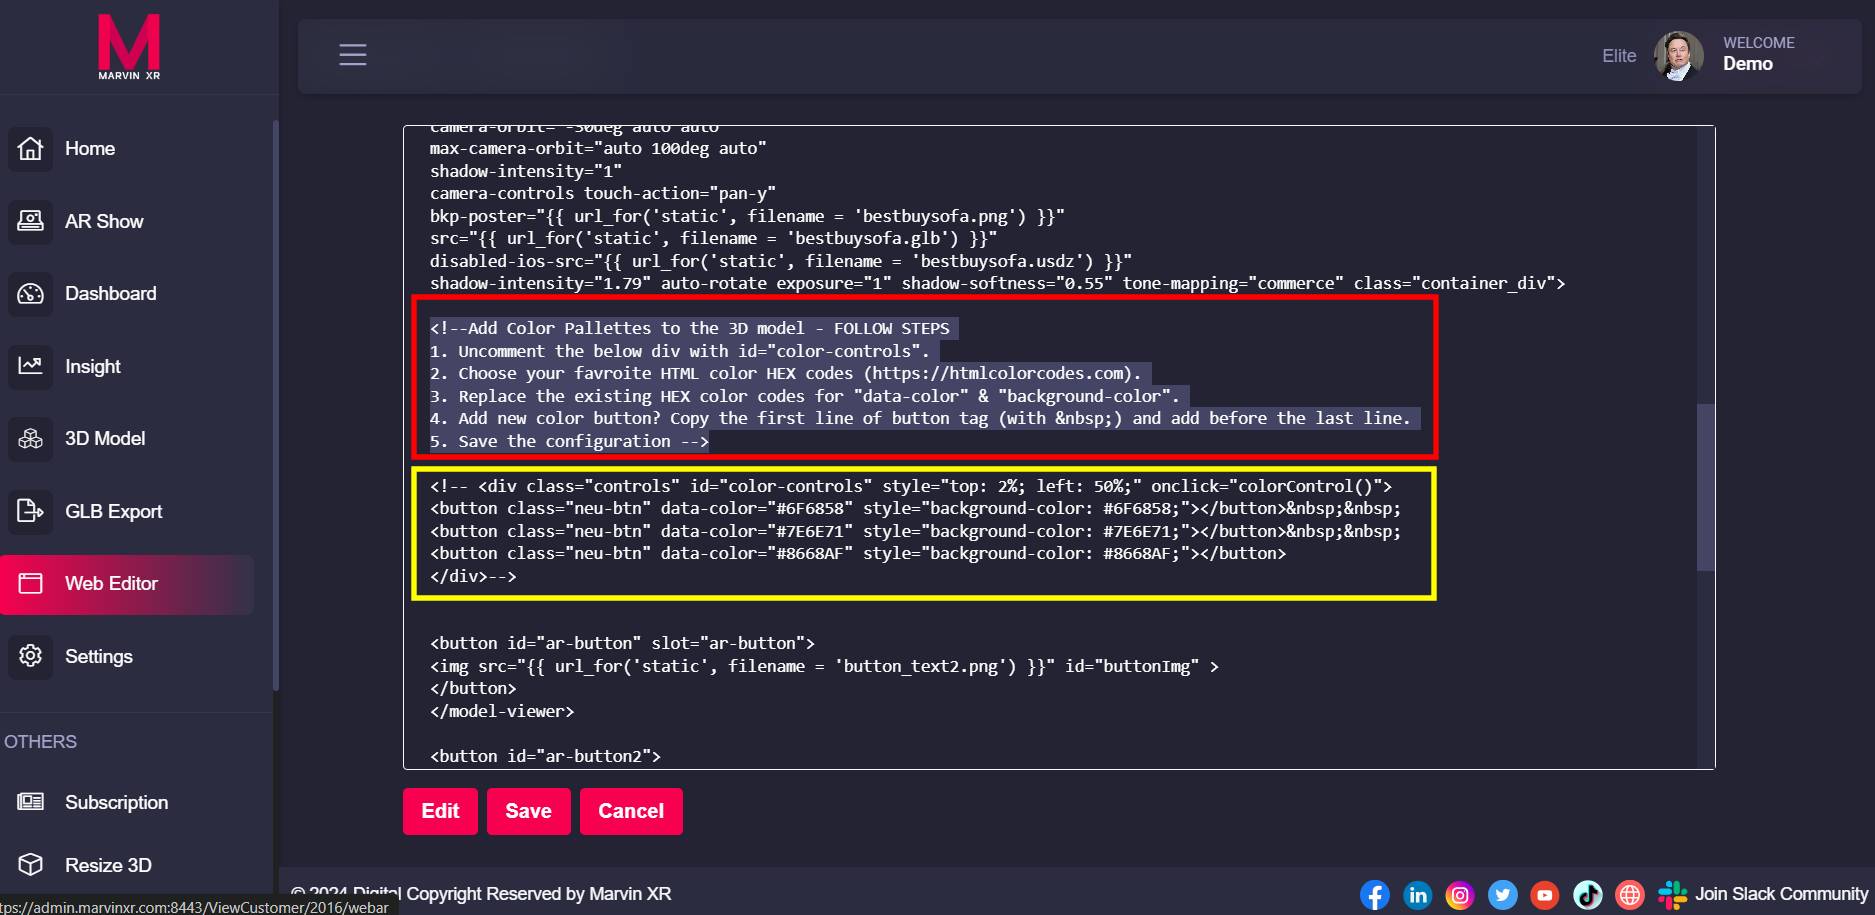
Color Template for Surface AR
Do you want to display your 3D product with various colors? Then you can do it with Marvin XR.
Here's an easy way to achieve it with our new Color Template.
1. Open your Surface AR campaign card and go to Web Editor menu and click on Edit.
2. Remove comment tag (yellow marked area) by remvoving (<!-- comment tag in HTML -->) this syntax.
3. There are three color pallete buttons by default. Change the color of them by putting Hex color code (HTML color codes).
4. If you want to add more color buttons to your Surface AR campaign - follow the instructions (marked with red).
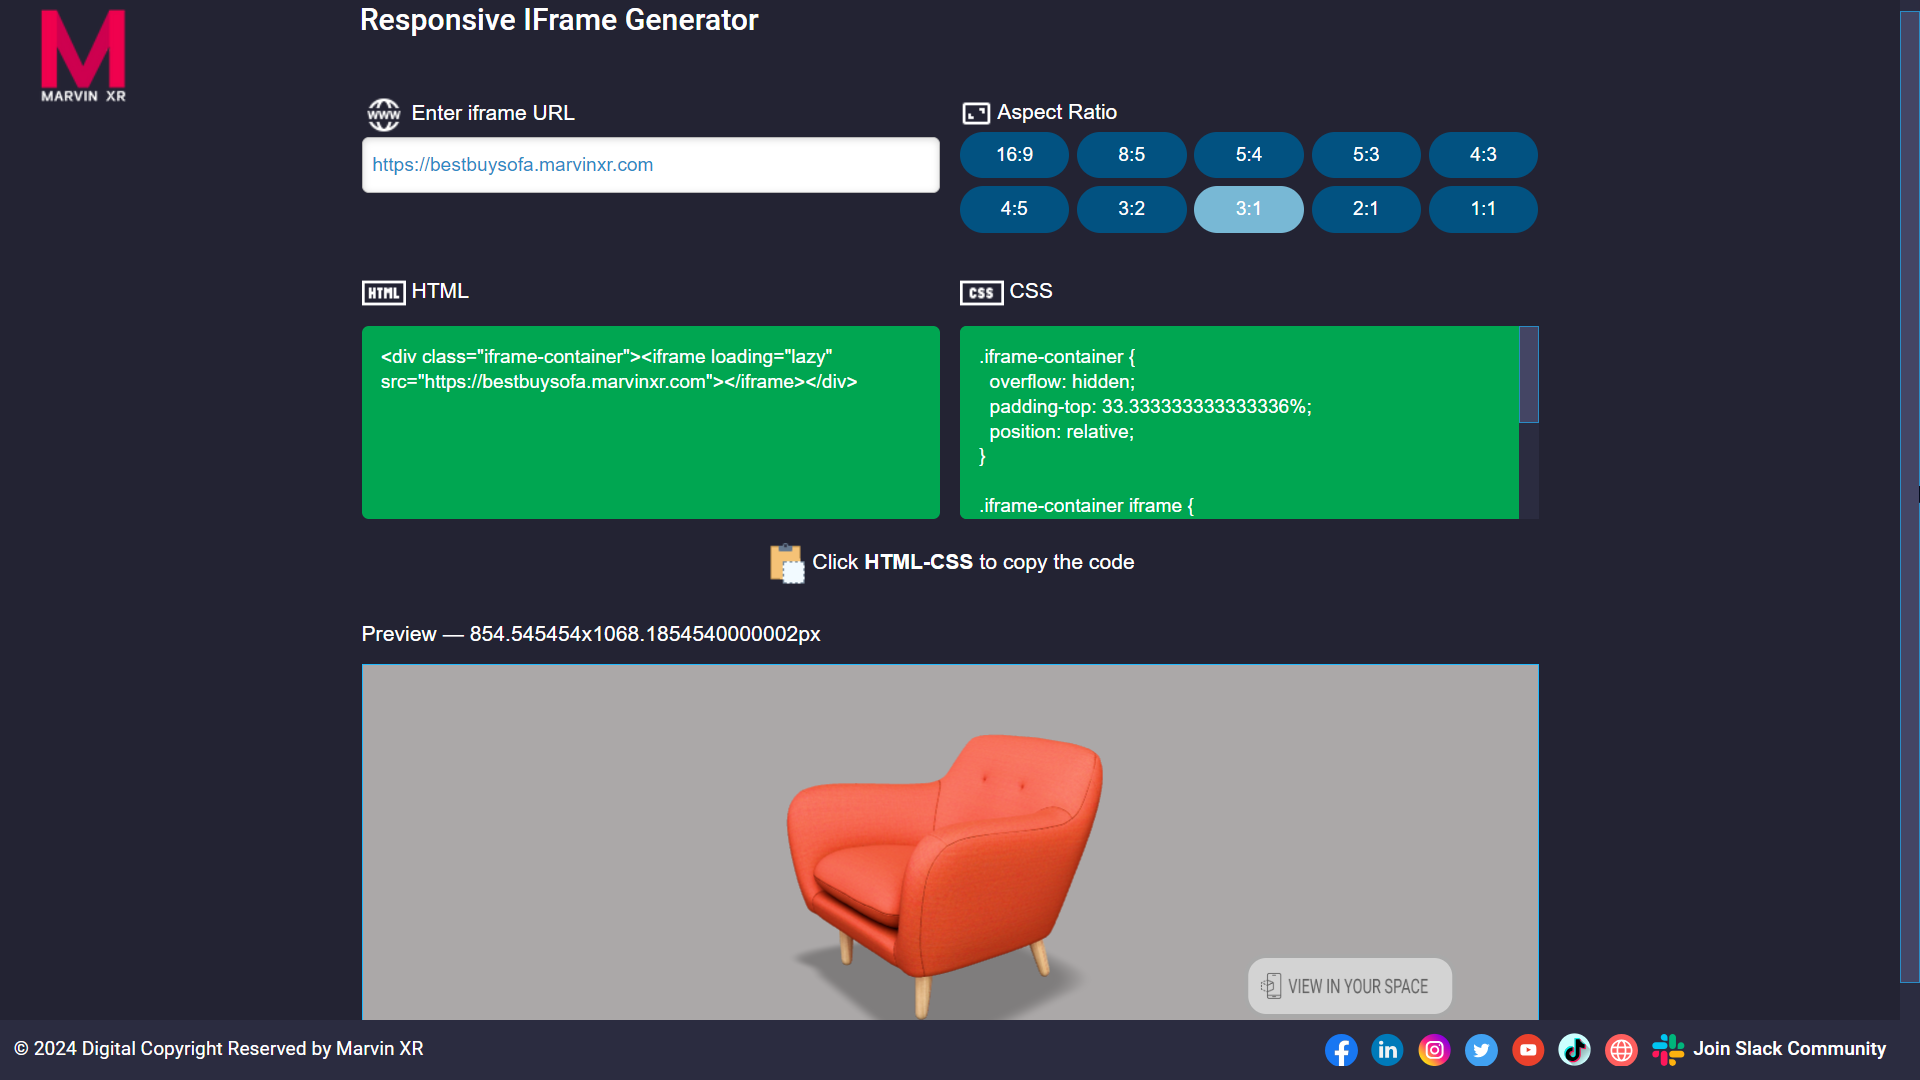
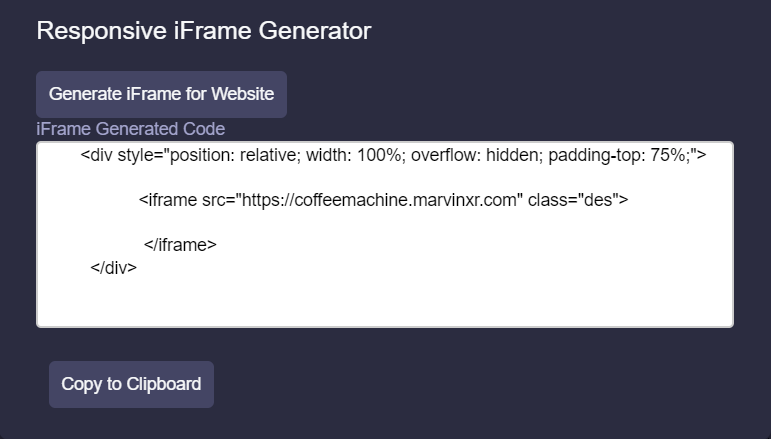
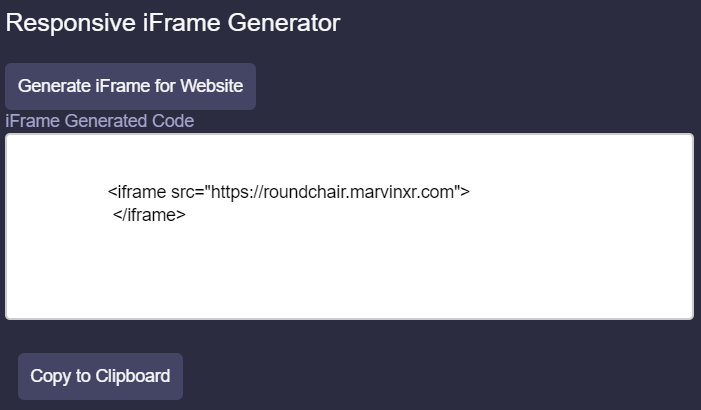
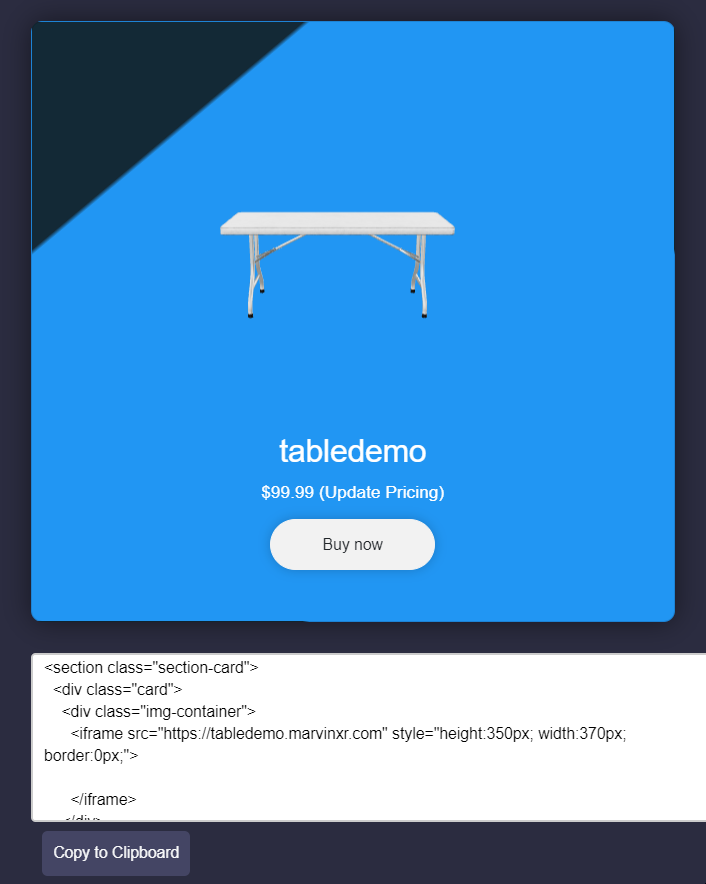
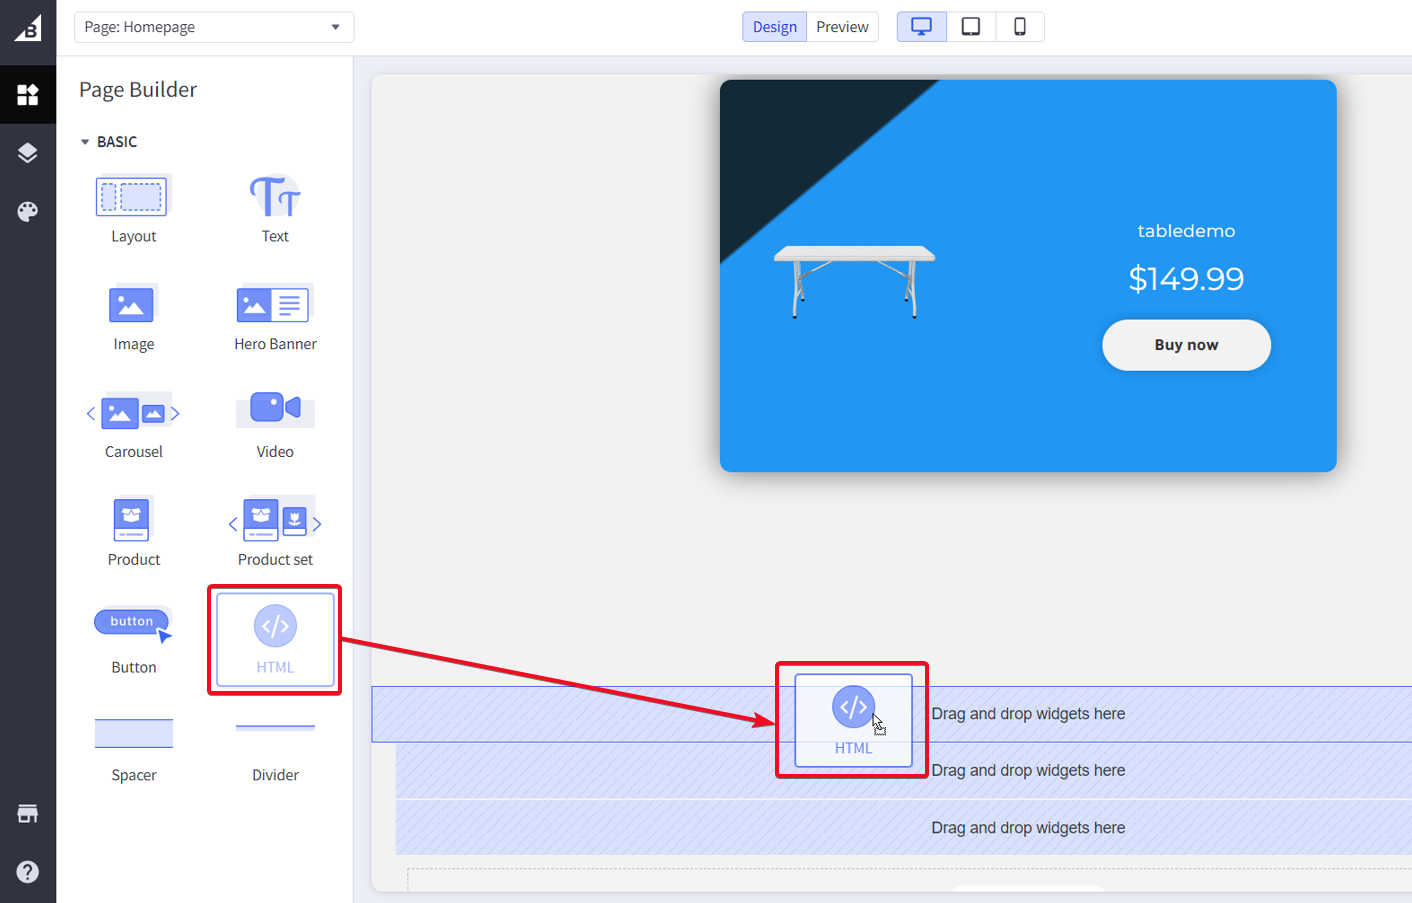
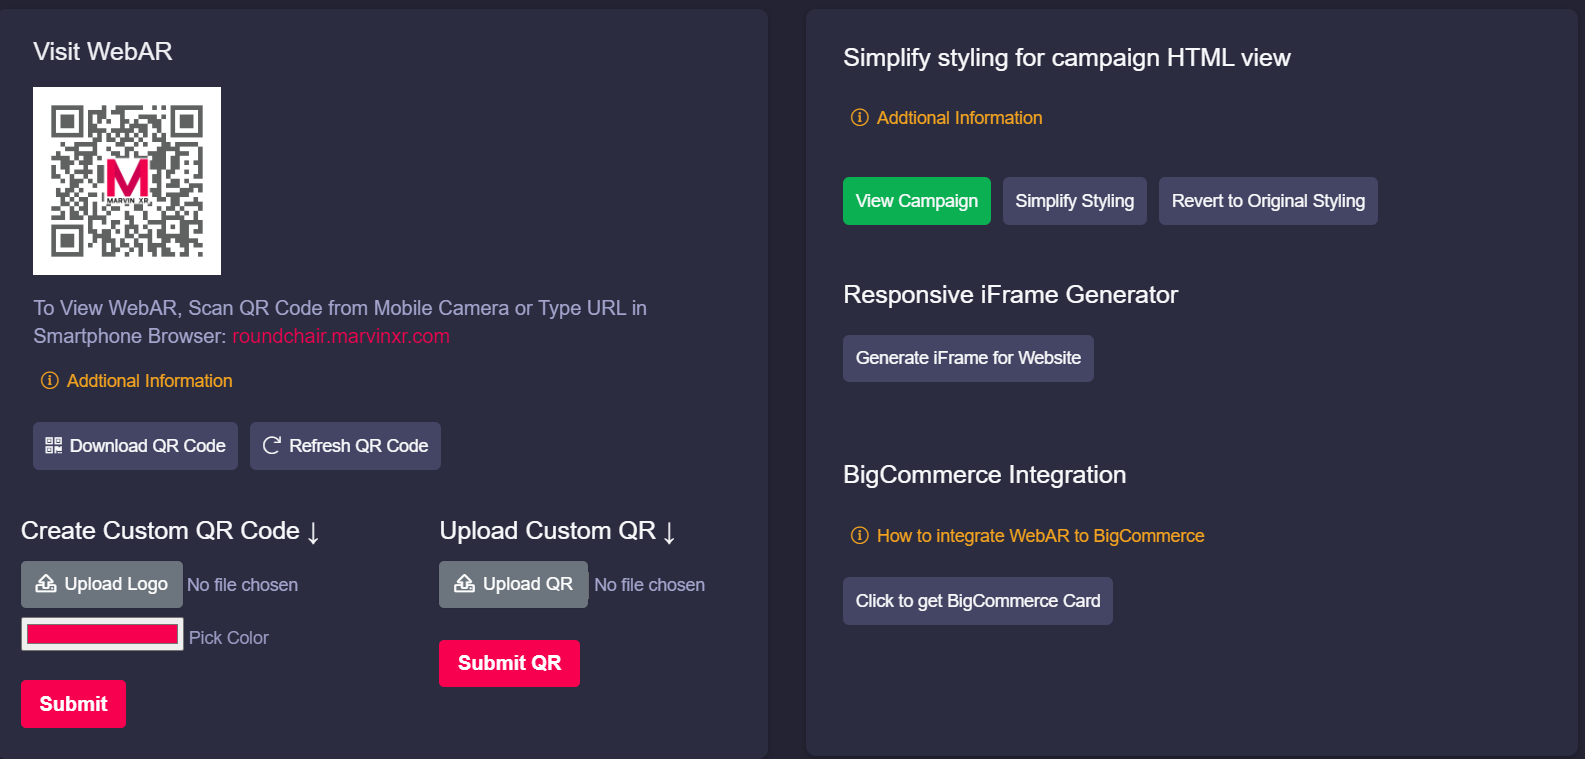
Responsive iFrame Generator
You want to embed the 3D visualization in your business website and struggling for proper iFrame codes? Often times this is a struggle for business to create proper responsive iFrame embedding code.
With Marvin XR's new Responsive iFrame Generator tool, now things can be so easy going forward.
Here's how to use Responsive iFrame Generator
1. Open your Surface AR campaign card and go to AR Show menu and click on Create iFrame for Website.
2. Enter iFrame URL (that's your AR campaign URL like https://bestbuysofa.marvinxr.com) in the Responsive iFrame Generator tool.
3. Choose your preferred ratio of window - the dimensions in which the iFrame will be displayed in your website.
4. HTML and CSS code will be auto generated - simply click on them to copy and paste in your website backend.

List of Platforms where iFrame Embedding works:
In 2024, the top ecomm marketplaces and websites (according to Forbes) are supported by Marvin XR iFrame embedding. If your business is using any of them, then go ahead and start adopting 3D ecommerce today.
- Wordpress
- Wix
- Shopify
- Shift4Shop
- BigCommerce
- WooCommerce
- PrestaShop
- Square Online
- Squarespace
- Weebly
Rebranding Surface AR Campaign

Everything You Need To Know About WebAR Rebranding ✌️
Change Page Title
Open your Surface AR campaign and go to Web Editor and click on the Edit button.
Find the <title> tag in the beginning of the page. Update your page name between the tags and Save.
<title>Your Page Name</title>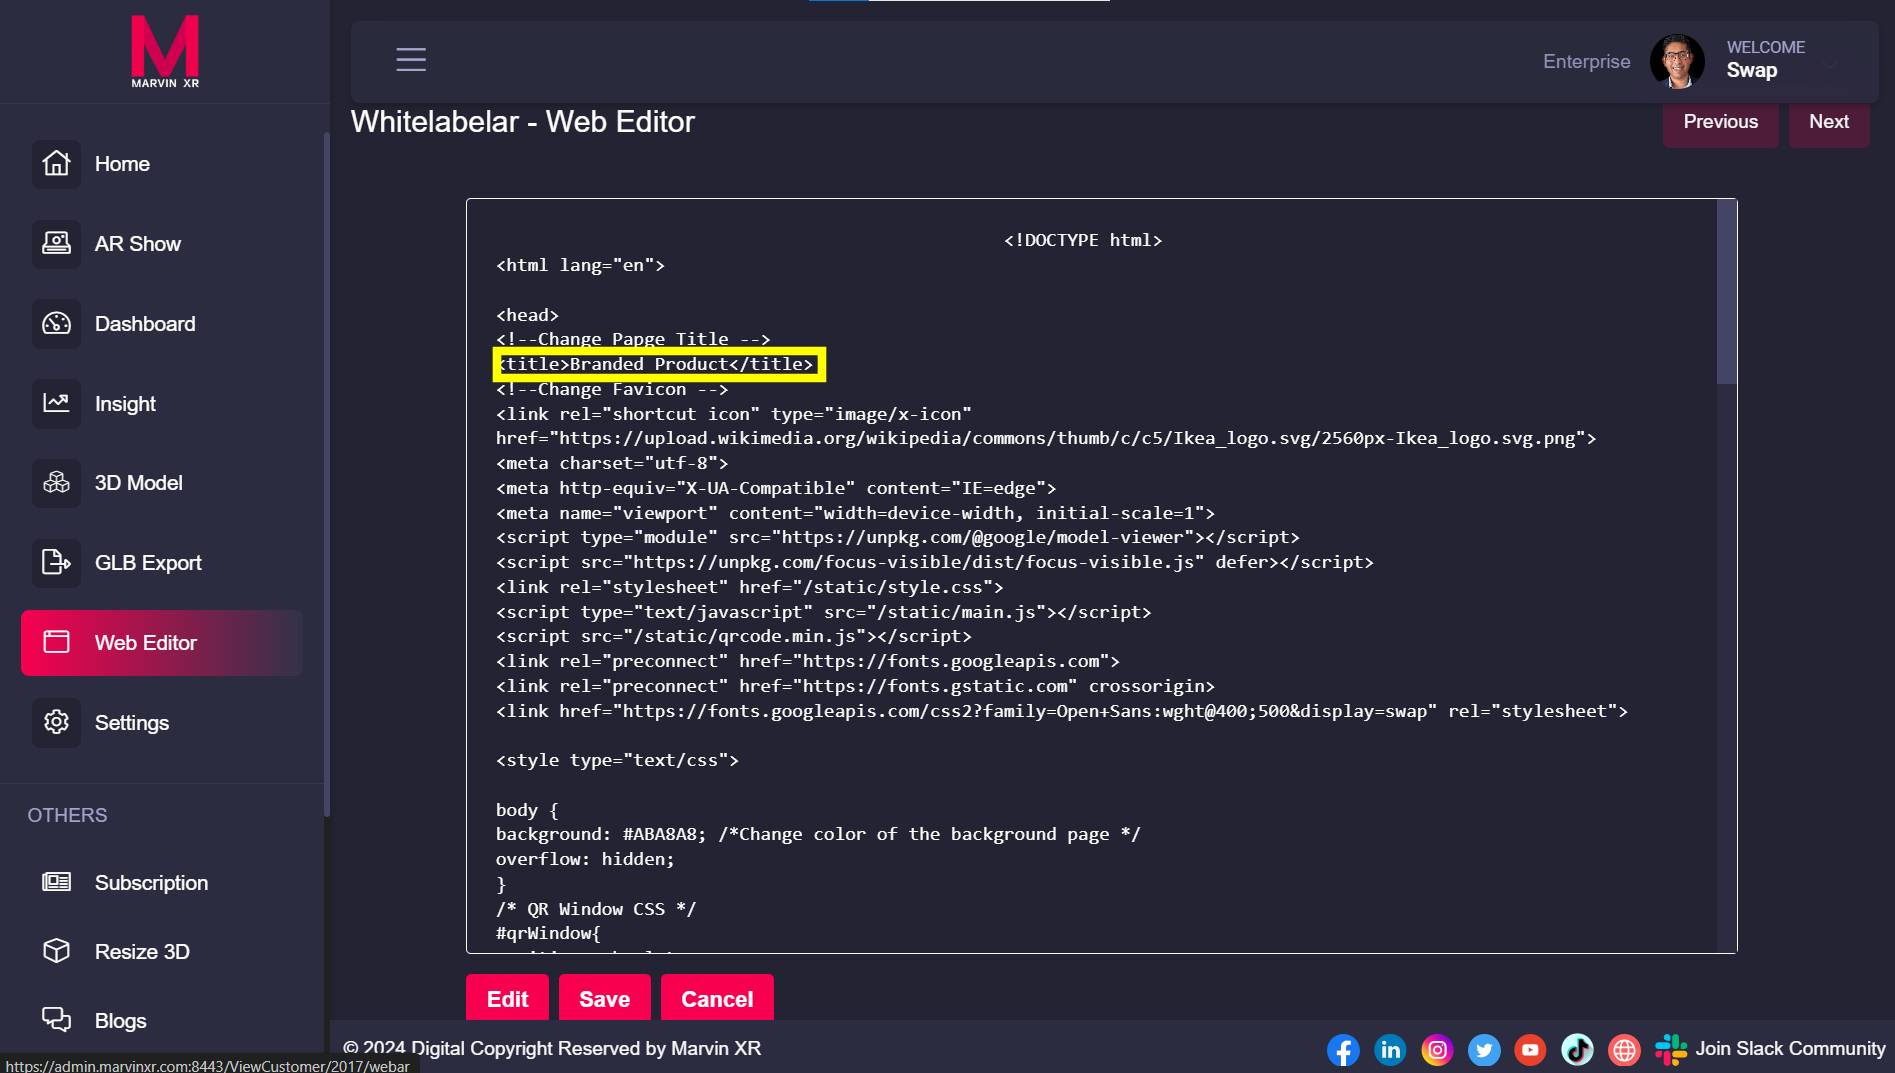
Change Page Favicon (URL icon)
Find the comment Change Favicon and update the following <link> tag. Paste the address of the new favicon (must be a PNG file) link address to the href value and Save.
<link rel="shortcut icon" type="image/x-icon" href="Insert PNG image file address">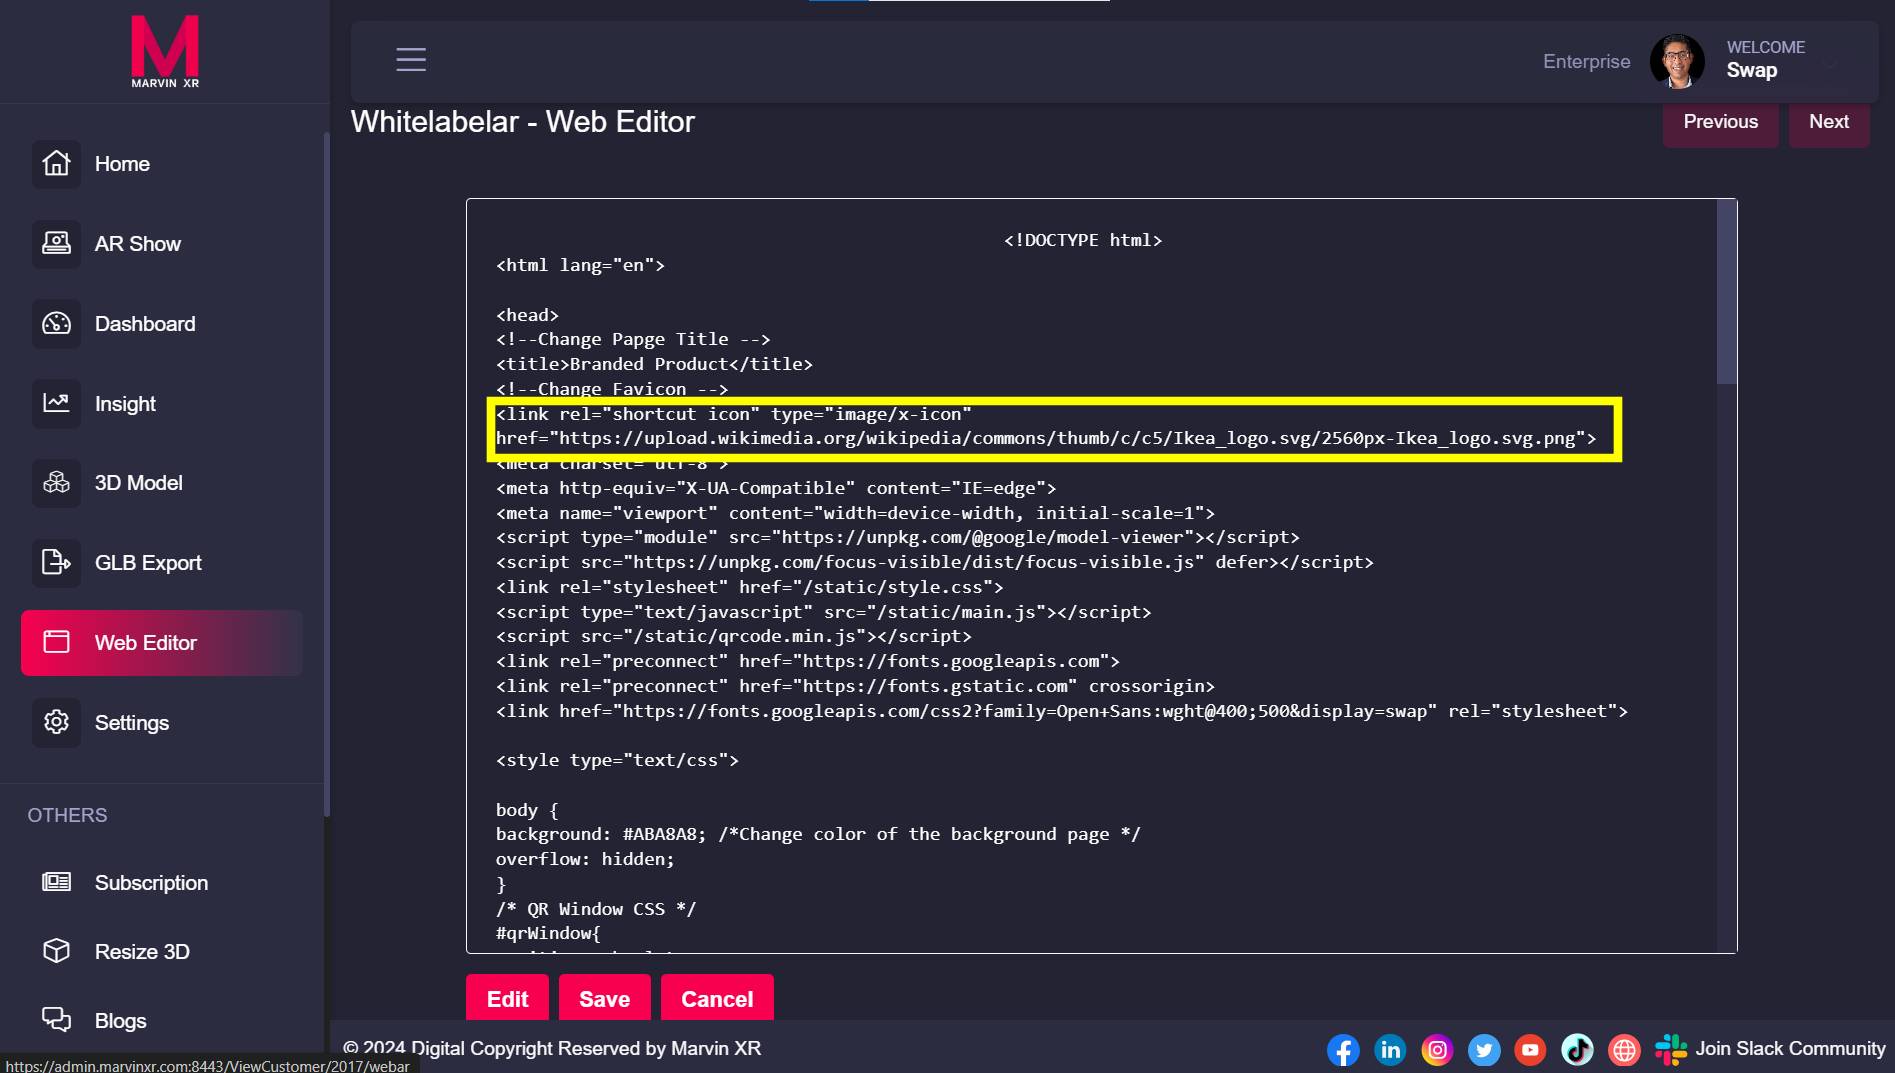
Change Background Color
Find the comment in the CSS, the following comment - /*Change color of the background page */
Change the default hex color code for background and Save. Find color hex codes from here.
background: #ABA8A8;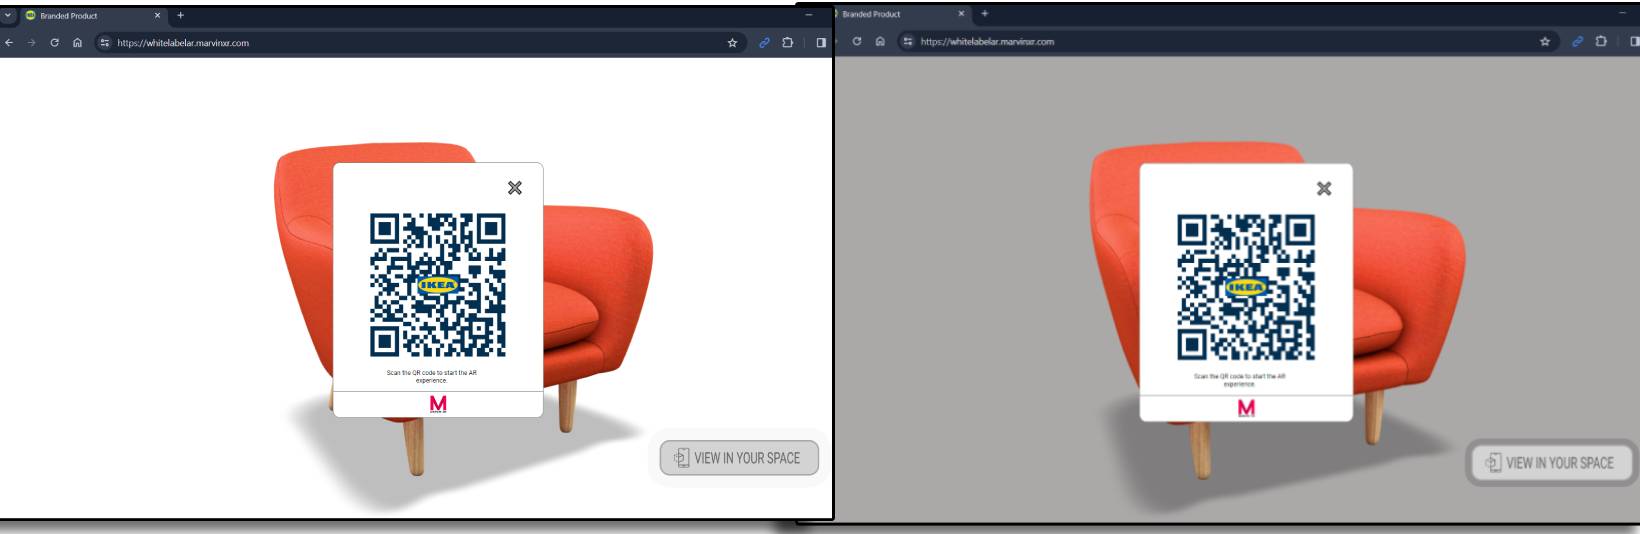
Change QR Window Size
If you want to change the default QR popup window default sizing, please change value next to the following comments: /* QR Window CSS */
To change popup window width - change the values next to /*Change QR window width*/
To change popup window height- change the values next to /*Change QR window height*/
#qrWindow{
position: absolute;
margin:auto;
background: rgb(255,255,255);
width: 100vmin; /*Change QR window width*/
max-width: 330px;
height: 100vmin; /*Change QR window height*/
max-height: 400px;
left: 50%;
top: 50%;
transform: translateX(-50%) translateY(-50%);
z-index: 10000;
border: solid 1px gray;
border-radius: 3%;
}Change Logo in QR Code
This is quite easy. Simply follow this existing tutorial to change logo in QR code.
How to Resize 3D Model for Surface AR

Having 3D visualization on the web is easy, but getting the same 3D to work in WebAR is a little trickier. Proper aspect ratio of the 3D compared to the environment is very crucial for a great AR experience for users.
There are standard tutorials in the web to describe how to setup 3D model aspect ratio with programming. But this is often not a very easy solution for non-programming creators. Follow the below steps and launch a great Surface AR experience with Marvin XR.
Download Blender
Download Blender 4.0 from here and then install it in your system. The installation is fairly easy and straight forward. Once done, open Blender now.
Import Your 3D Model
Get your 3D model ready - preferably in GLB format. However, if it is in different format, don't worry. Blender can export them into GLB after the modification.

Join All Vertices
Most often 3D models come up with separated vertices and components. This is helpful for the 3D artists to higlight and update separate parts of it. But for resizing, this is not a good option because geomtery is measured based on the holistic size of the model.
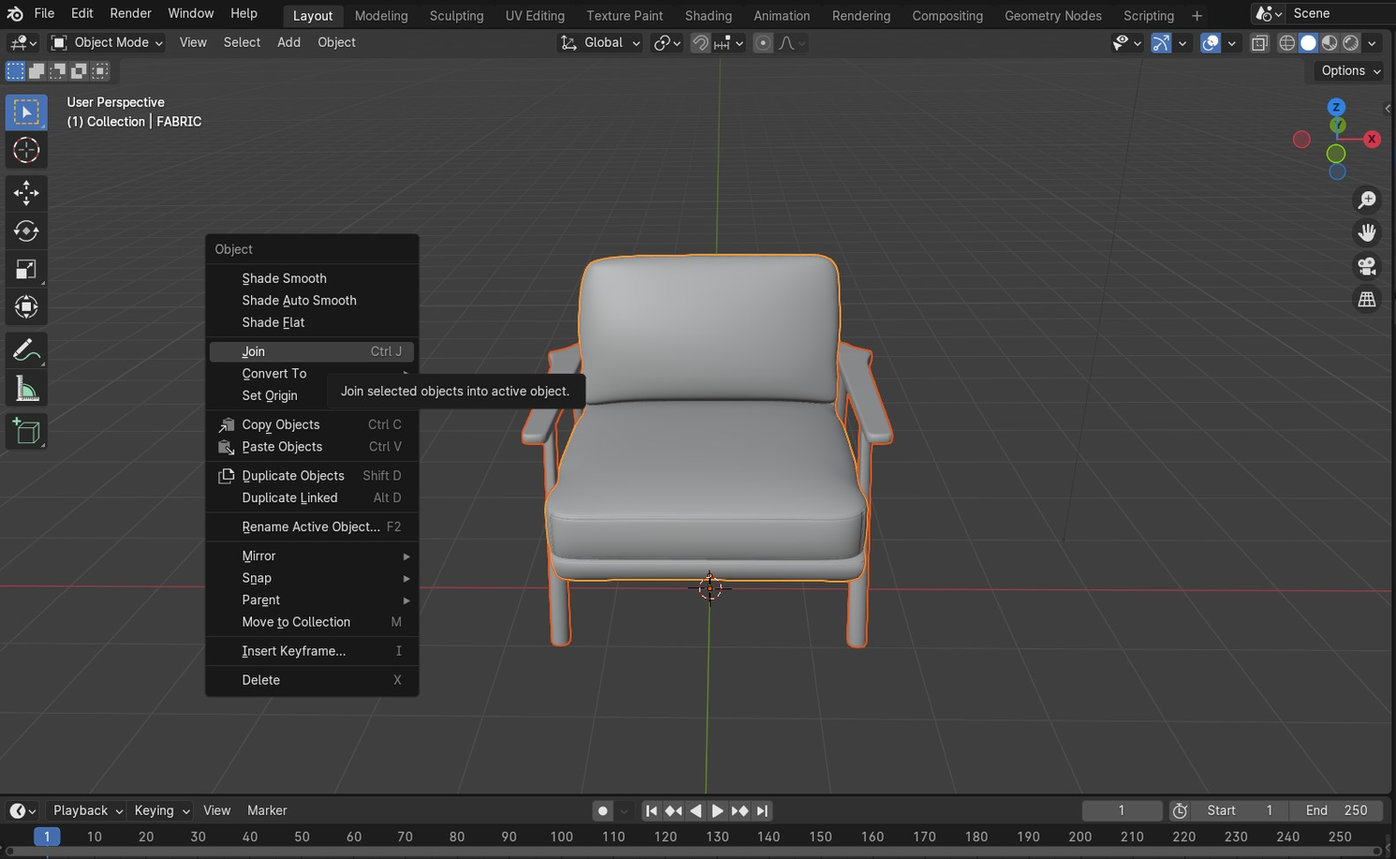
A good practice to handle this situation is to select the entire model and then right click on top it. Click on "Join" to join all vertices and make it a singular model.
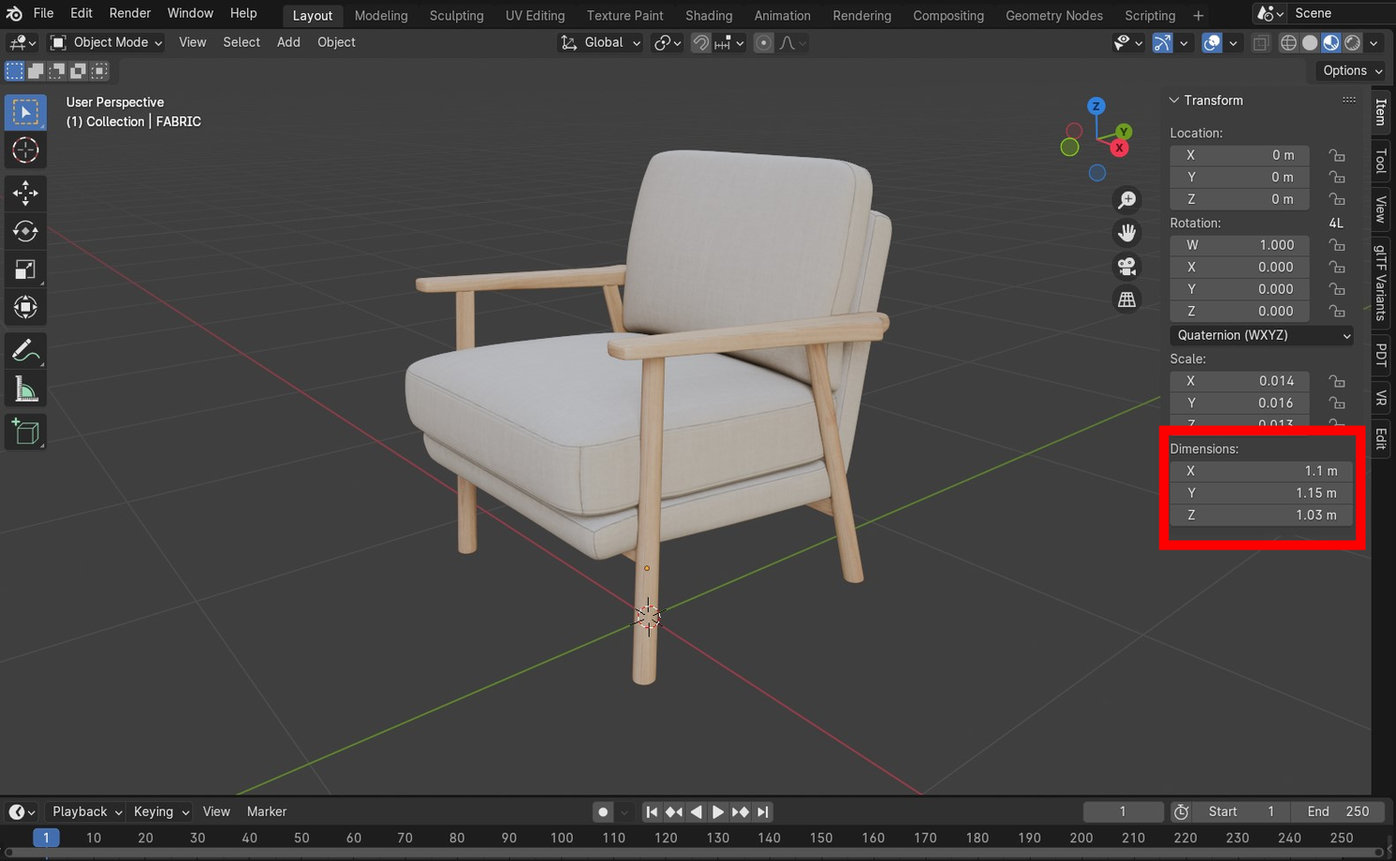
Set the Dimensions
Now keep the model selected and click on "Transform" menu from the right and find "Dimesnsion" section. Width, height and depth are represented by X, Y & Z dimensions. Please keep in mind that this is a metric system to set up the dimensions in meters.
Whatever dimesnsion you'll setup here will show up in AR mode. Users will find the virtual object appearing before them with the same dimensions.
Import 3D into Surface AR Campaign
Image-based AR
When an image is found by web app camera, AR content(s) appear on top of it or near it. The content can be a 3D model (static/animated), video, image gallery or even interactive buttons. If you are looking for a customized image-based AR web app, our team can help you to achive it. This is based on a combination of Three.js, A-Frame and Mind AR.
The engagement and entertainment rate are quite high for image-based Augmented Reality. Image-based AR experience is tied to your custom image. This means that you can use the target image in real world (banner, ad, leaflet, magazine etc.) or digital world (Facebook ads, Twitter, LinkedIn, Instagram, TikTok or anywhere). The AR experience will be displayed on top of the image and move along with the image as it moves around.
Use Cases: Product marketing, gamification experience, entertainment, augmented art, business card, ed-tech sector (books), magazine ads, flyers, any form of printed advertising etc. to bring the best AR experience for users. Imagination is the limit for image based AR.
Compatibility: It works on any phone with webgl and webrtc.
Benefit of Marvin XR image-based AR is that it is supported in wide variety of mobiles - including all types of brands and smartphone variations. This easily runs in older smartphones too.
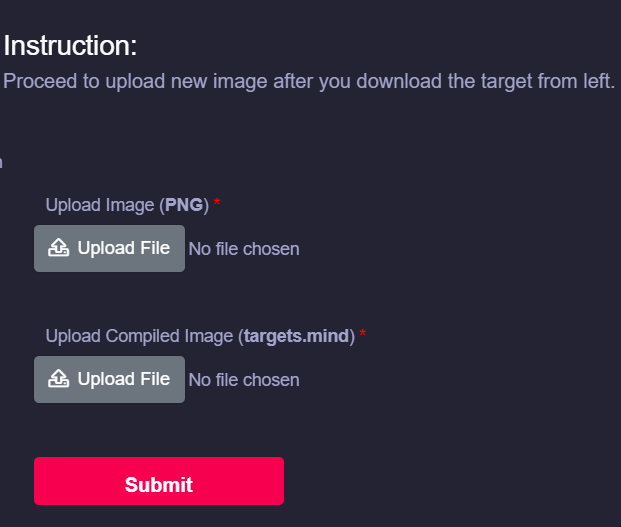
How to create Image-based AR campaign
Follow the below steps to build your first AR campaign within minutes. Go to the central dashboard (after you login, you land up here) and click on any of the buttons - Create AR Campaigns or Add New Campaign.
1. Provide a name for your campaign. Please remember not to use any space, underscore or special character within the campaign name (Read here for associated reasons).
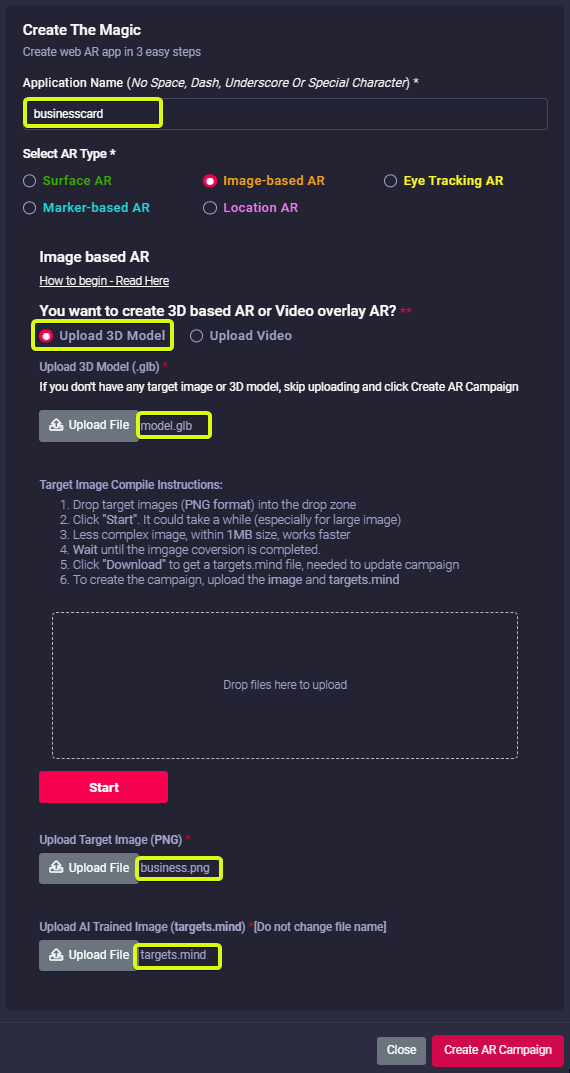
2. Drag your traget image (.PNG format) to the dropbox and click on Start button to create the camera identifiable format (targets.mind). Based on the size and the complexity of the image, it can take from few seconds to couple of minutes to complete this step.
Click Download button to download the AI generated camera recognition trained model (targets.mind).
|
Do not change the name of the file. Keep the trained model name as targets.mind |
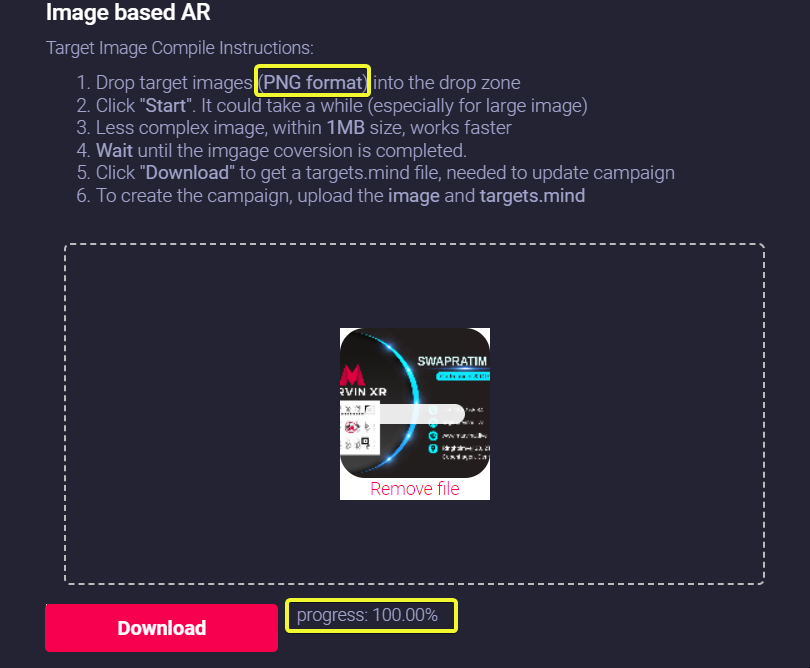
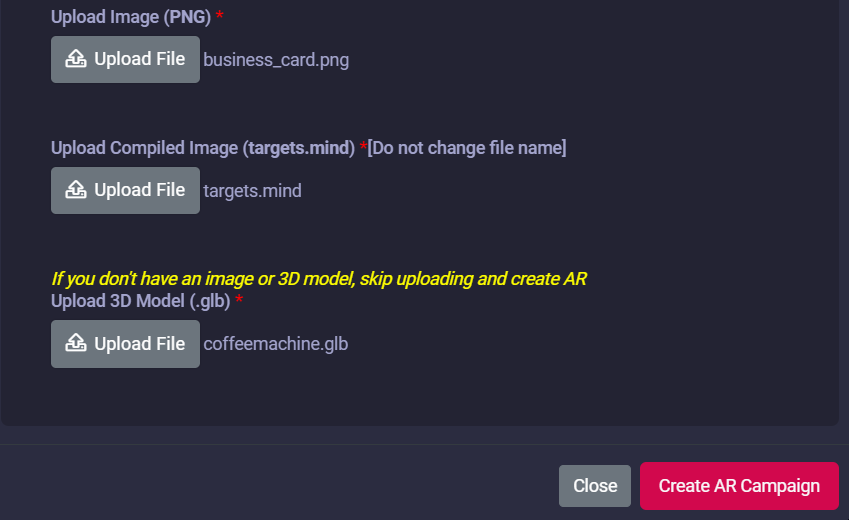
3. Now upload the following to the campaign:
- Target Image (PNG)
- AI trained model for camera recognition (targets.mind)
- 3D model (GLB)
If you don't have a 3D model, no worries - there's a default 3D model in the template (you can change it later anytime after the campaign creation).
Click on the Create AR Campaign button to finish the setup.
4. Your AR campaign can take up to 2 minute to get created. Read here for the associated reasns
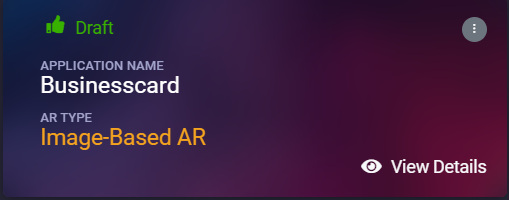
Congratulations! Now you have created your first image-based AR campaign. Enjoy the experience.
How to create Image-based AR with Video overlay
- Provide a name for your campaign. Please remember not to use any space, underscore or special character within the campaign name (Read here for associated reasons). Select Upload Video option.

- Upload your preferred video (MP4) which should be displayed in AR view, against the target image. Please make sure your video is less than 2MB in size. This is set for optimal performance in audience's smartphone. Too big of a video can take much time to load in the browser.
If you don't have a video ready - we cover you. The default video will show up automatically.
Want to compress your video size? Use Free Convert to convert or compress your video online.
When you upload a new video, it'll automatically take a snapshot of the first second of the video as a screenshot and show it to the audience before they click on it to play.
-
Drag your traget image (.PNG format) to the dropbox and click on Start button to create the camera identifiable format (targets.mind). Based on the size and the complexity of the image, it can take from few seconds to couple of minutes to complete this step.
Click Download button to download the AI generated camera recognition trained model (targets.mind).Do not change the name of the file. Keep the trained model name as targets.mind

-
Now upload the following to the campaign:
- Target Image (PNG)
- AI trained model for camera recognition (targets.mind)
When you upload a new image, the video will automatically resize itself according to the target image's height and width - isn't it cool!
- Target Image (PNG)
- Click on the Create AR Campaign button to finish the setup.
- Your AR campaign can take up to 2 minute to get created. Read here for the associated reasons.


Congratulations! Now you have created your first image-based AR campaign with video. Enjoy the experience.
Marker based AR
Do you know that the fastest way of invoking WebAR experience is to use marker-based AR. The marker looks more or less like an advanced QR or barcode. When users focus their camra to the marker, the AR experience comes up.
When a marker is found by web app camera, it's possible to show some kind of AR content on top of it, or near it. The content can be a 3D model (static/animated) or an image or a mixture of text, image and HTML components (like buttons for CTAs). Marvin XR is using world's most popular marker-based web AR backbone - A-Frame.
There is another important factor of marker-based Augmented Reality. The marker-based AR experience is tied to the marker. This means that the placement of digital elements depends on the location of the marker. In most cases, the experience will display on top of the marker and move along with the marker as it is turned or rotated.
Use Cases: Augmented Art, learning (Augmented books), Augmented flyers, advertising etc. to bring the best AR experience for users.
How to create marker-based AR campaign
Follow the below steps to build your first AR campaign within minutes. Go to the central dashboard (after you login, you land up here) and click on any of the buttons - Create AR Campaign or Add New Campaign.
1. Provide a name for your campaign.
Please remember not to use any space, underscore or special characters within the campaign name
(Read here the reasons).
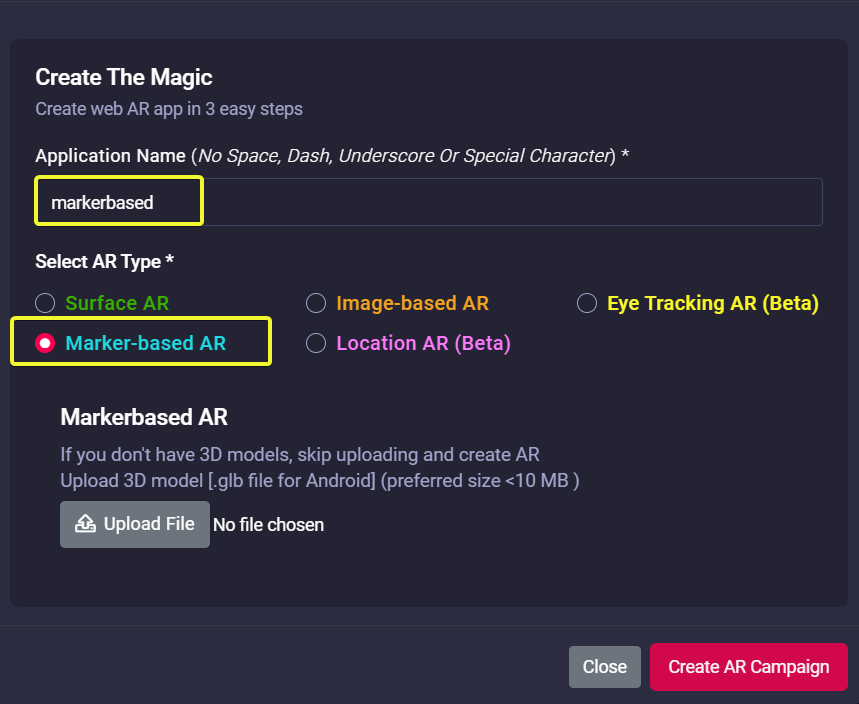
2. Upload 3D model (GLB) here.
If you don't have a 3D model, no worries - there's default 3D model in the template (you can change it at any time later).
Click on the Create AR Campaign button to finish the setup.
3. Open your campaign in your smartphone and focus on the marker. The AR will show up.

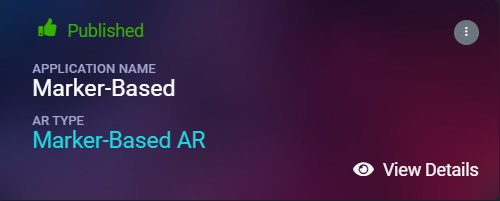
Congratulations! Now you have created your first marker-based AR campaign. Enjoy the experience.
Eye Tracking AR
Eye Tracking AR can work from both mobiles and desktops. Users can virtually try-on eyeglasses and sunglasses using our new eye tracking WebAR. This will help brands to create much higher user engagement from ecommerce platforms and help customers to make better decisions to purchase eyewear.
With the new eye tracking AR, now we have introduced easier way to import 3D assets for creators. You can now import GLTF folder (in zipped format) directly into the AR campaigns. Moreover, our new 3D configurator will help you to define position, rotation or scaling of 3D assets with single button click. You don't need to touch code from Web Editor anymore. This is a great step towards a true no-code WebAR platform.
Eye Tracking AR experience will definitely transform your e-commerce solution to grow business.
How to create Eye Tracking AR campaign
Follow the below steps to build your first AR campaign within minutes. Go to the central dashboard (after you login, you land up here) and click on any of the buttons - Create AR Campaign or Add New Campaign.
1. Provide a name for your campaign. Please remember not to use any space, underscore or special characters within the campaign name (Read here for associated reasons).
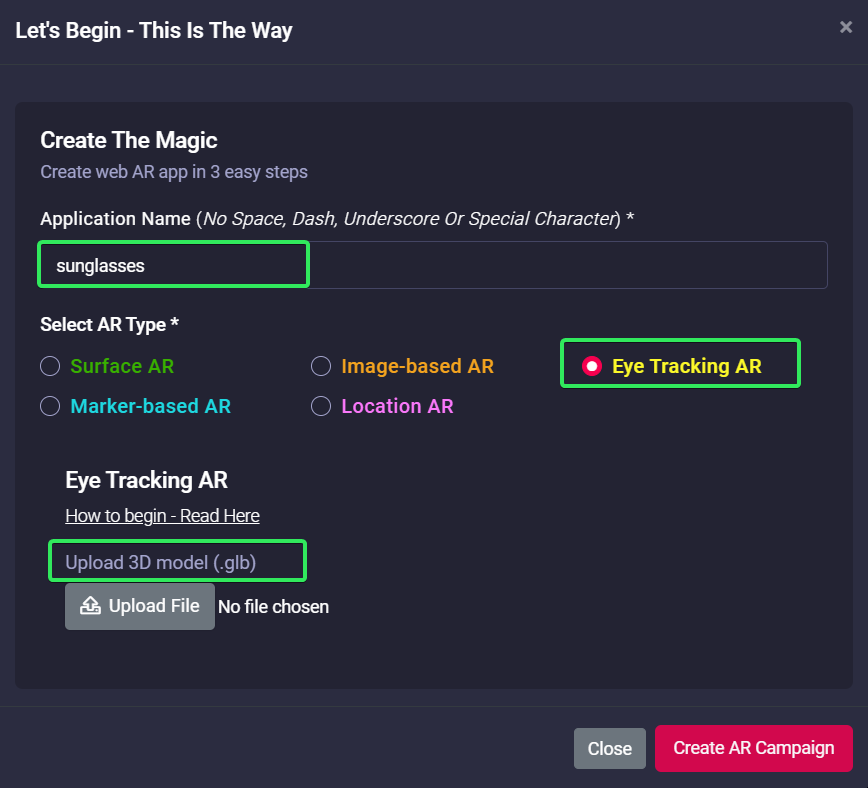
2. Upload 3D model (GLB) here. With eye-tracking AR, Marvin has introduced the GLB extension of 3D models for the campaign. Since GLB is quite popular and widely used across the industry, this will help the creators to work faster.
|
Upload 3D GLB model and click on Create AR Campaign button. |
3. 3D Configurator is here to help your AR journey. Click on View Details and go to AR Show menu.
Resize the virtual eyewear size, position and scaling from the configurator and test online even from campaign editor. Since eye-tracking AR can be viewed from a desktop, setting its virtual position is quite easy.

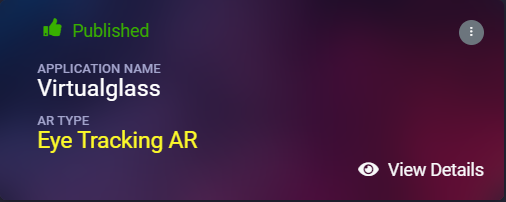
Congratulations! Now you have created your first eye-tracking AR campaign. Enjoy the experience.
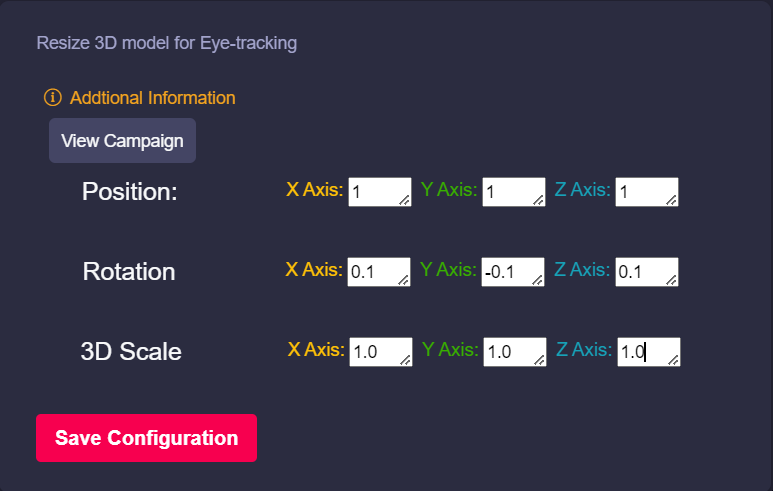
4. If you have experience with HTML, to adjust the 3D eyewear scale, position and sizing, click on View Details of the AR campaign, go to Web Editor menu, Edit and change the below sections. Once saved, you can quickly test it online.
P.S. - All values for rotation, position and scale parameters are based on X, Y & Z axis (in the corresponding order).
Rotation: If the eyewear needs to rotate its position compared to eyes locations.
Position: Does the eyewear sit way above eyes or it needs a little lowering - positioning can fix it.
Scale: How big the eyewear should appear compared to the face size - fix it with scaling factor.

Location AR
Location-based AR is a powerful sub-form of a marker less AR system. Therefore, it doesn’t require any physical target or unique markers to execute the rendering of AR experience and identify where to put a virtual object in the user’s environment.
Location-based AR technology, in fact, uses GPS data and a digital compass to define the user’s device location and position. GPS is a system of 30+ navigation satellites circling Earth. We know where they are because they constantly send out signals. A GPS receiver in your phone listens for these signals (a.k.a three satellites at any point of time, any location point). Once the receiver calculates its distance from four or more GPS satellites, it can figure out where you are.
For example, location-based AR would be quite helpful to show outdoor augmented information to the users, who are moving around holding their phone, and then, when a place of interest is spotted, they can move physically near it and enjoy a marker-based in-place experience.
How to create location AR campaign
Follow the below steps to build your first AR campaign within minutes. Go to the central dashboard (after you login, you land up here) and click on any of the buttons - Create AR Campaign or Add New Campaign.
1. Provide a name for your campaign.
Please remember not to use any space, underscore or special characters within the campaign name (Read here the reasons).
2. You need to create a marker which will be displayed over a certain geo-coordinate when users reach there. Marvin XR provides an option to make it more meaningful. Instead of just a red location dot, you can write a piece of text which will be visible to the users. This way, you can promote a certain brand, name, tagline, key phrase or many more.
|
Provide name or description in the next input field that will be displayed over geo-location |
3. Drag the google map to your desired location and place the Red Letter Pin on that specific coordinate. The lattitude and longitude will be automatically updated in the above text.
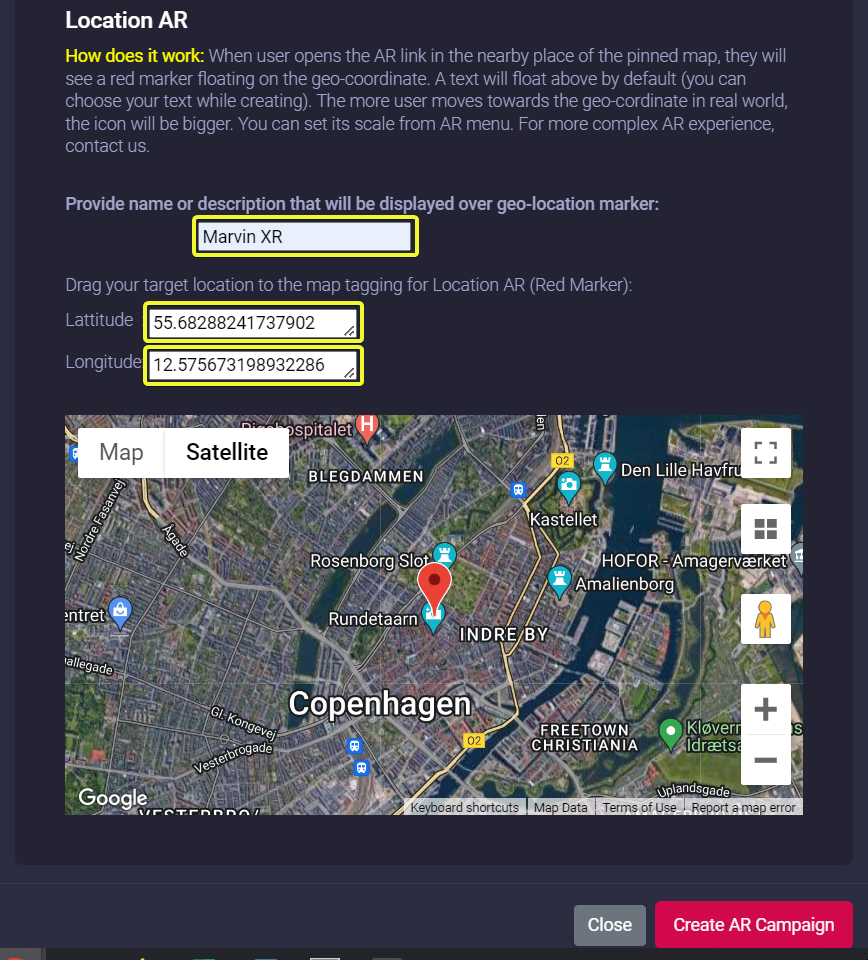
4. Click on the Create AR Campaign button to finish the setup.
Congratulations! Now you have created your first location-based AR campaign. Enjoy the experience.
More config: The location AR text will be visible when you are almost close to 1000 meter from the pin pointed coordinate. The more you'll move towards the location, the bigger the marker-text will be. When you reach the target location, you can view the text in the correct sizing.
How to add image to Location AR campaign
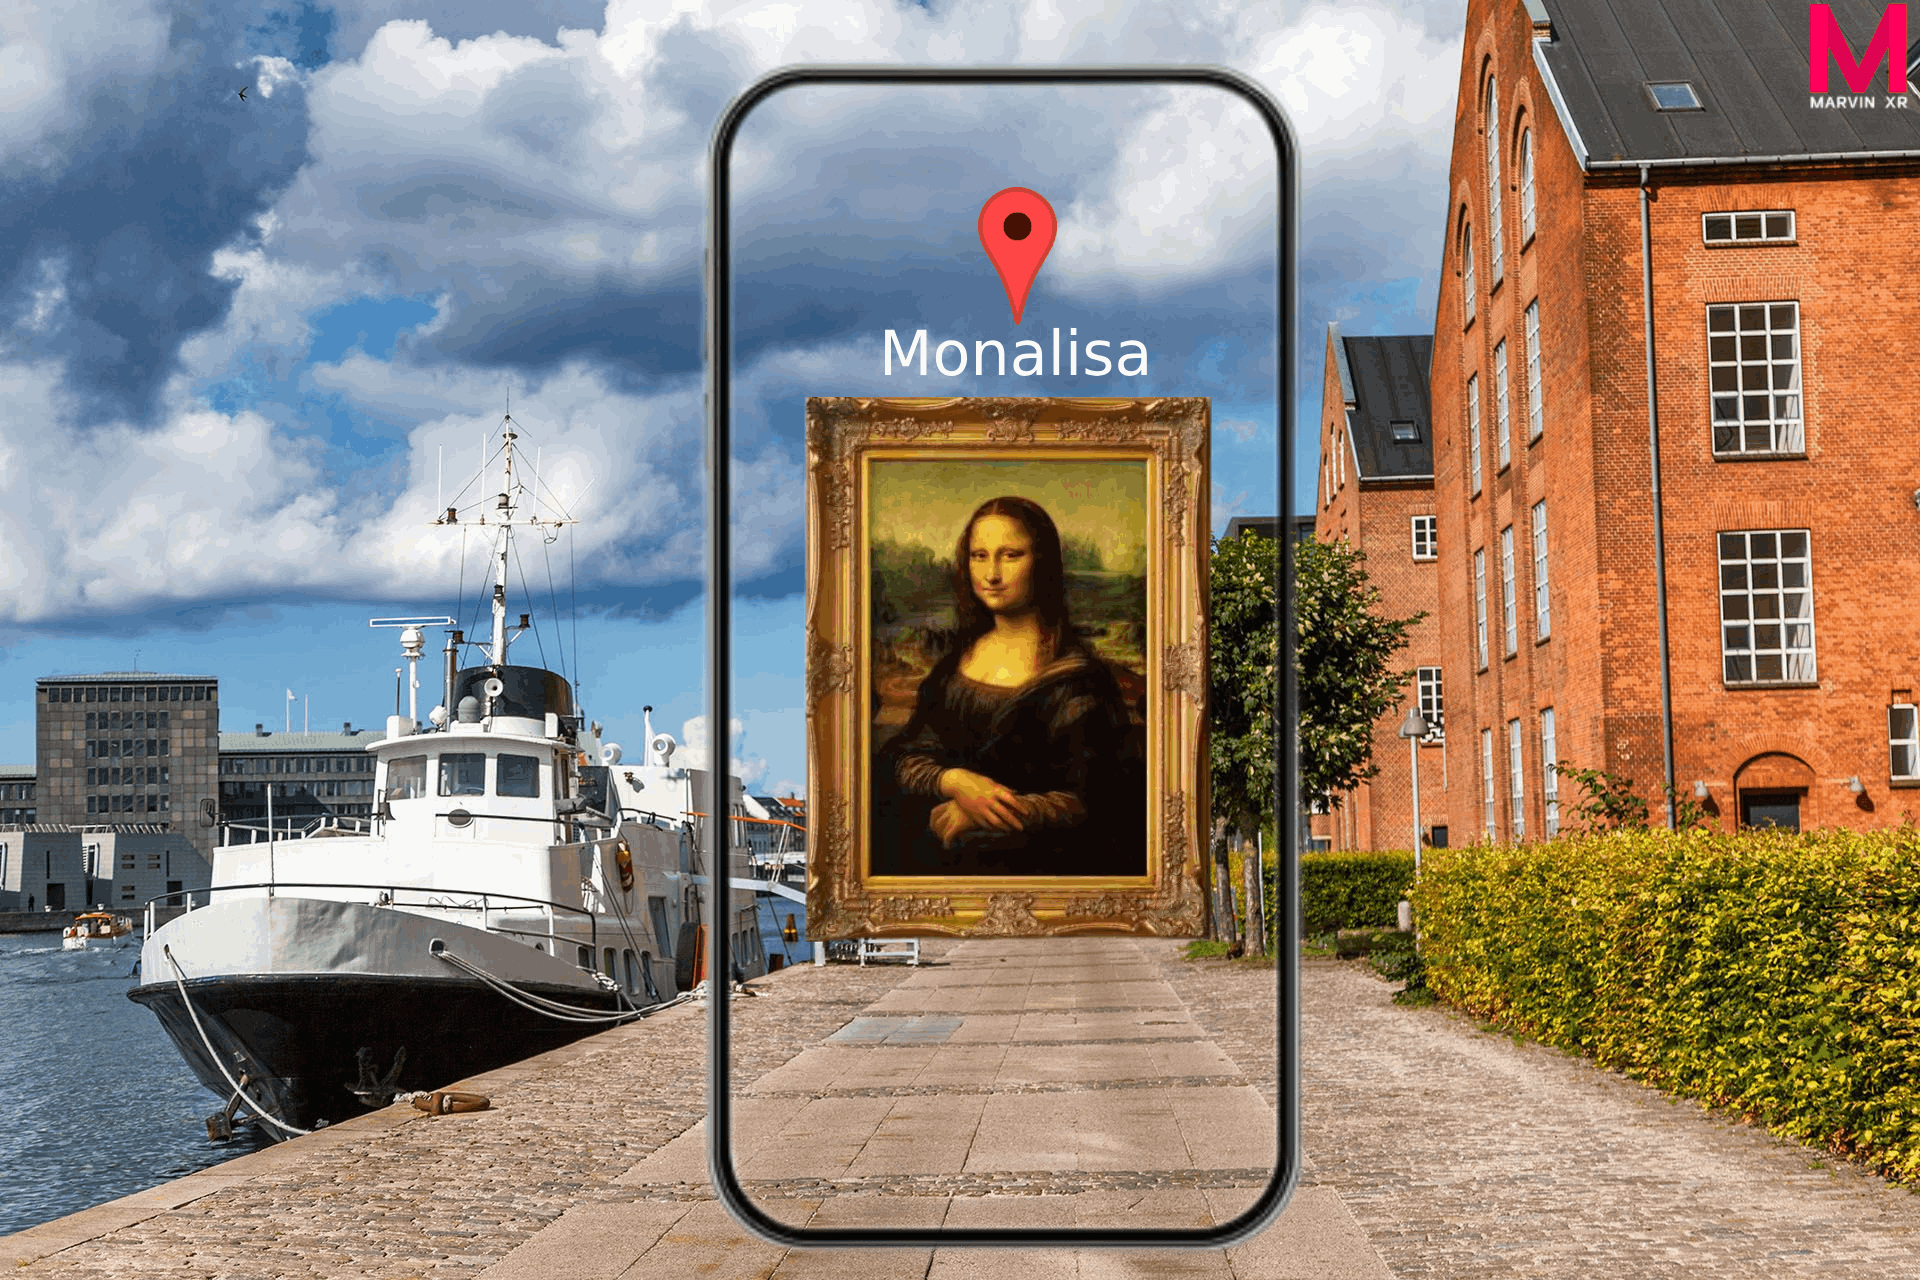
Viewing image in geo-location WebAR can add an extra layer of user curiosity and engagement. This can open an interesting engagement strategy for tourism industry to highlight a local attarction. It is easy to add such experience in Location AR.
Steps to Follow:
Create a new Location AR campaign. Click on the View Details and open the campaign. Go to Web Editor menu and click on Edit button. The default campaign comes up with a location marker (a-link component) pinned to the geo-coordinates along with a text. We need to remove it (so the circular red marker will disappear). Remove this section as highlighted below.
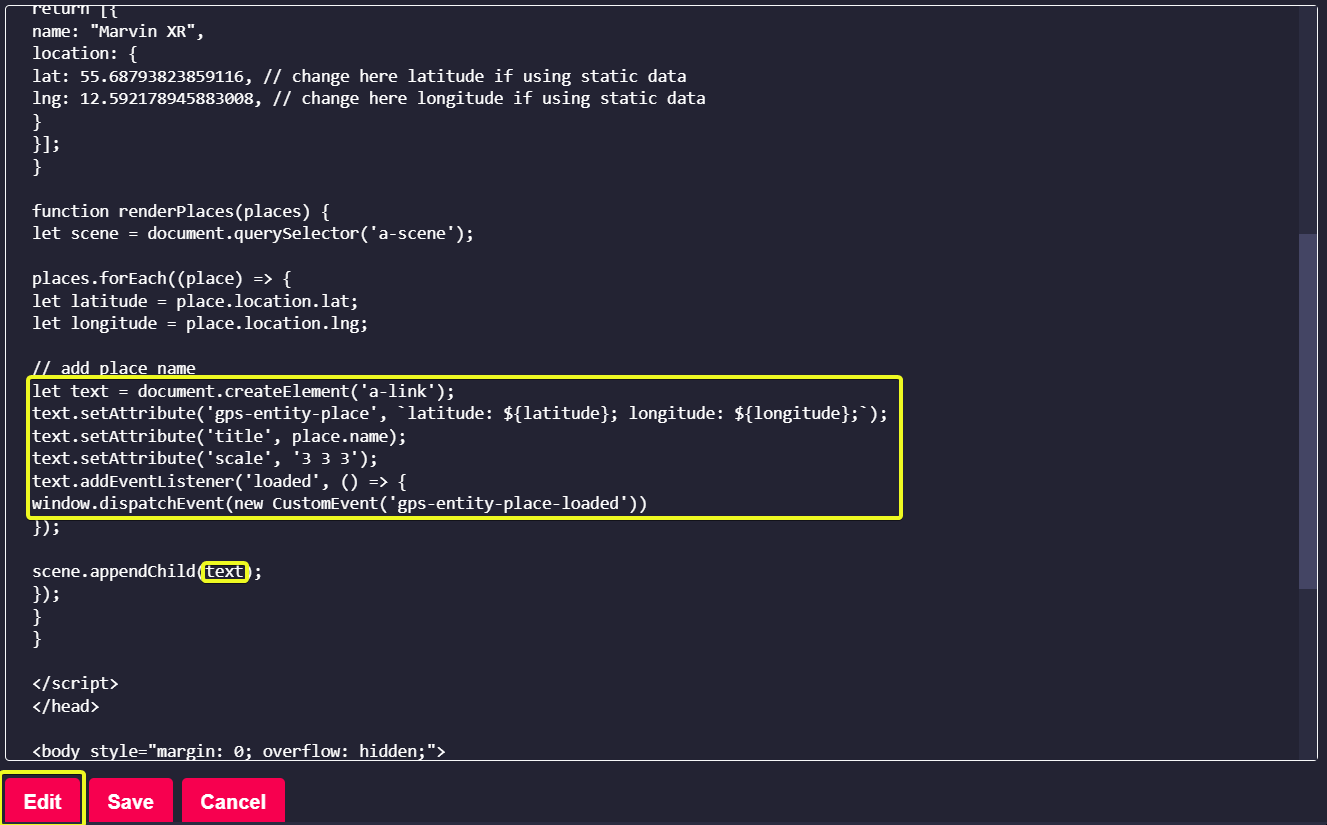
Add this new section which will display an image instead. Copy the following piece of code and insert instead. Please remember few things which will be beneficial for an optimum experience:
- Host your image in hosting site like https://imgur.com or similar hosting sites with public access.
- Scale your image (x:y:z). The further you go away from the geo-coordinates, the smaller it'll become.
- Position (0 0 0) will place the image at the base of 3d coordinates. Change them to shift position.
- Rotation will be helpful if you want to rotate your image in different direction.
let image = document.createElement('a-image');
image.setAttribute('gps-entity-place', `latitude: ${latitude}; longitude: ${longitude};`);
image.setAttribute('src', 'https://i.imgur.com/ORJswXY.png');
image.setAttribute('scale', '100 100 100');
image.setAttribute('position', '0 0 0');
image.setAttribute('rotation', '0 0 0');
image.addEventListener('loaded', () => {
window.dispatchEvent(new CustomEvent('gps-entity-place-loaded'))
});
scene.appendChild(image);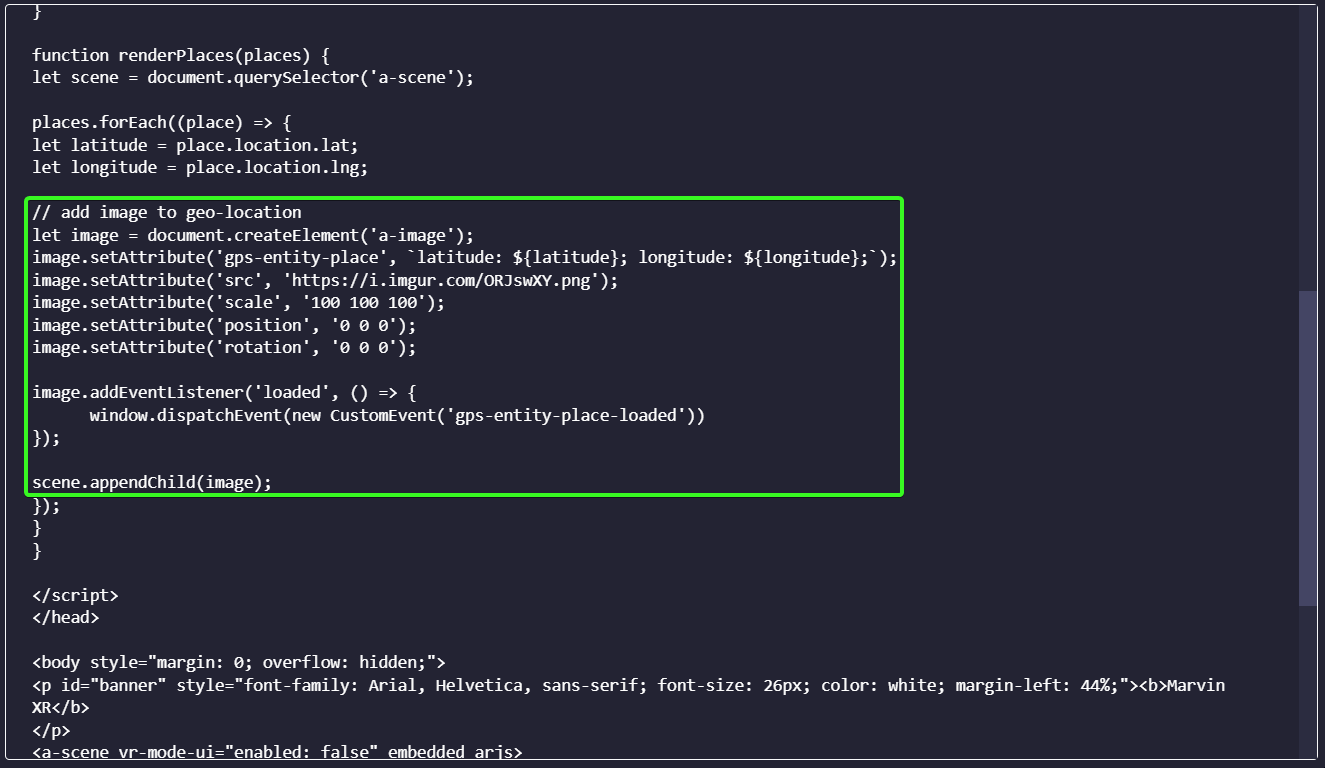
If you want to put your branding experience, replace 'Marvin XR' with your desired text. Now click on Save button to save the configuration. It's ready for testing. Go and test your new Location AR experience.
Add Additional Image to Location AR
It's possible to add more than one image to your Location AR campaign. You need to add similar <a-image> component and append it to the <a-scene>. Please remember that if you add exact geo-coordinates for both the images, they will overlap and the second one will be visible only.
It's a good practice to choose a different geo-coordinate for the second image (for example, 50-100 meter apart in different direction) to make sure both of them are visible side by side or in different direction. You can also use positioning parameter to slide their absolute positions. Always select different variable name (image, image 2 etc.) for each image element (to avoid override).
While you put the geo-coordinate values, please remember to limit the digits after decimal to up to six digits for optimal performance. Google map provides 14 digits after decimal which can increase computation time for the AR campaign to evaluate data everytime, can cause slight delay in performance.
places.forEach((place) => {
let image2 = document.createElement('a-image');
image2.setAttribute('gps-entity-place', `latitude: 55.696068; longitude: 12.505245;`);
image2.setAttribute('src', 'https://i.imgur.com/HxYx4ZT.jpeg');
image2.setAttribute('scale', '100 100 100');
image2.setAttribute('position', '0 0 0');
image2.setAttribute('rotation', '0 0 0');
image2.addEventListener('loaded', () => {
window.dispatchEvent(new CustomEvent('gps-entity-place-loaded'))
});
scene.appendChild(image2);
});
Create a Virtual Image Gallery with Various Images
This part can be little tricky but it can greatly enhance your Location AR experience. You can use this for various purposes. For example, an art gallery can showcase open virtual gallery of paintings at an open exhibition. Traesure hunt can be built around with such experience. Live shows can engage audience with various virtual images floating around them like an open gallery to entertain them. Once again, imagination is your limit here.
Like the previous step described above, you can add various <a-image> block to the campaign. But to show the images all around without overlapping, it's a good idea to spread them in an even state. Here's come the trick. Select up to six geo-coordinates, 50-100 meter apart, in different directions and use each of them for an <a-image> element. For optimal experience, select 6 images per campaign. You can experiment with more to see if they fulfill your criteria.
Note: Geo-location AR is based on satellite data. When a user starts the AR campaign, it fetches data from more than one geo-stationary satellites and assemble them to a singular data to use (since each satellite location data slightly varies based on its angular position from the observer). Now this to and fro communication takes around 240 ms which means there will always be a slight delay from a runtime information.
Manage your WebAR campaign
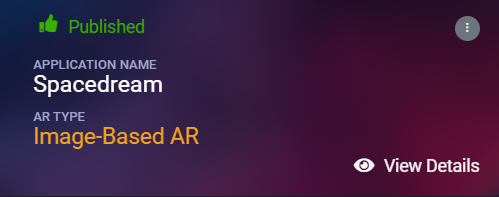
Once you create the WebAR campaigns, you can publish them on a global scale. This means you can use them across digital (embed in a website, add to CTA links/buttons or add QR code) or print (QR code to invoke campaign link to user’s smartphone) media.
It is important that you get hold of the campaign so that if it needs any change or update, you should be able to do it on the fly and publish the reviewed campaign almost instantly.
This is quite important and a beneficial function over any kind of traditional AR apps (Android/iOS) where a single update can take days, weeks or even months before getting published. Moreover, unless users update their apps, the new updates are not going to be visible the them anyway.
WebAR update can be instantaneous meaning any published update will be immediately visible from viewers end with a single refresh of the web browser URLs.
At the same time, getting hold of the runtime KPIs is also important to understand and measure the level of success of any WebAR campaign. This will ensure that you have more insight about your engaged audience. You can retarget them for further campaigns or understand the most loyal segments of your customer base.
In today's world, social media channels are the most effective marketing channels to reach your target audience. It is essential to broadcast and share your WebAR campaigns to the social media channels as soon as you create them.
Luckily Marvin XR has got them all under the hood to provide you a complete platform experience to build, manage, monitor and spread your creative campaigns faster to take a step ahead in the game.
With each AR campaign, a well curated effective workflow is created to help you to achieve your goal. Let's put some light on the following features that come with your AR campaigns.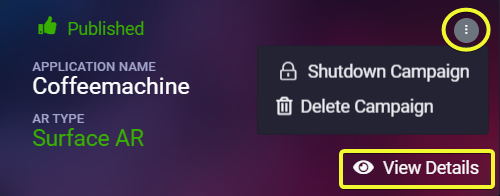
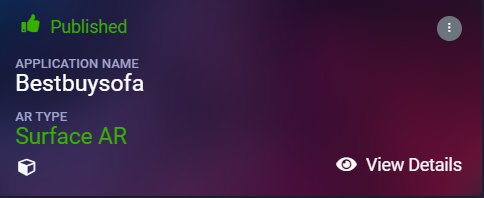
As you can see, each WebAR campaign, shown as a card in your central dashboard has some basic features. You can Delete Campaign whenever needed or you can Shutdown it so it'll not be reachable but you still can keep all the creative work inside. You can start it up anytime from campaign settings.
AR Campaign Menu
This chapter will describe the details of all AR campaign menu and related features inside
AR Menu
Automatic QR Code generation

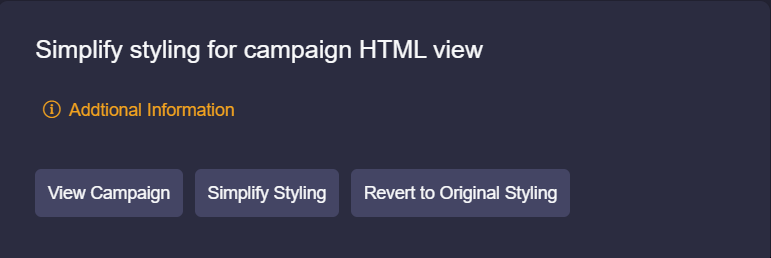
One-click HTML view change for Surface AR
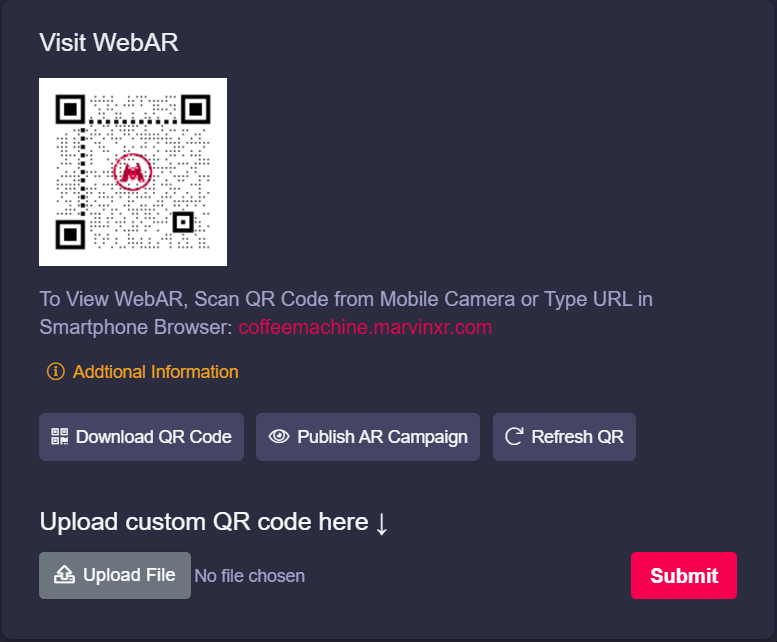
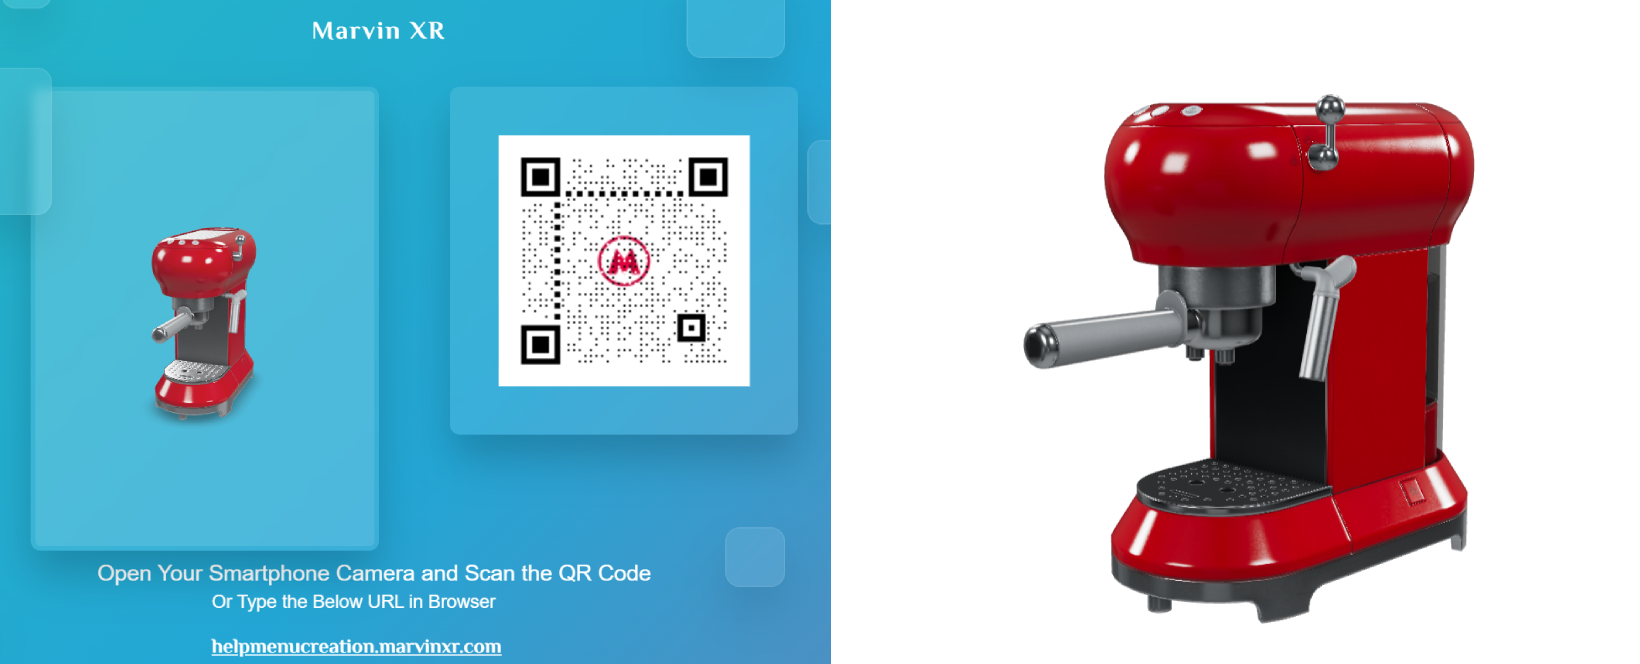
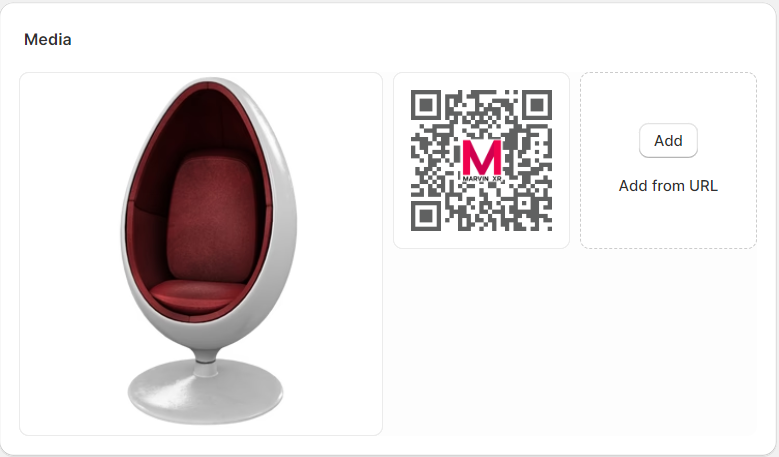
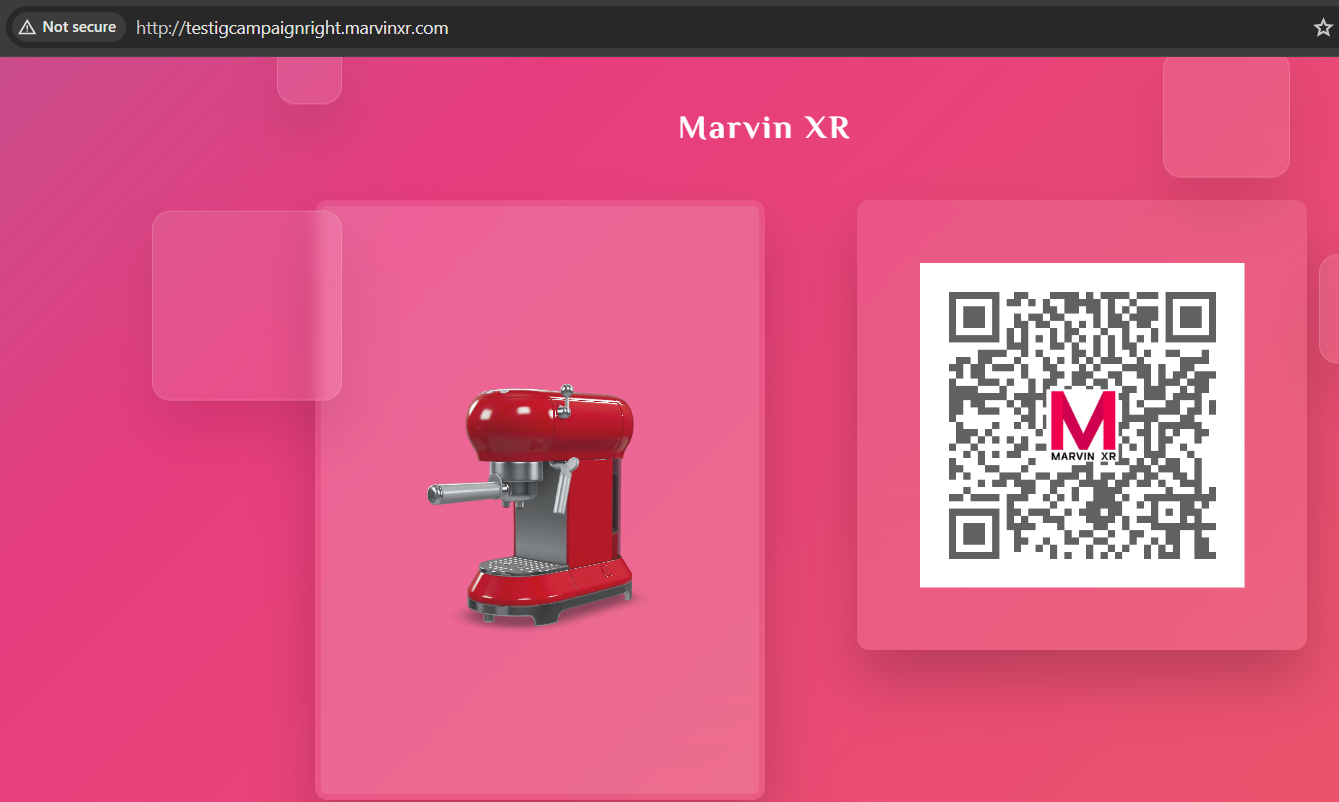
You can always view your campaign from AR Menu page. The default HTML view of the campaign has a unique design. When you open it from desktop, it'll show you the 3D model and the QR code (along with URL details) so that you can quickly test it from mobile scanning the QR from the screen.
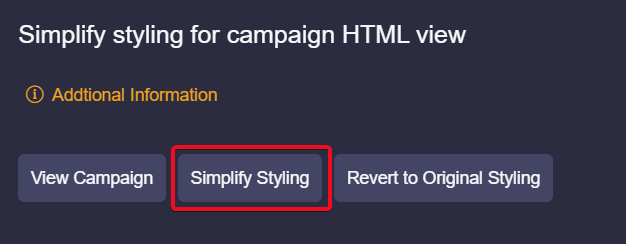
Simplify Styling
Click on Simplify Styling would convert the campaign HTML user interface to minimalistic view immediately.
iFrame - integrate WebAR anywhere
It is crucial to embed the WebAR experience to websites, ecommerce stores or any digital platform. Marvin XR covers it with a single click.
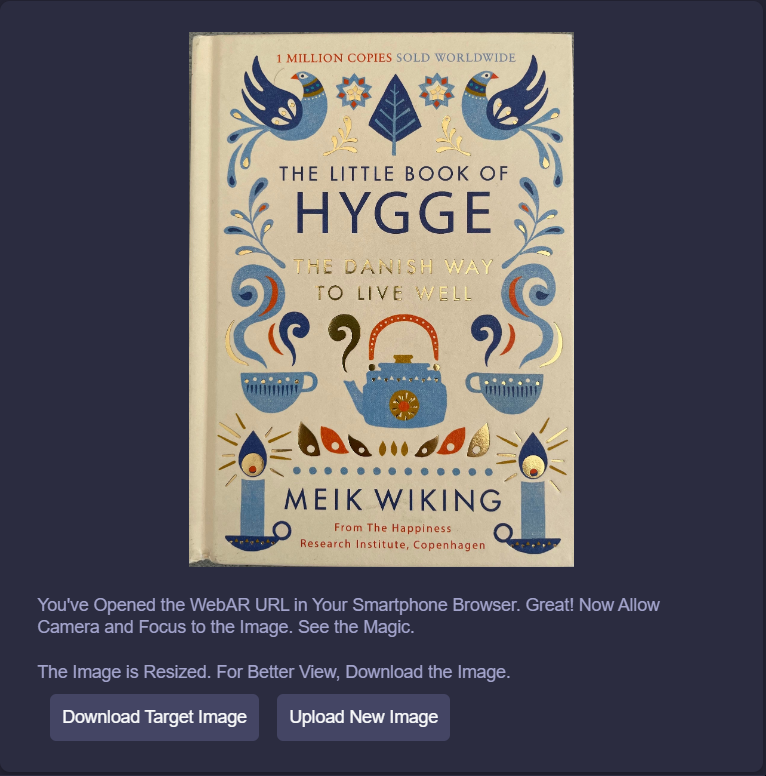
Campaign view for Image-based AR
When it's an image-based AR campaign clicking on View Details will present you different options.
Apart from QR section, the right side of the page will display the target image.
You can download the image to print it or embed it somewhere anytime.
If you want to change it, click on Upload New Image.
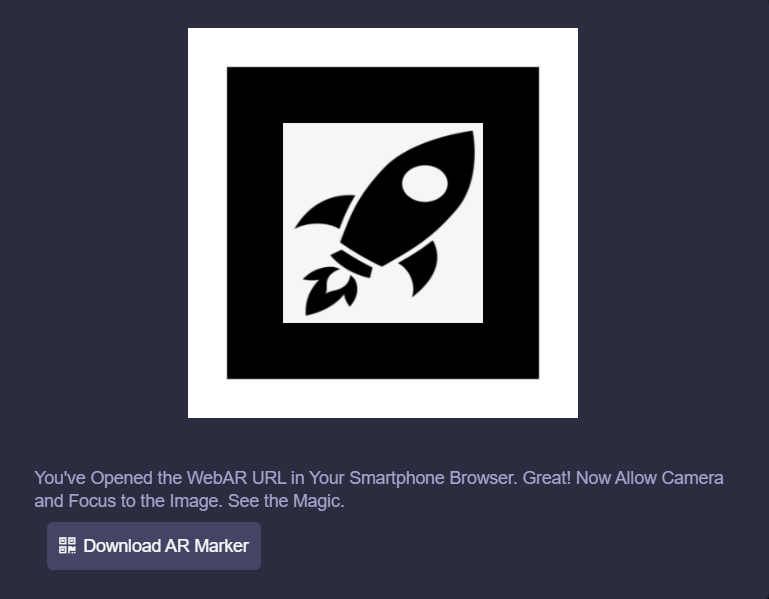
Campaign view for Marker-based AR
For marker-based AR campaig, the view will consist of the AR marker.
Focus AR camera view to the marker and AR will show up on top.
You can download the AR marker and print it i you want to use as a label somewhere.
Campaign view for Eye-tracking AR
For eye tracking AR, you'll have access to 3D web configurator.
Resize the virtual eyewear size, position and scaling from the configurator from campaign editor.
Since eye-tracking AR can be viewed from a desktop, setting its virtual position is quite easy.
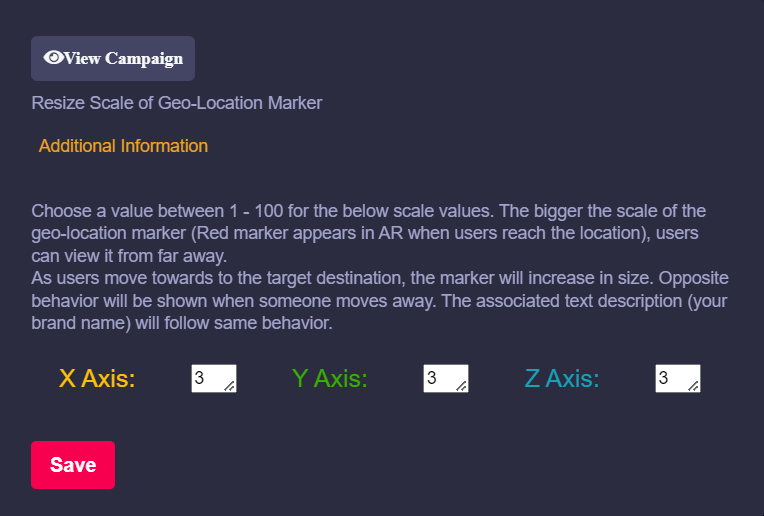
Campaign view for Location AR
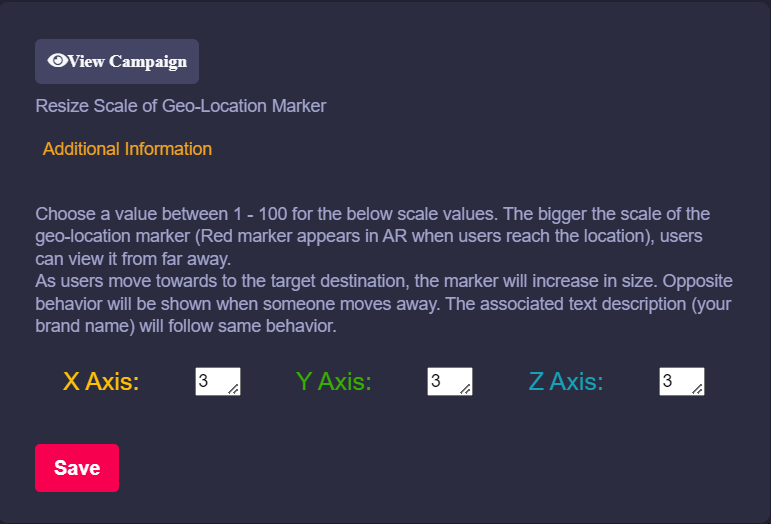
For location AR, you'll have access to 3D web configurator.
Resize the marker text - how big or small it should look like when you reach the geo-coordinate.
1:1:1 - is a standard banner size to be displayed before the viewer within 10m from the target point.
Conclusion
To create and add quick touch of changes to your augmented reality campaign, AR menu can always bring some quick help for your team.
Dashboard
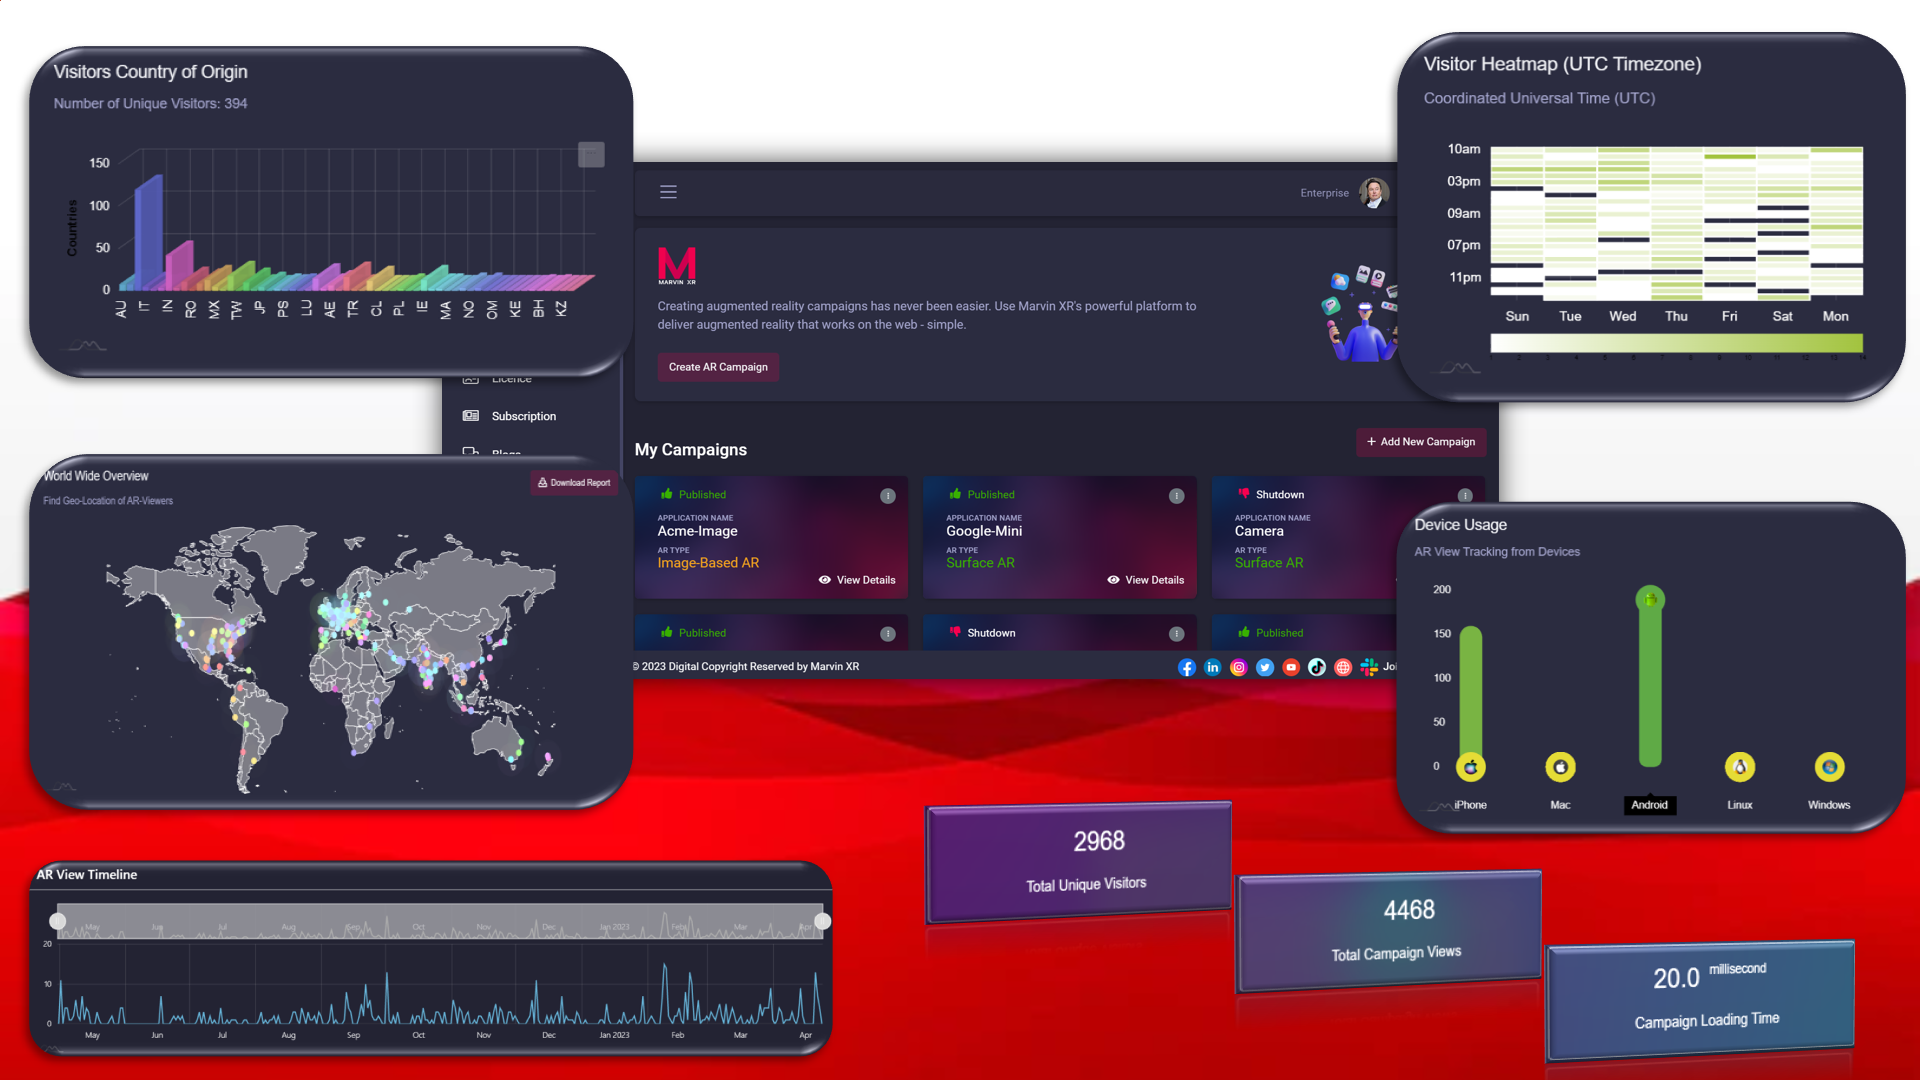
Web augmented reality campaign dashboard is quite useful for the business to track KPIs and have a complete overview of the campaign performance worldwide. Several key information can help business to redefine the strategy for the campaign, retarget customer segment or in case if it's an ecommerce, then even udpate product distribution based on the most engaging and lotyal customer base across geographies.
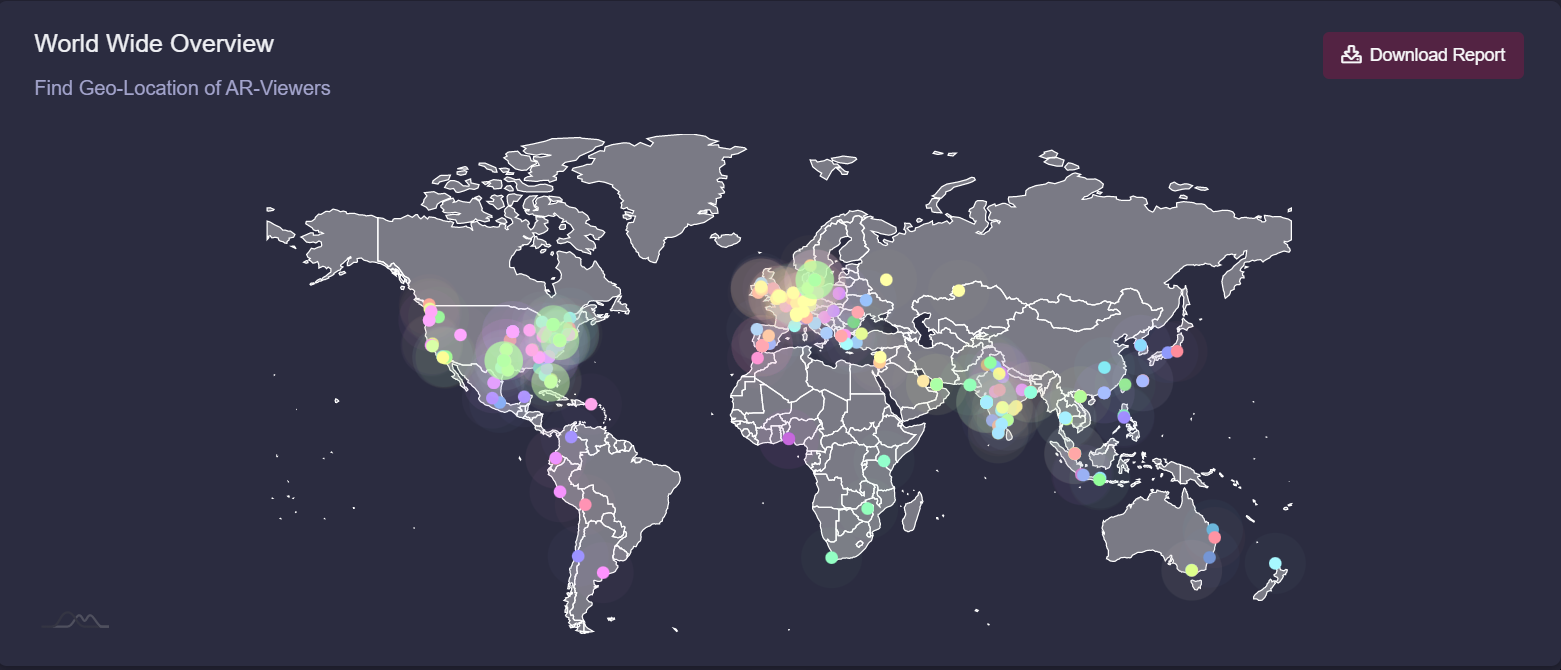
World Wide Overview
Whenever anyone activates the AR from their smartphone, the dashboard shows that IP location of the user. The dashboard holds the total viewers history for its lifetime. You can download the report to excel with all the details inside.
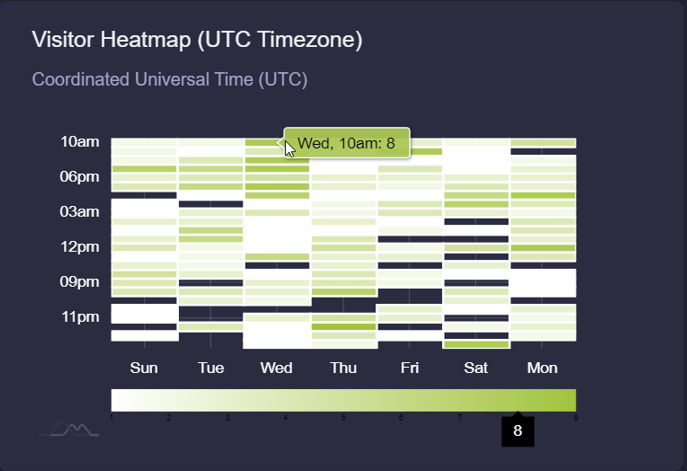
Visitor Heatmap
When does your audience like to engage more with your campaign? This is a critical insight in regards to how you can plan to launch the following campaigns (paid ads, social media strategy or email campaign) afterwards to maximize your chance to close the sales funnel quickly.
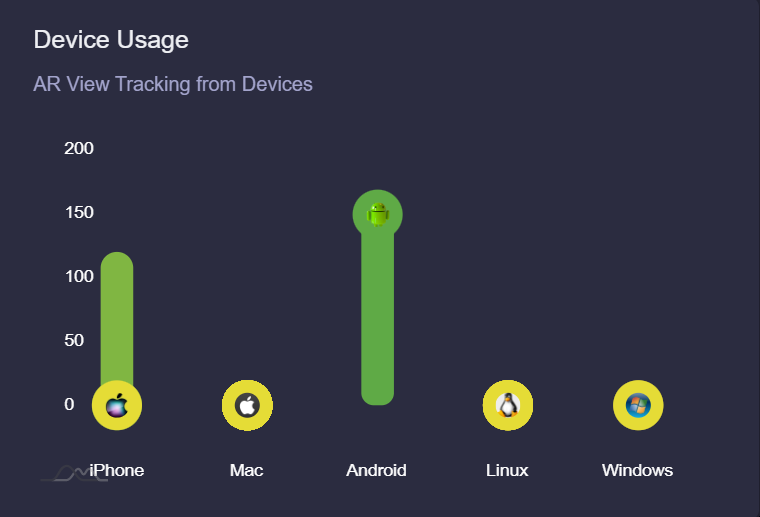
Device Usage
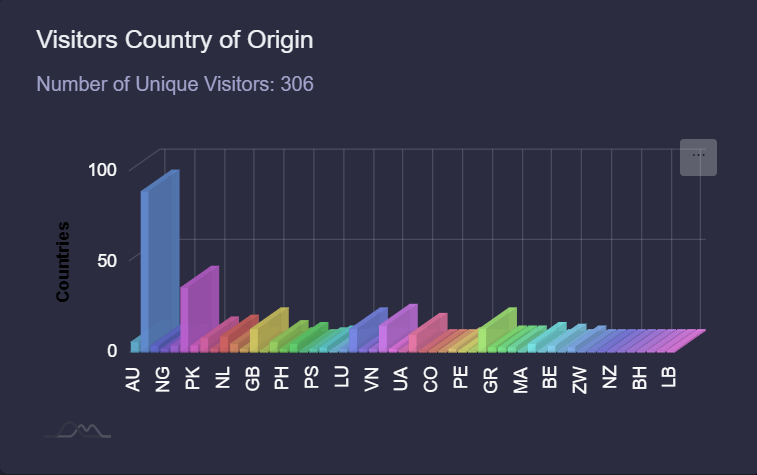
Visitors Country of Origin
When you aspire to launch a true international campaign to spread your brand recognition over internet, this view will help you to grab a fair insight of which country could be your next target to extend your business with more people interested in your product or service.
Browser Usage Statistics
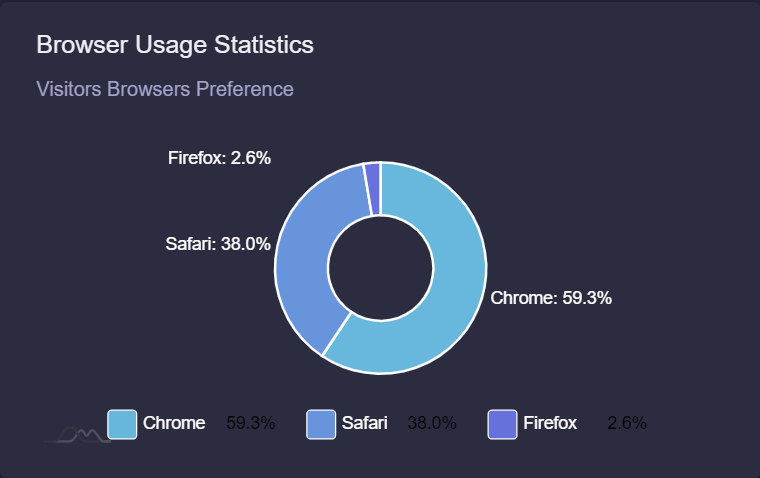
Remember, however, that web browser preference is just one data point among many, and should be used in combination with other data and insights to create a truly effective marketing campaign.
Insight
Web augmented reality campaign insight help you to track your AR campain to the micro level. This is important to keep a progressive overview of your campaign performance and perhaps improve the campaign from time to time or experiment to see the uplift of user engagement graph in the long term.
Total Unique Visitors
A viewer can open an AR experience many times due to its novel and wow effect. But if the user is using same smartphone, opening an AR campaign multiple times will not count the user as multiple persons. It will still be considered as a unique user. Thus the total unique visitor will show your campaign's maximum reach within its lifetime.
Total Campaign Views
As a society, we still widely rely on word of mouth to decide on any kind of purchase. WebAR campaign can manifest it to manyfold with its unique user experience associated. Often, upon discovering, users are keen to show the experience to their friends and family. As a result, one user can view a campaign multiple times. We capture the total campaign views too.
Campaign Loading Time
WebAR campaign's success depends on its agility and speed to get loaded faster in users' smartphone. Too much HTML components associated can overkill a campaign. The rule of success is to keep things simple. Your campaign loading time is a valuable metric to measure the performance benchmark under ideal conditions.

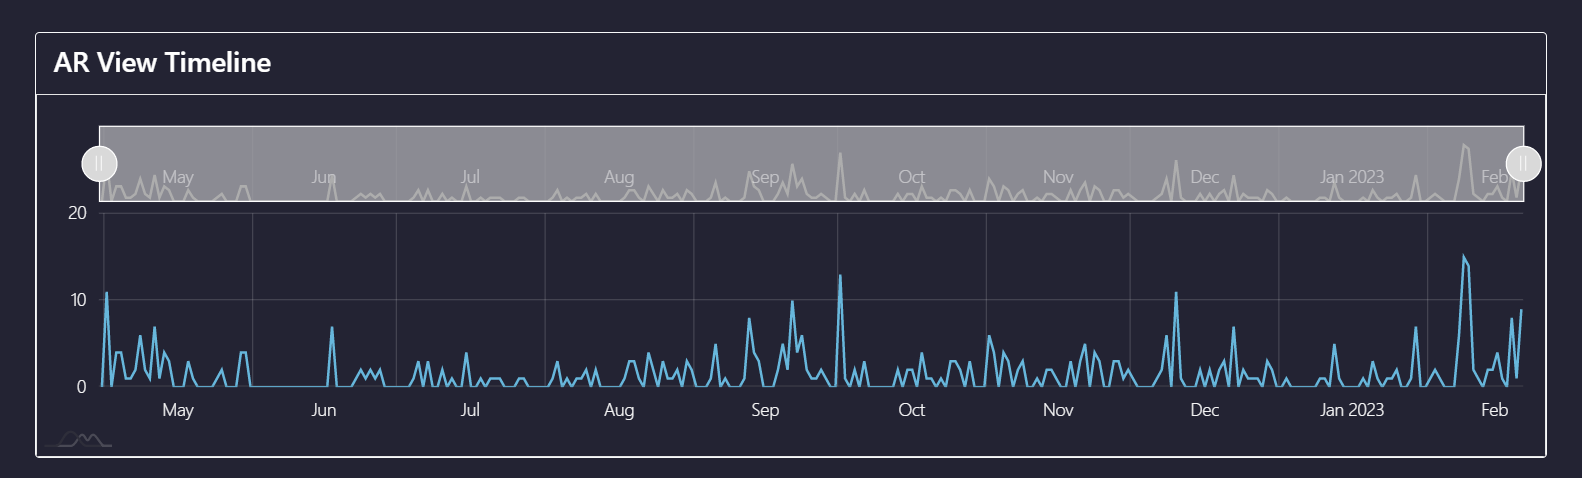
AR View Timeline
Your campain lifetime performance index is enlisted within this segment. The daily user engagement will highlight the performance from day to day. If you want to analzye a specific timeline, just drag the above bar to increase or decrease the span of your search time period. This way, if you are running an AR campaign for a longer period of time (typical with ecommerce related SKUs), getting back to past and analyzing certain phases could always be useful for business insight.
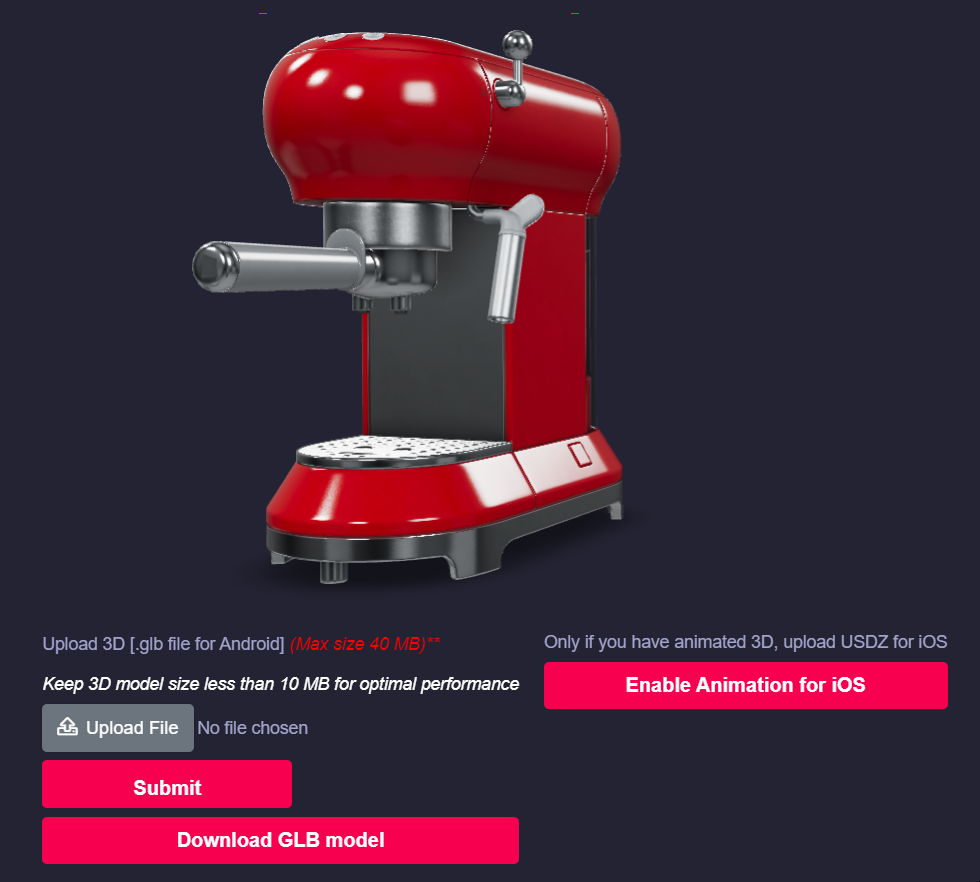
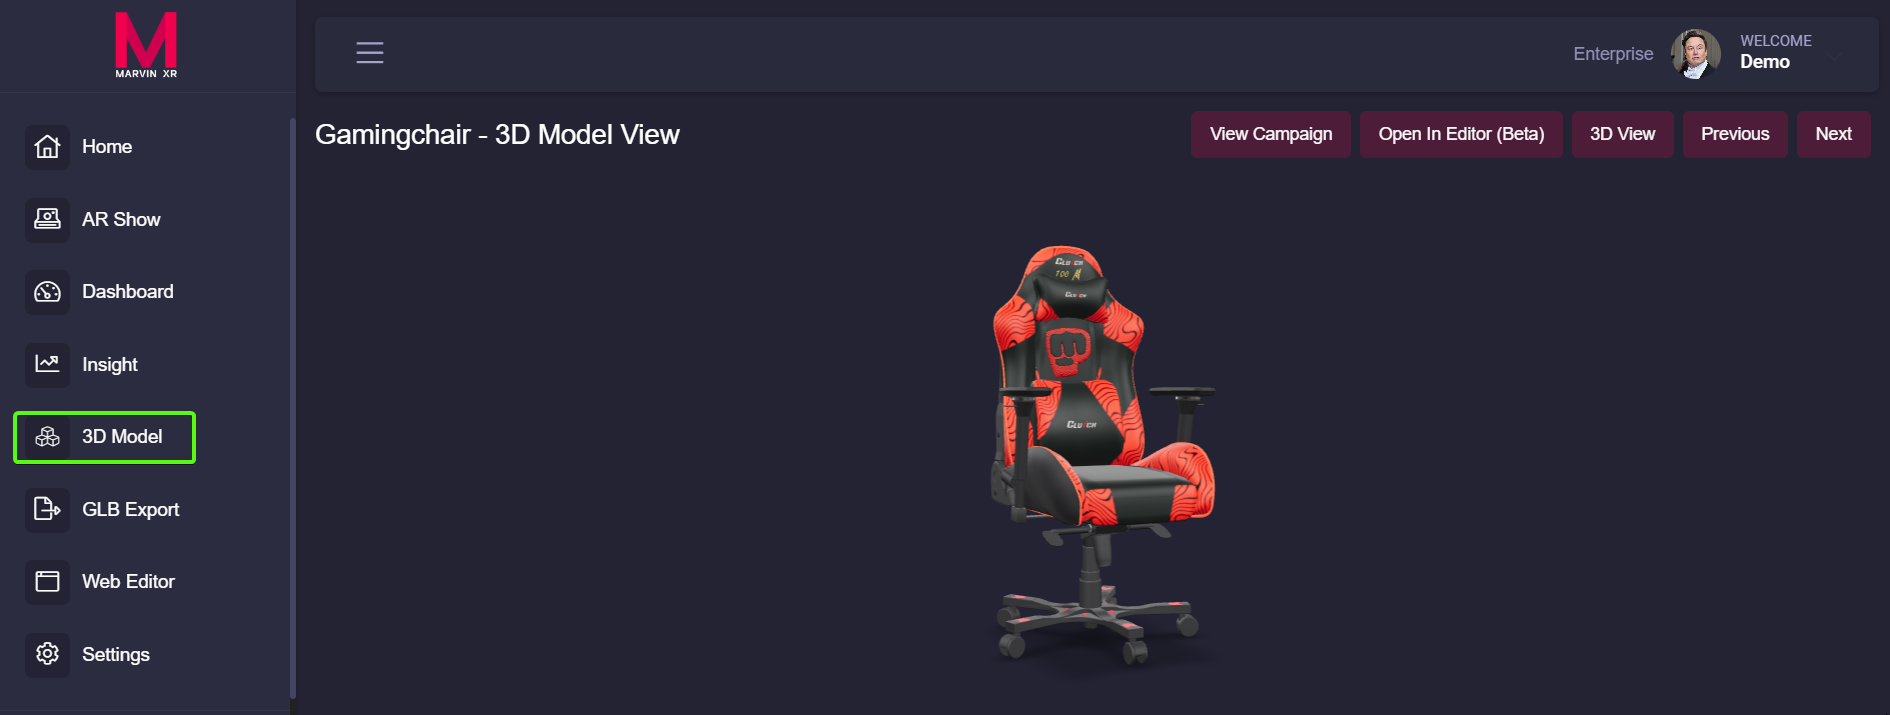
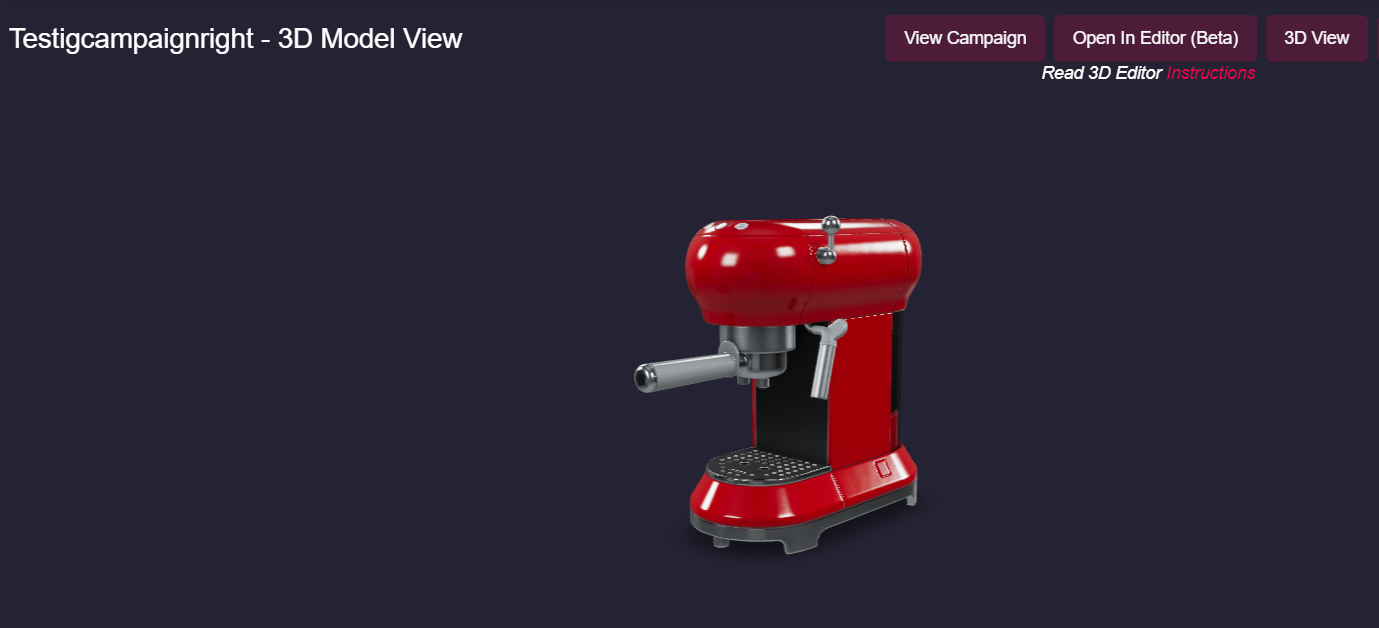
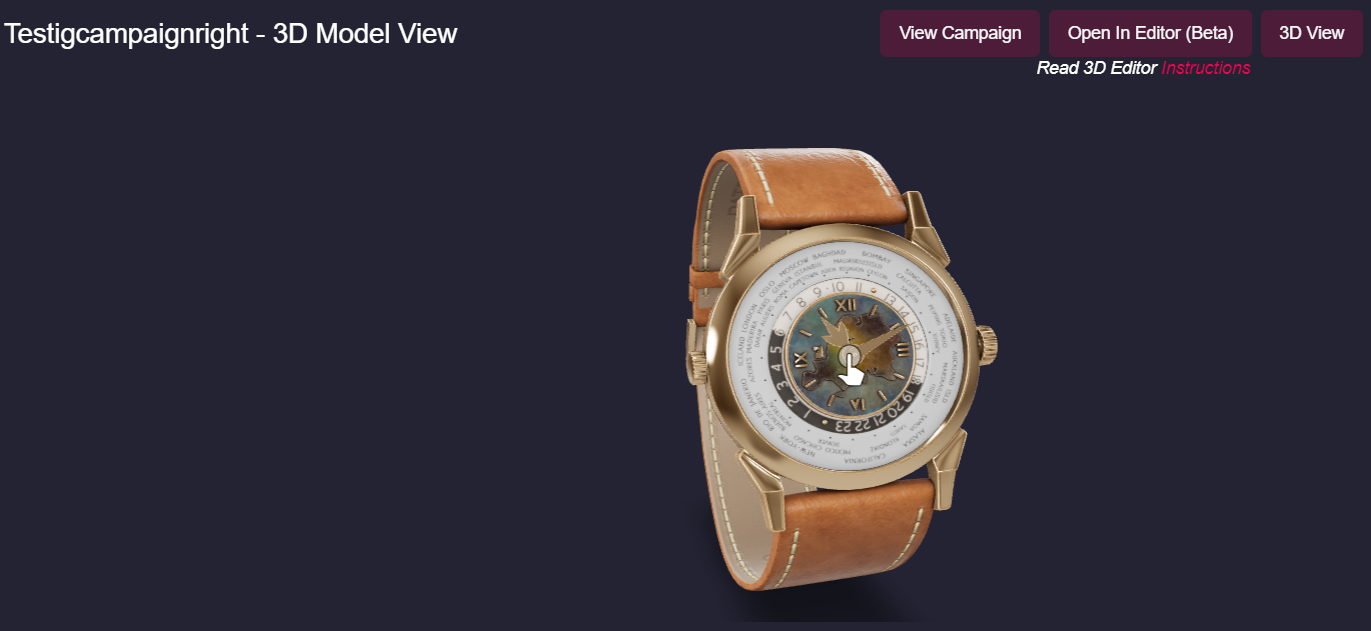
3D Model
3D Model View is to help you to get an overview of the 3D model that you are using for your AR campaign. From here, you can upload a new 3D model anytime which would get reflected to the campaign immediately.
|
There is no upper limit restriction to upload a 3D model of any size. But for webAR, the smaller the 3D model size, the better the campaign performance will become. |
3D Model View for Surface AR
It is recommended for Surface AR to upload a GLB and a USDZ model whenever you want to change.
|
Please note that for animated 3D models, the above steps will not work |
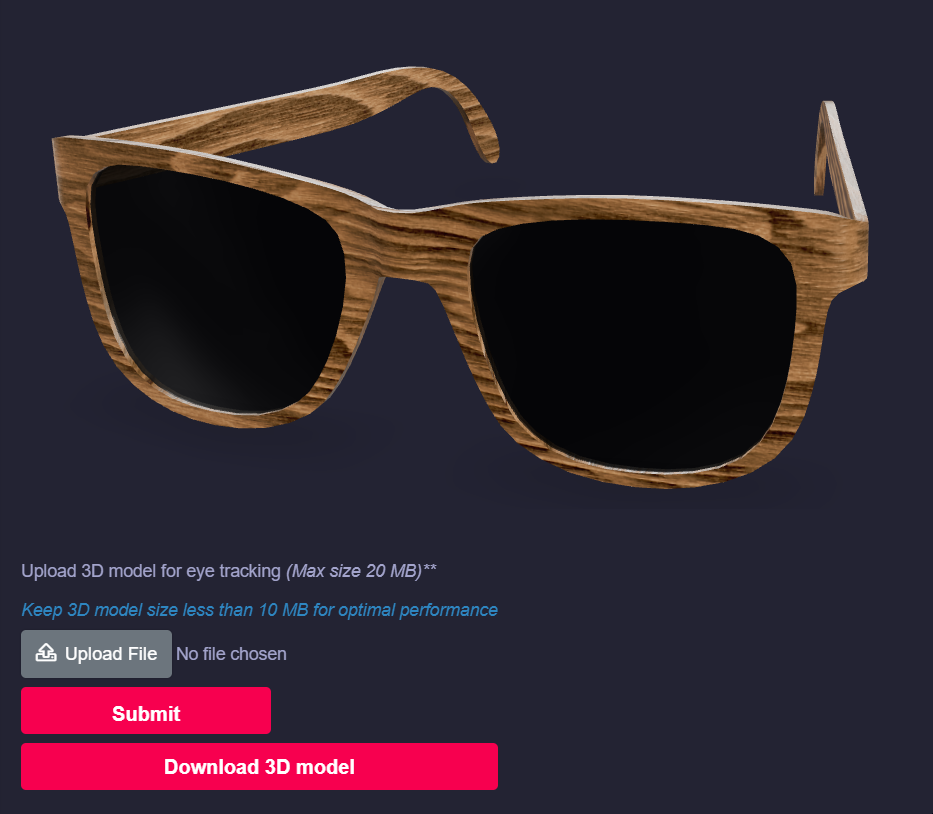
3D Model View for Image-based AR and Marker-based AR
For image-based and marker-based AR, you need to upload GLB 3D model only.

3D Modle View for Eye Tracking AR
For Eye tracking AR, you need to upload GLTF model.
GLB Export
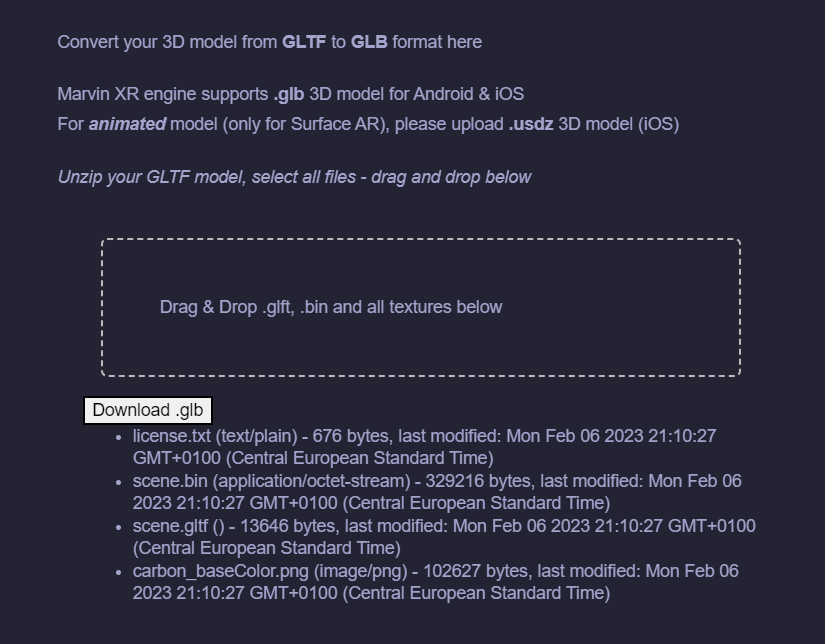
You are ready to build the first web based AR camapign but you don't know how to get the GLB format for 3D model? No problem, we have a solution ready for you. In the world of 3D modelling, several mainstream formats are available. Some of the most common 3D file formats are:
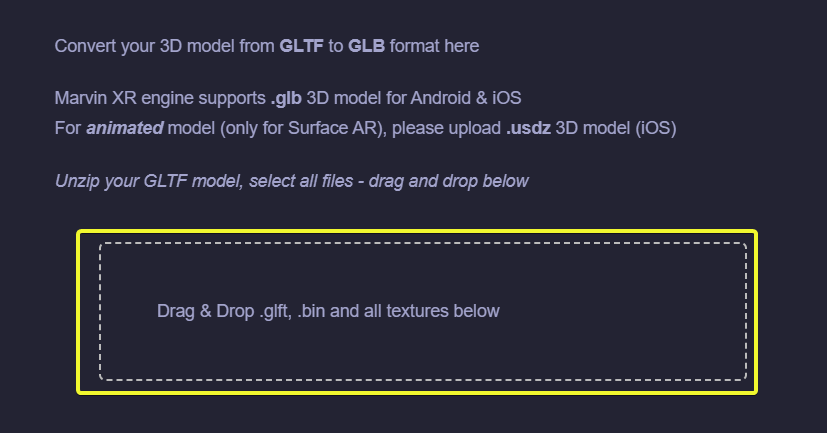
Unzip your GLTF file within your computer, select all the files inside and then drag and drop them into the above marked area. Your GLTF will be immediately converted into GLB file and get downloaded automatically.
|
If .glb does not get downloaded automatically, please click on Download .glb button |
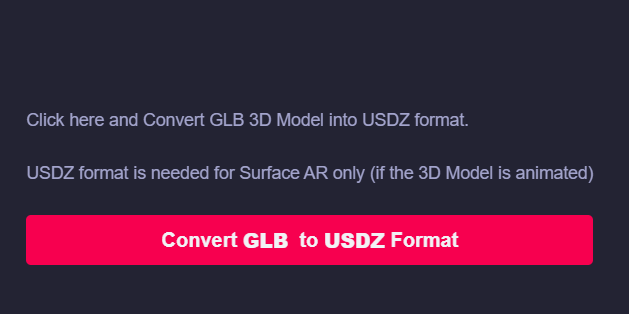
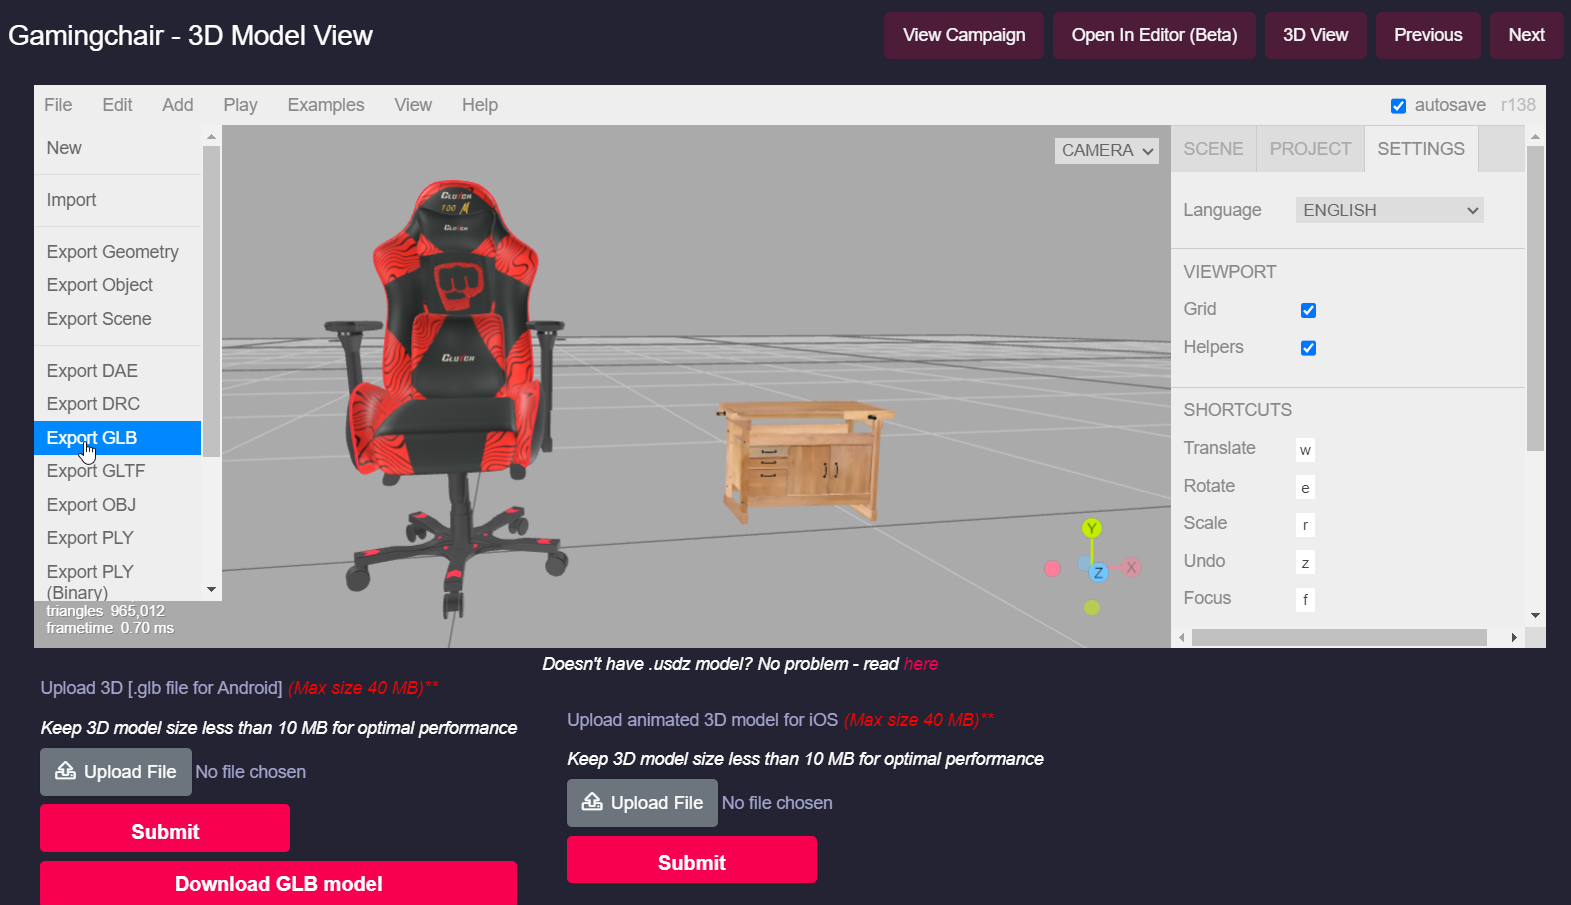
If you want to convert GLB into USDZ format - click here. This is a drag and drop USDZ builder:
2D Compiler
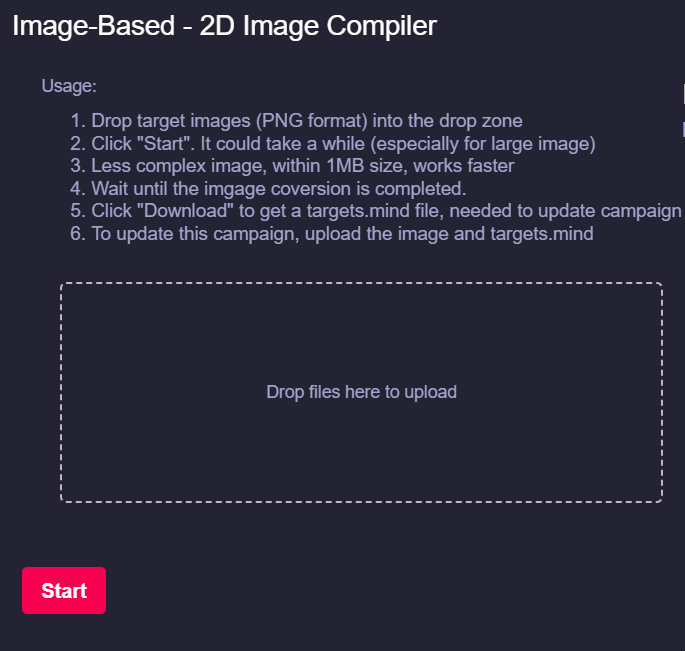
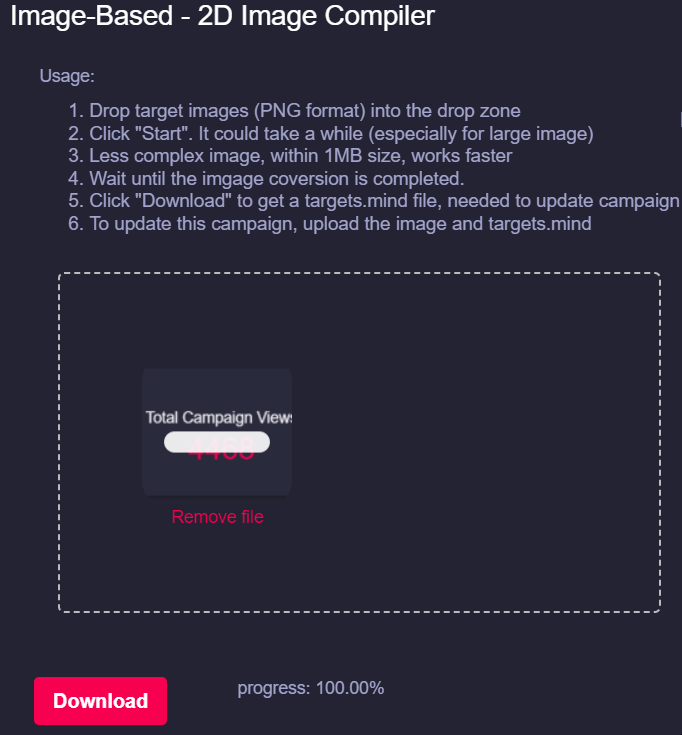
2D Complier works in a very simple way. Get your new target image and drag it to the above box - Drop files here to upload and click on Start button to create the camera identifiable format (targets.mind). Based on the size and complexity of the image, it can take from few seconds to minutes to complete the step.
|
Always get your target image in .PNG format |
|
Do not change the name of the camera recognition model file. Keep it as targets.mind |
Web Editor
|
Change HTML view of your AR campaign using Web Editor |
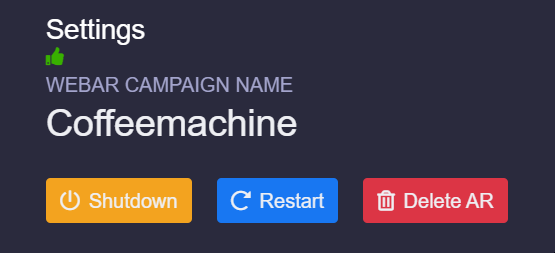
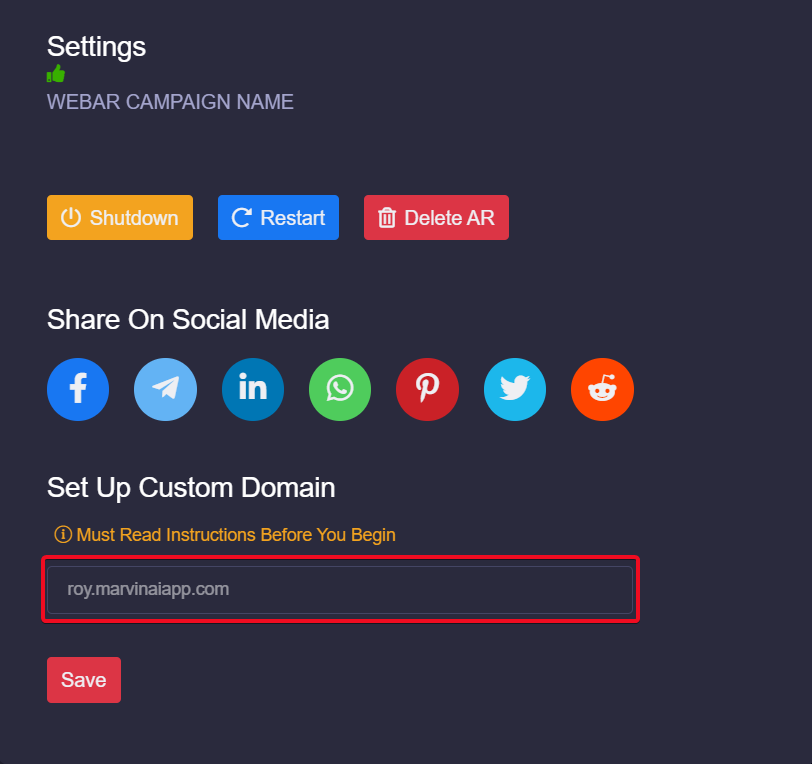
Settings
Shutdown
Restart
Delete AR
You are done with your AR campaign. There is no need to keep it there. Delete it for good.
|
Once a campaign is deleted, it cannot be recovered again. All data associated will be gone too. |
Share AR campaign on Social Media
One of the key metrics for a WebAR camapign success is to bring it towards as many as possible audience segments. Social media channels are great to share your work to the world. Share the campaigns directly to all major social media at once.

Create Custom QR
Branded QR Can Bring Loyal Audience to AR Experience Easily
Whether it is a print or digital platform, QR code always plays a crucial role to invoke WebAR experience. Building a high definition branded QR code still requires some effort and expertise. So Marvin XR has taken the initiative to close the gap and helps its users to build custom QR code within seconds.
Steps to Create Custom QR Code
To use a branded logo inside your WebAR campaign QR, you need to follow the below steps:
1. Go to your preferred AR campaign and click on View Details. You'll land up in the AR view menu.
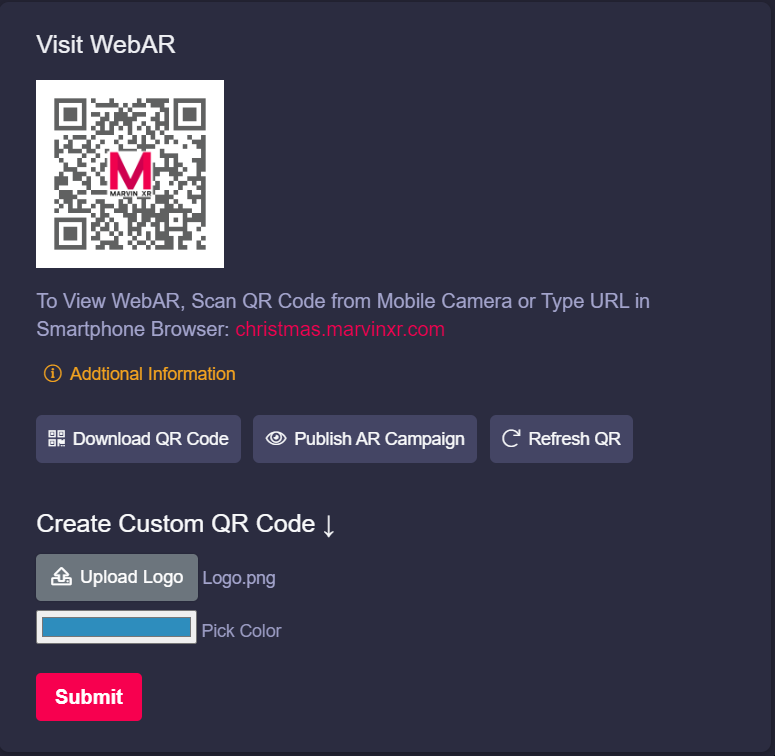
2. Upload your preferred logo. The logo should be in PNG format.

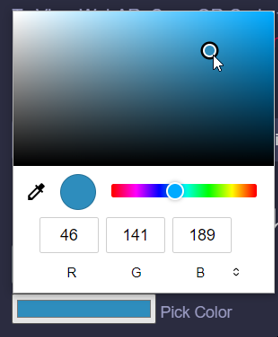
3. Choose your favorite color which will mark the QR background color. The whole new color picker editor will save your time to choose the perfect blend of color for the QR code.
4. Click on Submit button and see your new QR code gets generated immediately.
If the QR code does not changes immediately on the page, it could be because of your browser cache.
Use your keyboard to click Shift + F5 to clear browser cache and refresh the page. New QR will appear now.
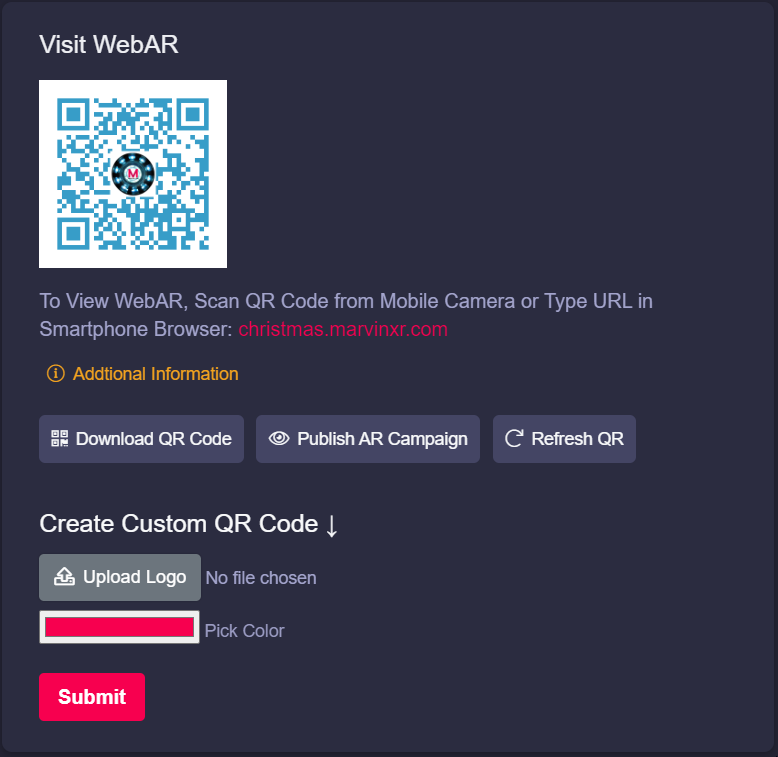
5. If you want to get back to the default QR code, click on Refresh QR button.
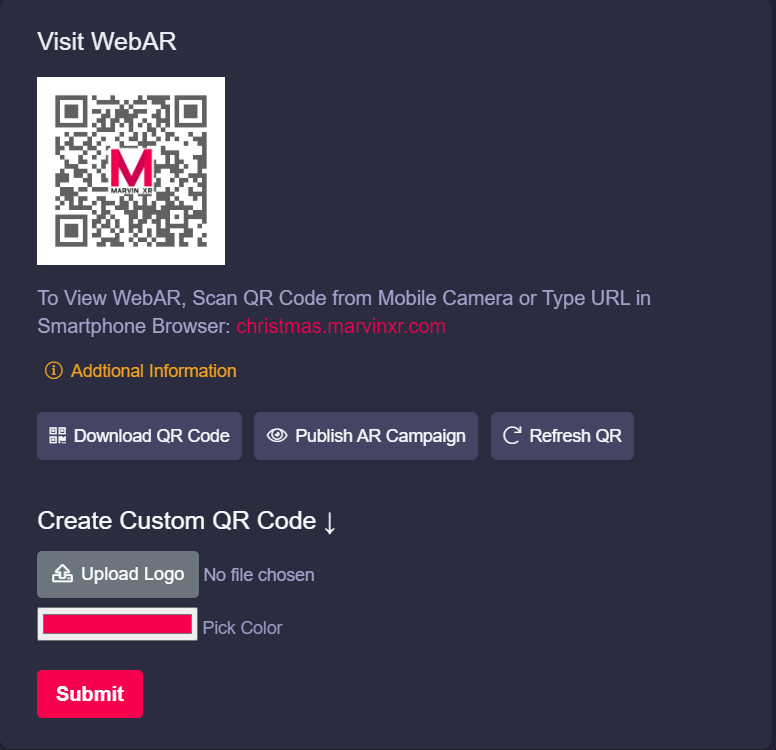
Enjoy the world of creativity with Marvin XR.
Custom Domain Mapping
What is Custom Domain Mapping?
Benefits of using Custom Domain Mapping for WebAR Campaigns
- Professionalism: Custom domain mapping helps to establish a professional brand identity for your WebAR campaign. When customers use your product with your own domain name, it shows that you are serious about your business.
- Credibility: Having a custom domain name makes your product more credible and trustworthy. Customers are more likely to trust a product with a custom domain name than a product with a generic domain name.
- Branding: It allows you to use your own brand name in the product URL, which can help to reinforce your brand identity and increase brand awareness.
-
SEO: Improve your product's SEO by allowing you to use your own keywords in the URL. This can help your product rank higher in search engine results pages (SERPs).
- Flexibility: It provides greater flexibility if you want to use your own domain name with your product. This can be particularly useful for businesses that have multiple domains or want to use a specific domain for a specific product.
- Better User Experience: A custom domain name that matches a business’s name or brand is easier for customers to remember and identify. This results in a better user experience, as users can quickly find the product they are looking for and can easily return to it in the future.
How to add Custom Domain for WebAR Campaign
- Click on View Details of AR campaign and go to Settings menu.
- Add new CNAME at your DNS provider and map Content with this campaign name

- Wait for 30min for DNS provider to propagate it across global DNS servers
- Use same CNAME as an input here (without any HTTP/HTTPS)

- After saving the new custom domain address (DNS). Wait for up to 2 min to take effect.

- Now try your new DNS address in browser with HTTPS


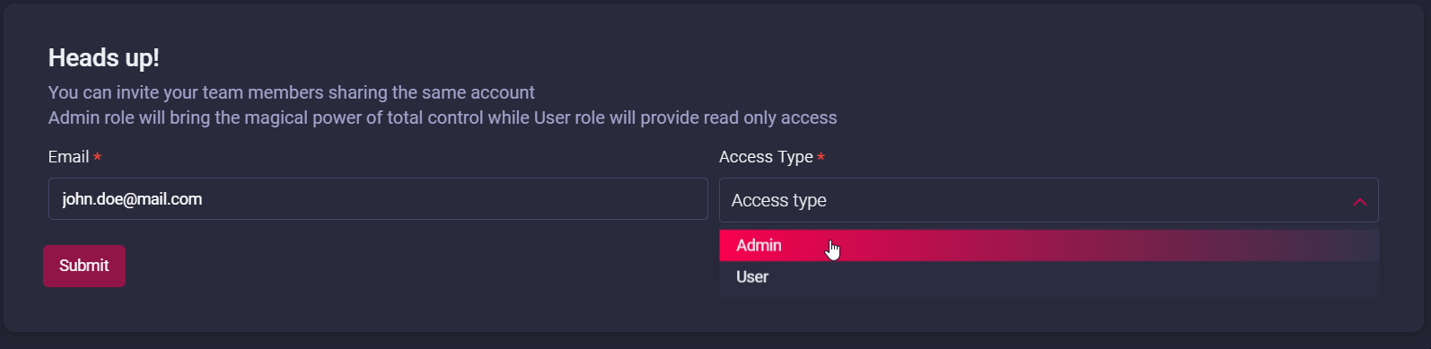
Team
License

Security and GDPR
Overview
Marvin XR is a security first SaaS platform. The core foundation of this platform is to ensure enterprise grade security for your WebAR campaigns. Core features of this platform are based on DevSecOps model.

Environment and Data Security
- Linux based Operating System:
Linux systems are rarely infected by malware such as viruses, worms etc, thereby making it as a very secure OS. As a normal user, we will never come across a situation where Antivirus software is been sold for Linux.When a Linux system is compromised, virus or malware will not get the root access to damage system wide. Only local files and programs of users will be affected, as the normal user will not have access permission to all the files in the system. This leads to least effect of virus in systems with Linux. As Linux users don’t have root access, it is difficult to cause damage on Linux. - Application Security Framework:
Marvin XR platform is developed based on the globally highest ranked, most secure application framework, among many. By default, it prevents most of the common security vulnerabilities like- Cross site scripting (XSS) protection- Cross site request forgery (CSRF) protection- Safe password hash (SHA-256 hashing algorithm)- SQL injection protection- Clickjacking protection- Encrypted connection - Containerized Architecture:
WebAR campaigns represents isolated containers running microservices separated from each other and the network. This includes both in transit and at rest data, since both can represent high-value targets for attackers. All container storage are encrypted with hashing algorithm to ensure their integrity, security and least possibility to transmit data in between them. Thus, if any live AR campaign, if gets compromised, will never impact any other in the system. The removal of a rogue campaign can ensure safety of the environment. - Auto Renewal SSL Certificate for AR Campaign:
SSL certificate is authorized to every AR campaign by Lets Encrypt Certificate authority to enable HTTPS.SSL (Secure Sockets Layer) is the standard encryption technology which establishes a secure connection between a web browser and the server. This ensures that all the data which passed during the connection remains private and encrypted. SSL is used to protect the sensitive information entered by visitors.To enhance security, every 60 days, the SSL certificate is auto-renewed. This minimizes the chance of further security vulnerabilities.
GDPR (General Data Protection Regulation) Compliance
- EU Based Cloud Datacenter:
Marvin XR is an AWS global startup partner and its datacenter is located within EU. Location restriction ensures that all the intellectual assets and data remain inside EU arena. - Data Controller:
Marvin XR works as a data controller of its customer campaign related data. Being a data controller, it ensures that all the data remains safe inside the secure cloud infrastructure with necessary safety measures like network layers, access-control based OS and permission check for them to be accessed only by its customers and admins of the platform. - Data Protection:
The platform keeps record of all user data and does not store any personal data with which a person can be identified individually. This is to ensure inidividual data privacy.
At the same time, Marvin XR does not use any third party plugin like Google Analytics which can feed on AR campaign generated user data and store somewhere beyond the control and reach of Marvin XR and its customers. This policy is to ensure absolute control of campaign related data remains with the platform. - Data Deletion:
Marvin XR ensures that upon deleting any AR campaign, all historic and current data related to the campaign are deleted instantly without the chance of reverting back. This is to provide freedom to the customers if they choose to delete all their campaign data if they want to leave the platform. At the same time, Marvin XR cannot hold the responsbility to access, manipulate and use the data afterwards.
Conslusion
There are many more security insights built inside Marvin XR platform making it a robust and trustworthy SaaS platform for enterprises where security is the preliminary level of qualification for software adoption. It differentiates itself from the market competitors with advanced level of security that no other competitor offers today. This is the right solution for your business to start growing with WebAR experience.
3D Editor User's Guide
Introduction
We have released a much waited feature - Web Editor for 3D Models in Marvin XR. This will help the creators to build WebAR campaigns faster. If you are going to use 3D Editor for the first time, the following guide will help you to make it a useful tool.
How to use 3D Editor
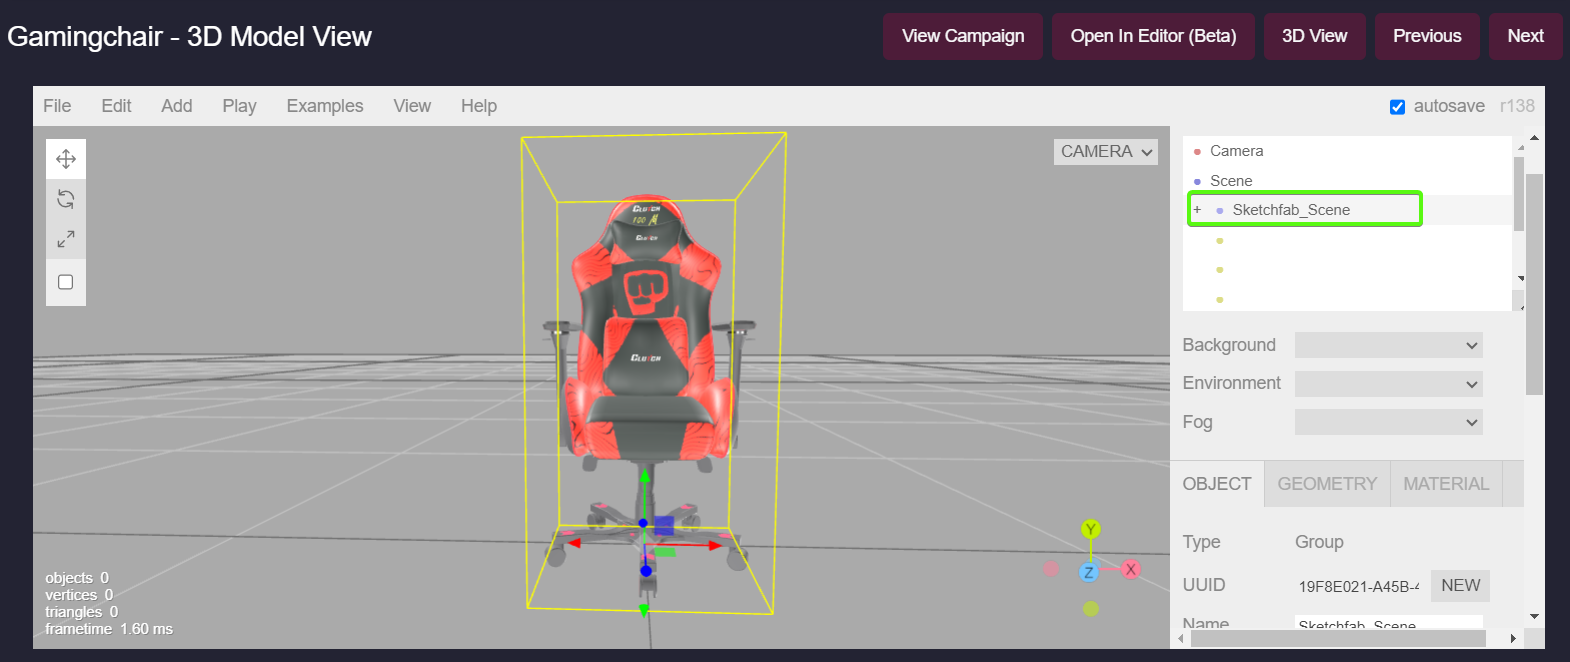
Open any AR campaign and go to 3D Model menu. This is where you can manage your 3D asset for your AR campaign.
Click on the Open in Editor button - this will open the 3D model in 3D Web Editor.

Scroll your mouse to zoom, right click to drag the view and adjust accordingly.
At this point, the 3D model is still non-editable. You need to follow a simple step to make it editable.
Go to the right panel of 3D Editor and click on Scene option (under Camera).
Scroll down to UUID menu and click to adjacent button NEW.
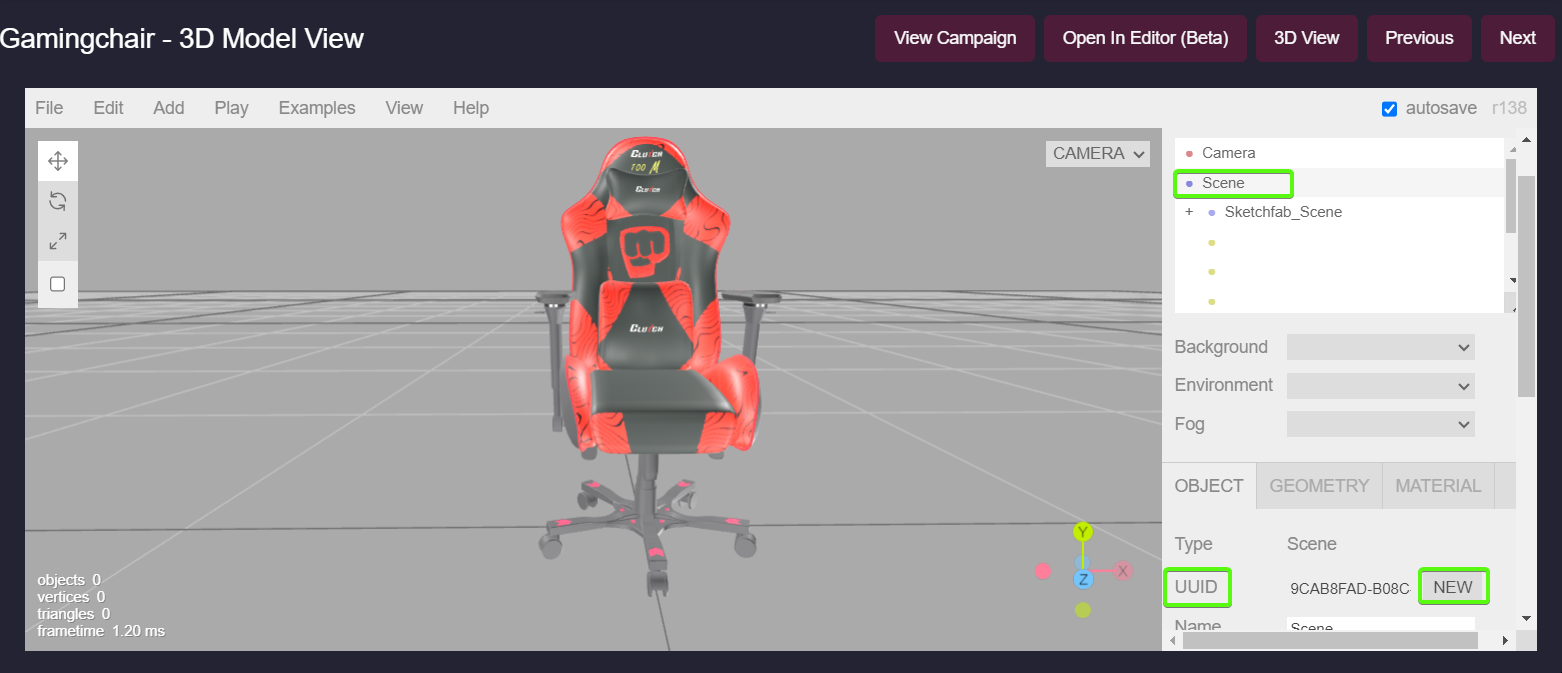
As soon as you click on the NEW button to create a new UUID, the model will become editable. You can see the object layers appearing under Scene.Click on the first top level layer and start editing.
You can move, rotate, increase/decrease model size, add objects, slide, separate layers and many more functions using the 3D editor.
To add another 3D object to the scene, you can import a 3D file.
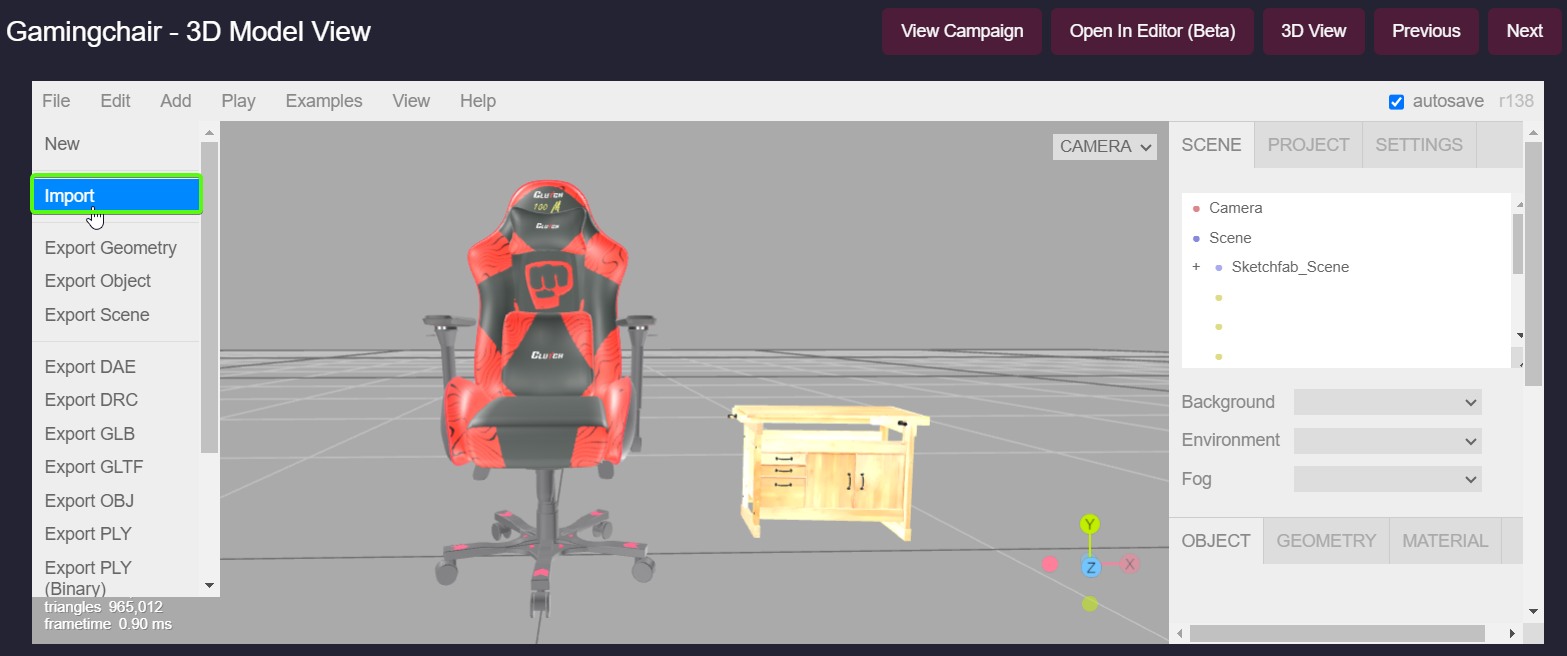
Once you are done playing around with the 3D Editor, you can finally export the scene as GLB and USDZ formats and upload to the AR campaign.
Known Issue
You are done 3D editing one AR campaign and move on to the next. Sometimes, due to browser caching issue, you can see the earlier 3D object getting loaded to the new 3D model editor. If you see this, please close the browser and open again (opening in incognito mode will help). If you are using Google Chrome, cleaing the browser cache with Shift + F5 will definitely help.
Shopify Integration
Why Shopify

Shopify has more than 4.5 million stores running around the globe. With ongrowing 3D visualisation demand along with WebAR, this platform is itself a huge market. As a matter of fact, Shopify also offers 3D product visualisation. But if you are planning to use Shopify AR then you are limiting yout future scope of managing ecommerce platform. In future, if you move out to different ecommerce platform for any reason, you will completely lose the opportunity to carry forward the AR capabilities. Not to mention the time, effort and money will be gone along the process. Perhaps you need to build entire 3D ecommerce part from scratch in the new platform. This may not be a very desired situation for many.
This is where Marvin XR can add value to your ecommerce transformation. The platform agnostic WebAR solution has compatibility with more then global top 20 ecommerce platform including Shopify, BigCommerce, WooCommerce, Magento, Wix, Wordpress, Squarespace, PrestaShop and many others. Get the complete list here. Moreover the cost frinedly solution does not put pressure business budget while adopting it quickly.
Shopify Integration Steps
Marvin XR has now introduced easy WebAR integration with Shopify. It will take 2 minutes to integrate 3D preview with AR solutions ready for online e-comm shops. User can preview products in AR using browsers only, no apps needed.
1. Create a Surface AR campaign. For product 3D-AR visualization, this is the most suitable AR experience for ecommerce.
2. Click View Details on your AR campaign card and go to AR Show menu.


3. Click on Generate iFrame for Website to get the iFrame syntax. Click on Copy to Clipboard button.
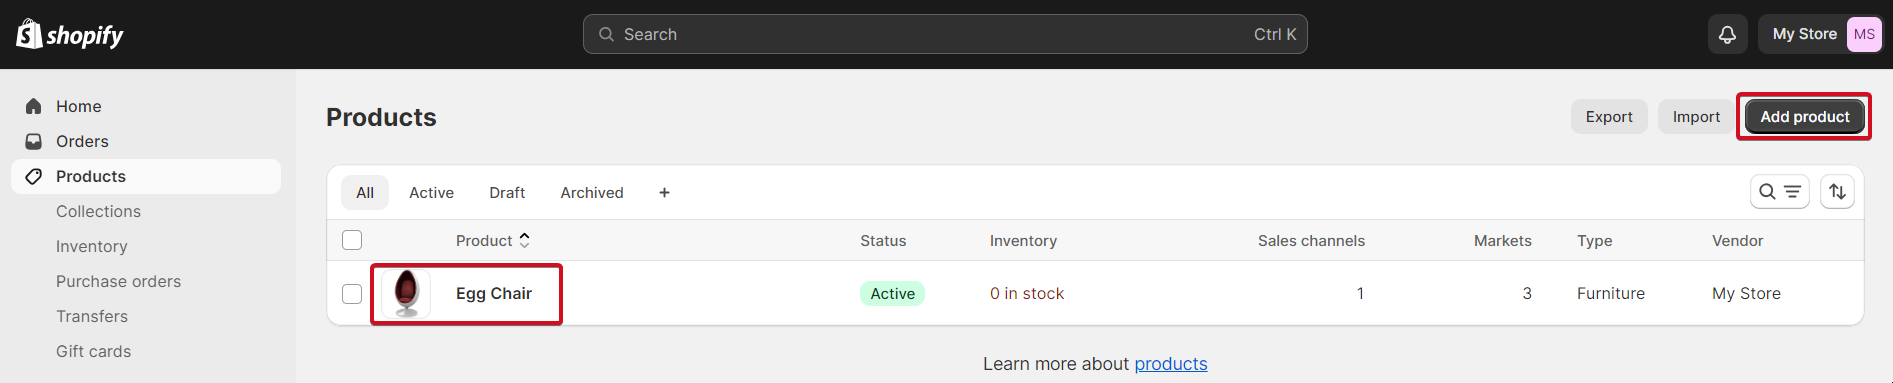
4. Go to your Shopify admin account and click on Products menu. If you want to add a new product, click on Add product button. If you want to add WebAR experience to existing product, select your product and click on it.
5. Go to the product description field and add the iFrame syntax there. Adjust iFrame height and width accordingly. Copy the below syntax and modify as per your requirement.
<iframe src="https://roundchair.marvinxr.com" style="height: 480px; width: 580px; overflow: hidden; border: 0;"></iframe>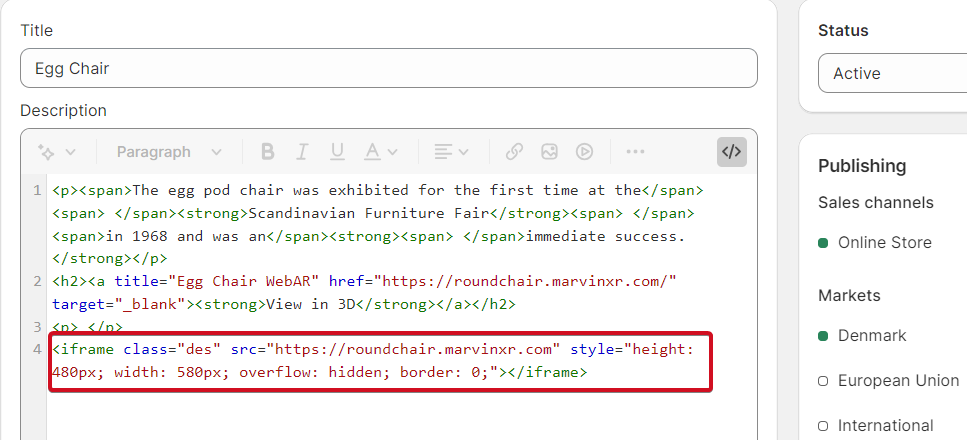
6. You can add link to text to be opened in the new window if needed.
<h2><a title="Egg Chair WebAR" href="https://roundchair.marvinxr.com/" target="_blank"><strong>View in 3D</strong></a></h2>7. Add QR code to product image gallery if needed to let users scan them from desktop version.
8. Publish your changes and see WebAR get integrated to your Shopify store.
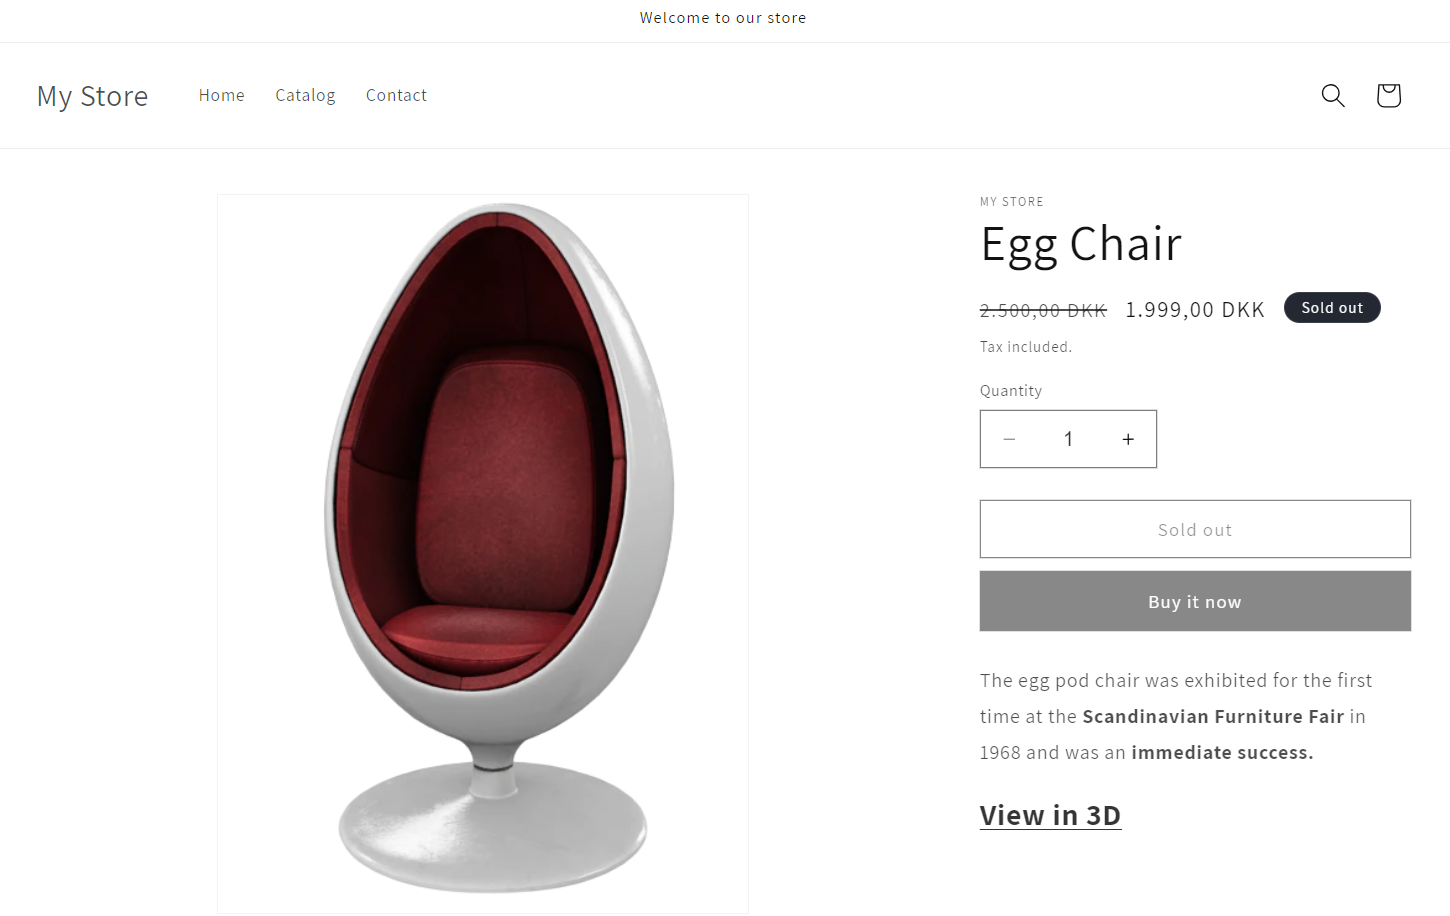
Congratulations! Now you have successfully integrated 3D AR view for your Shopify store. The iFrame address should point to the AR campaign. If you have a custom DNS mapped name, you can use it to the iFrame address too.
All the analysis will be collected inside Marvin XR campaign dashboard and insight for your reference. If you want to use AR campaigns in different channels at the same time, you can do it too. Now enjoy your Shopify store with next generation customer experience and see the revenue growth.
BigCommerce Integration
Augmented Reality Can Help Grow Your Online Store
One of the greatest limitations in ecommerce is the difficulty of representing a physical, three-dimensional product in a virtual, two-dimensional environment. AR can help bridge the gap between shopping at a physical location and shopping online by making it easier to represent merchandise and giving the consumer a better understanding of the product they’re purchasing.
BigCommerce Integration Steps
Marvin XR has now introduced easy WebAR integration with BigCommerce. It will take 2 minutes to integrate 3D preview with AR solutions ready for online e-comm shops. User can preview products in AR using browsers only, no apps needed.
1. Create a Surface AR campaign. For product AR visualization, this is the most suitable AR experience for ecommerce.
2. Open the AR campaign and go to AR Show menu. Default AR campaign comes with a template based UX design which is good for marketing campaign. Click on Simplify Styling to make the UX simple, apt for embedding in BigCommerce.
3. Now click on the button Click to get BigCommerce Card. This will create a code-block, ready to be integrated to BigCommerce store.
4. Login to your BigCommerce account and edit your store design. Add a new HTML element to your page.
5. Replace the default HTML code-block with the code-block you copied from your AR campaign (BigCommerce Card). Please add your payment link inside the Buy now button.

6. Save and Publish your store

7. Now open it from your smartphone and try out the virtual try-on experience from your BigCommerce store.
Congratulations! Now you have successfully integrated 3D AR view for your BigCommerce online store.
Few points to consider during the integration. The integration steps above are for non-technical shop owners to accelerate their business in the marketplace. However, with a very basic knowledge of HTML, anyone can change the product card layout (color, text, button, skin css etc.) according to their own brand theme.
It is important to add the payment option to the Buy now button. Button name can be changed to whatever name you choose, it will not impact the integration and experience. The iFrame address should point to the AR campaign. If you have a custom DNS mapped name, you can use it to the iFrame address too.
All the analysis will be collected inside Marvin XR campaign dashboard and insight for further analysis.
WordPress Integration
Why WordPress

Around 810 million websites use WordPress as of 2023, according to our best estimations. This represents around 43% of all websites. And that figure is growing rapidly. In fact, over 500 sites are built with WordPress every day, compared to just 60-80 on competitor platforms like Shopify and Squarespace. A lot of them are hosting ecommerce websites while planning for adopting 3D ecommerce. Marvin XR wordpress integration opens up the opportunity to easily start using product 3D visualistion and WebAR capabilities.
WordPress Integration Steps
1. Create a Surface AR campaign. For product 3D-AR visualization, this is the most suitable AR experience for ecommerce.

2. Click View Details on your AR campaign card and go to AR Show menu.

3. Click on Generate iFrame for Website to get the iFrame syntax. Click on Copy to Clipboard button.

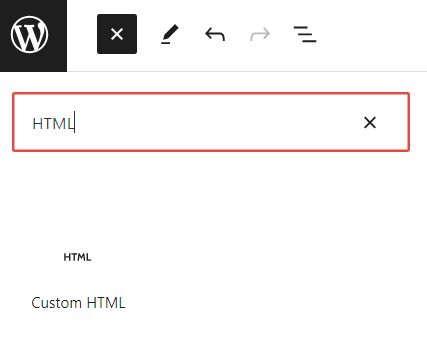
4. Go to your WordPress admin account and click on the product page where you want to embed 3D-WebAR. Add Custom HTML Blocks to the page.
5. Add the following piece of code - iFrame embedding. Adjust the height and width according to your choice and click on the Preview mode to display the results.
<iframe src="https://roundchair.marvinxr.com" style="height: 480px; width: 580px; overflow: hidden; border: 0;"></iframe>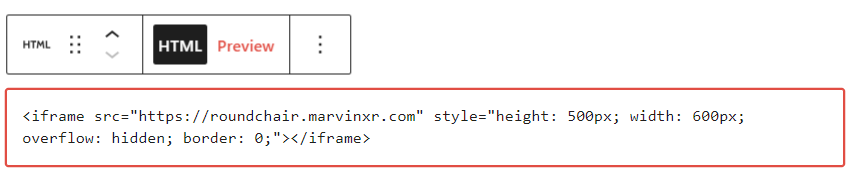
6. Now the integration is done. Publish your product page and share it with millions of users across the internet.

Congratulations! Now you have successfully integrated 3D AR view for your WordPress ecommerce store. The iFrame address should point to the AR campaign. If you have a custom DNS mapped name, you can use it to the iFrame address too.
All the analysis will be collected inside Marvin XR campaign dashboard and insight for your reference. If you want to use AR campaigns in different channels at the same time, you can do it too. Now enjoy your WordPress site with next generation customer experience and see the revenue growth.
Troubleshooting Known Issues
There are few known issues which are described below. They are essentially not an hinderance to your regular activities but knowing them would be helpful.
1. AR Campaign is not working after creating it
When a new AR campaign is created, it takes from a few seconds up to a minute or two (based on how busy the platform is). So if you're trying to access an AR campaign immediately after creating it, you may view such error page.
Grab a cup of coffee, take a little break and come back after a couple of minutes - your new AR campaign will be up & running.
2. SSL certificate is not working
Marvin has a developed a higher security model to protect your AR campaign against extrenal threat. Even if something goes wrong (campaign gets compromised or attacked), this will not affect any other campaign or any other customer. This is an enterprise grade security feature. Read more here.
In order to achieve that, each of your AR campaign needs to obtain a secure SSL certificate (that green padlock on the browser) from a global trusted SSL certificate provider (to register its authenticity). This process can take somewhere between 5-15 minutes.
So when you find your new AR campaign running but without SSL certificate, please do not ge alarmed.
Wait for a few minutes and it'll arrive automatically.
Fun Fact: Another security feature - to ensure a higher level of protection, this SSL certificate gets auto renewed every 90 days.
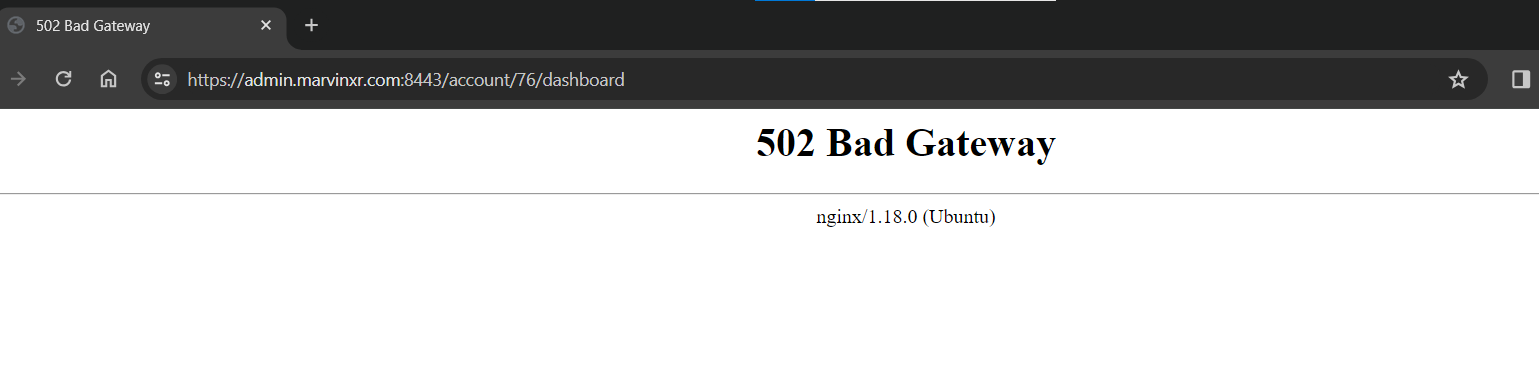
3. AR Studio shows error
This is a random error that can show up sometime. If you create a new AR campaign without uploading any 3D model (for every AR campaign, there are default 3D models assigned to it from template if you don't have any 3D model to upload immediately), there's a small percentage of chance that once you click the button "Create AR Campaign", an error screen can show up like below.
Solution: Remove everything from the URL except this (https://admin.marvinxr.com:8443) and reload the page. The dashboard will show up and the error will not show up.
This is a random error and currently team is looking for a fix for it soon.
4. Upload new 3D model but old one still in display
You upload a new 3D model (read here) to your AR campaign but after submitting it, the new 3D model does not show up in the 3D editor view. How to deal with this problem?
Technically when you upload a new 3D model, it is immediately gets reflected in the system. You can reload the AR campaign to see the immediate effect. However, sometimes it does not get reflected in the dahboard 3D viewer (like the below image).
The reason for this is the limitation of the browser in general. This is not a platform error. Your browser can hold a cached view of the 3D model.
Quick Solution: For Windows based browsers, hit Ctrl + F5 (or Ctrl + Reload) and for Mac, hold Cmd+Shift+R or Shift+Reload. This will clear the local cache of your browser (Chrome, Firefox, Edge etc.) and reflect the new uploaded 3D model view right away.
5. AR Campaign seems down
Look at the status of the AR campaign from the dashboard. If it is down already, you cannot access the AR campaign. It's a good idea to start the campaign again to access it.


Power Tools

Power Up Your 3D & AR Game
You want to step up with 3D ecommerce business and signed up to Marvin XR to produce awesome WebAR based virtual try-ons. But you need so many products to turn into 3D models and you don't know where to begin with. We understand your challenges and the new Power Tool section has introduced a bunch of tools and platforms to solve your problems.
Sketchfab: It's the biggest online marketplace with more than 5 million 3D models available. You can download them for free, buy exclusive models or contact 3D artists to build custom ones.
Blender: It's a free and open-source 3D software, widey used for creating and editing 3D models, adding animation, effects and many more. Blender is evolving for last 30 years. A great tool for you if you buy general 3D models and then want to customize them quickly. Remember: Marvin XR has similar online 3D editor too.
Luma AI: Do you want to scan real life objects and build quick 3D library. Then Luma AI is for you. It's a cutting-edge artificial intelligence software enabling the creation of realistic 3D images, videos, and game assets using an iPhone. Export the 3D assets and then import them into Marvin XR.
Turbosquid: It's another online marketplace like Sketchfab which sells stock 3D models used in 3D graphics to a variety of industries, including computer games, architecture, and interactive training. You can also opt for buying 3D assets from here.
Canva: The fastest way to launch and test WebAR to a large audience is to use One Page websites. You can simply embed AR campaigns as iFrames there. Canva can help you to quickly create One Page websites easily along with necessary graphics and presentations.
Qlone: It's a 3D scanning app, like Luma AI, based on photogrammetry for creation of 3D models on mobile devices. The resultant 3D models can be exported for external use. You can export 3D models in GLB and USDZ formats too. An easy to build 3D assets and import in Marvin XR.
Additional Tip
Marvin XR provides a combination of all the services including
- 3D Modeling Service: Based on 2-6 images of a product, our 3D artists can build 3D assets quite fast combining a hybrid system of AI & manual process of fine tuning. We don't need any object scanning or similar photogrammetry process to build 3D assets. For best prices, please contact support.
- WebAR Builder: This is the Marvin XR DIY platform. You can manage your entire business 3D portfolio from a single place. Choose the right plan and expand your business faster than ever.
- 3D Configurator: 3D visualization with 3D product configurator can increase the chance of user engagement and online sales by manyfold. We can provide the best in class 3D configurator for your business. Contact us for a quote.